
Set Up Face/Finger Recognition on Surface Pro 3, Pro 4 with Windows Hello

Windows Hello is a new feature on Windows 10, with this feature, you can sign into Windows just with a glance on the camera or a touch on the finger reader, without typing a digital password. This is a more personal way to log into your device, and make your device more secure. And here will show you the way to set up Windows Hello on your Surface Pro 3 or Pro 4 with Windows 10.
- Set up Surface Pro Windows Hello:
- Set up Face recognition on Surface Pro 3, Pro4
- Set up Fingerprint on Surface Pro 3, Pro 4
- Can't find the Windows Hello option on your Surface?
- Windows Hello is not available on your Surface?
Set up Face recognition on Surface Pro 3, Pro4
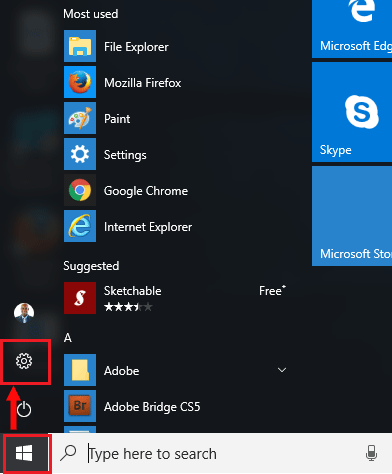
1. Click (tap) on Start icon, select "Settings".
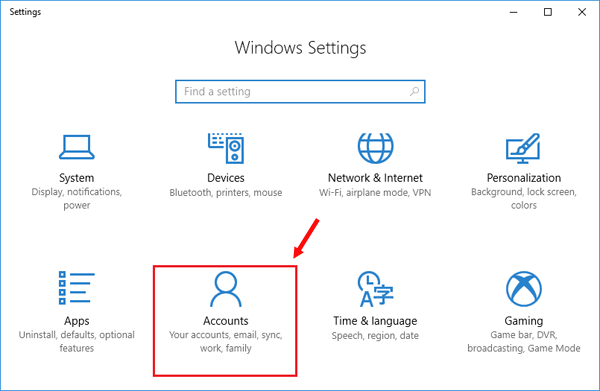
2. Click on "Accounts".
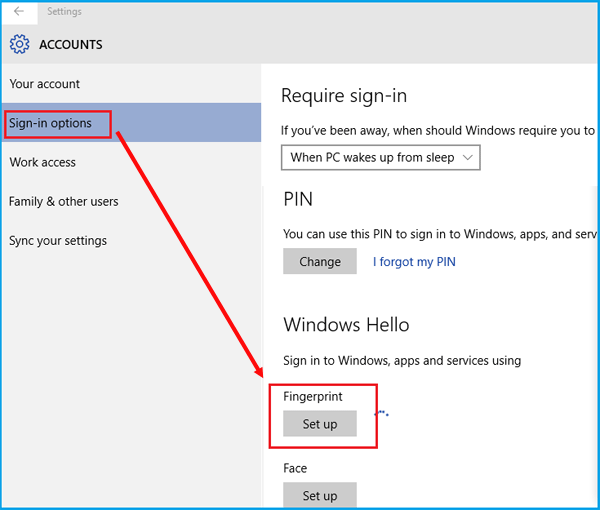
3. Click on "Sign-in options". Locate to Windows Hello section on the right panel, click on "Set up" button below "Face".

4. When the Windows Hello setup dialog pops up, click on "Get started".

5. Face to the camera of your Surface that will automatically recognize and register your face to system.
6. When the facial recognition is set up, you will see the "Improve recognition" button under Face. If you often wear glasses, you can click on it to improve your face recognition with wearing glasses. If you don't improve the recognition, you may get the error message "Couldn't recognize you, please sign in with your PIN" the next time when you wear glasses to login with Windows Hello.

Set up Fingerprint on Surface Pro 3, Pro 4
If you have a Surface Pro Type Cover with Fingerprint ID or Microsoft Modern Keyboard with Fingerprint ID, you can set up your finger recognition on Windows Hello to login by swiping your finger.
1. Connect the Type Cover or Microsoft Modern Keyboard with your Surface.
2. Open Accounts Settings, click on "Sign-in options", locate to Windows Hello section, click on "Set up" under Fingerprint.
3. On Windows Hello Setup dialog, click on "Get started".

4. Type in your PIN code to continue.
5. Slide your finger on the fingerprint reader to scan it as the program prompts.

6. When the fingerprint is set up, click on Close.
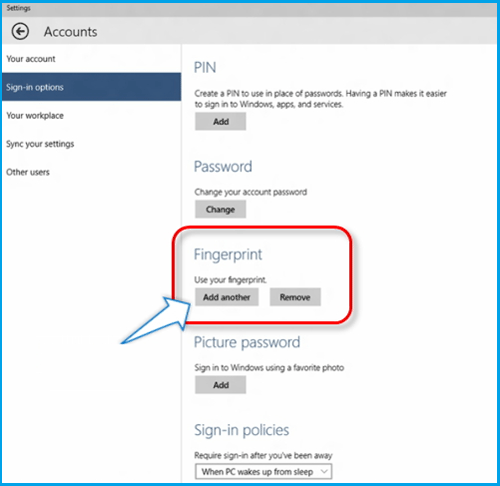
7. If you want to add more fingerprint for your Surface, click on "Add another" button and follow the instructions to complete it.
Can't find the Windows Hello option on your Surface?
If there is no Windows Hello option on your Surface Pro 3/4, you may need to manually check, download, and install all available updates on your Surface.
To check and install updates on Surface Pro with Windows 10
1. Click on Start → Settings.
2. Select Update & security → Windows Update.
3. Click on Check for updates.
4. After the updates are downloaded, click on Install.
5. After all available updates are installed, click on Start → Power icon → Restart, to reboot your surface.
6. Sign in your Surface to see whether the Windows Hello is available and then set up it.

Windows Hello is not available on your Surface?
If the Windows Hello option is not available on your Surface Pro 3, or Pro 4, you may need to set up the PIN code first to enable Windows Hello.
To set up PIN code on Surface Pro 3, Pro4
1. Open Accounts Settings.
2. Navigate to "Sign-in options", click on "Add" button under PIN.

3. Enter current password.
4. Type in your PIN code, and retype to confirm it, and then click on OK.

