


How to Convert HEIC to JPG on Mac (Free & Easy Methods)
By default, your iPhone photos are saved as HEIC format, which can save storage while keep high image quality. But the HEIC format is not compatible with common websites, apps or devices. That’s why many Mac users look for simple ways to convert HEIC to JPG.
In macOS, there are free built-in tools to convert HEIC to JPG, no matter it is for single conversion or batch conversion. In this article, you can learn the easiest and most effective methods to convert HEIC to JPG on Mac.
- Contents:
- Why Convert HEIC to JPG on Mac?
- Method 1: Convert HEIC to JPG Using Preview
- Method 2: Change HEIC to JPG with Finder Quick Action
- Method 3: Turn HEIC to JPG via Sips (Command Line)
- Method 4: Use Online Tool for HEIC to JPG Conversion
- How to Change iPhone Settings to Avoid HEIC
- FAQs on HEIC to JPG Conversion on Mac
Why Convert HEIC to JPG on Mac?
HEIC is supported on Mac. But many web browsers, design apps and social platforms cannot accept. After converting HEIC/HEIF to JPG, you can use it across devices and platforms, share it on websites and social media, edit it on most apps, and upload or email it in smaller hassle. Afterall, JPG is still widely preferred.
Method 1: Convert HEIC to JPG Using Preview
No matter it is for bulk conversion or single conversion, Preview is one of the simplest ways to convert HEIC files on Mac.
Step 1: Right-click your HEIC image and choose to open with Preview.
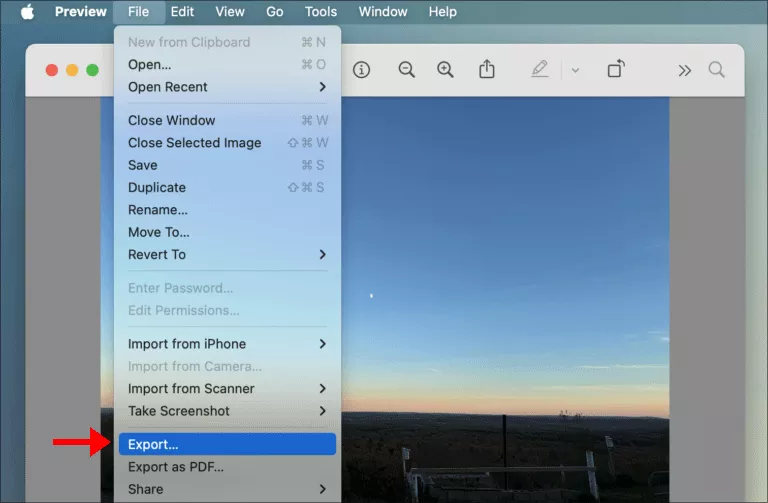
Step 2: Go to the menu bar and click File > Export.
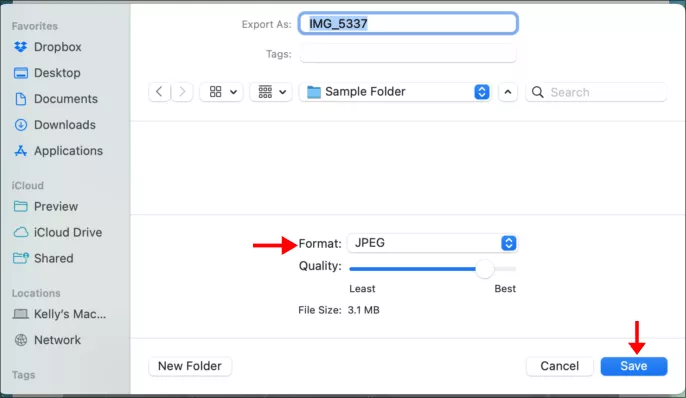
Step 3: The Export prompt comes. You need to choose JPEG from the format dropdown.
Step 4: It is also available to adjust the quality. Finally, click the Save button to get your JPG image.
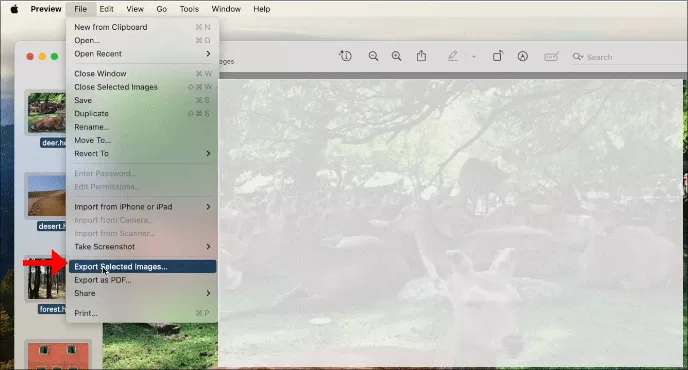
If you have dozens of images to convert, you can select all images and choose to open with Preview. In the menu bar of Preview, click File and choose Exported Selected Images from the context menu. After that, you can set format to JPEG and choose an output folder to save the converted photos.
Method 2: Change HEIC to JPG with Finder Quick Action
For the people who are using macOS Monterey or later, Quick Action in Finder is the best choice.
Step 1: Run Finder and choose your HEIC files.
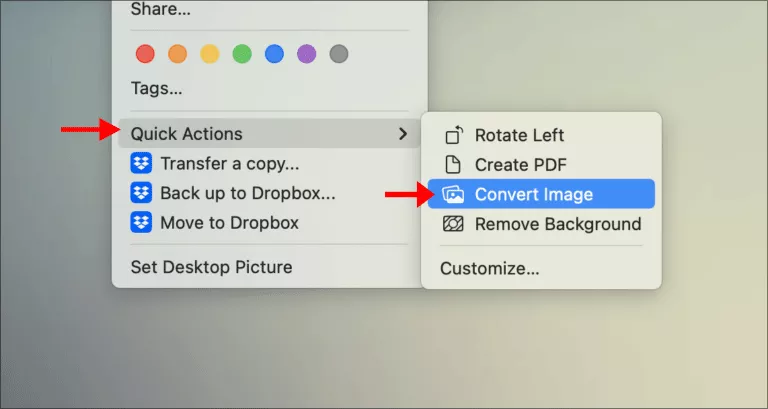
Step 2: Right-click the files and choose Quick Actions > Convert Image.
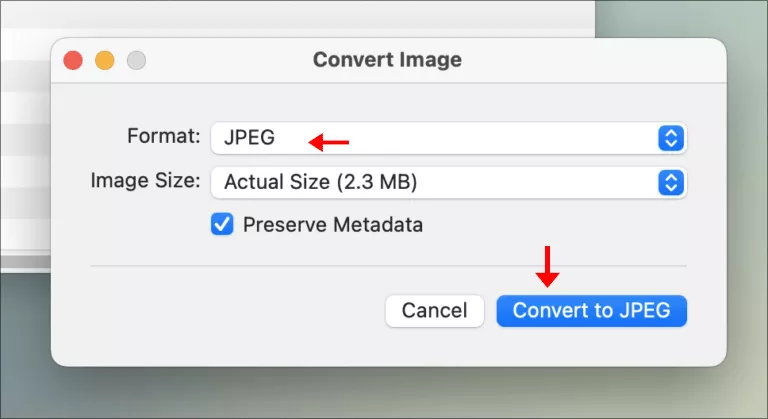
Step 3: A dialog pops out. You can select JPEG as the format and click the Convert to JPEG button. Soon, you can get the JPG files which is saved below your HEIC files.
If you do not see the Quick Actions option on your Mac, follow the steps below to create one with Automator:
Step 1: Launch Automator and hit New Document. Then select Quick Action.
Step 2: Set “Workflow receives current” to image files in Finder.
Step 3: Look for Change Type of Images in the action library. When you find it, add it to the workflow area.
Step 4: In the prompt: Would you like to add a Copy Finder Items action, choose Add.
Step 5: Choose JPEG as your format type. Finally, save the Quick Action and name it as Convert to JPG.
Method 3: Turn HEIC to JPG via Sips (Command Line)
The Scriptable Image Processing System, also called sips command, is the built-in tool on Mac Terminal to turn HEIC to JPG. This method is complex and not suitable for beginners.
You can check the command lines below:
For a single file conversion:
sips -s format jpeg photo.HEIC --out photo.jpgFor all HEIC files in a folder:
for file in *.HEIC; do
  sips -s format jpeg "$file" --out "${file%.HEIC}.jpg"
done
Method 4: Use Online Tool for HEIC to JPG Conversion
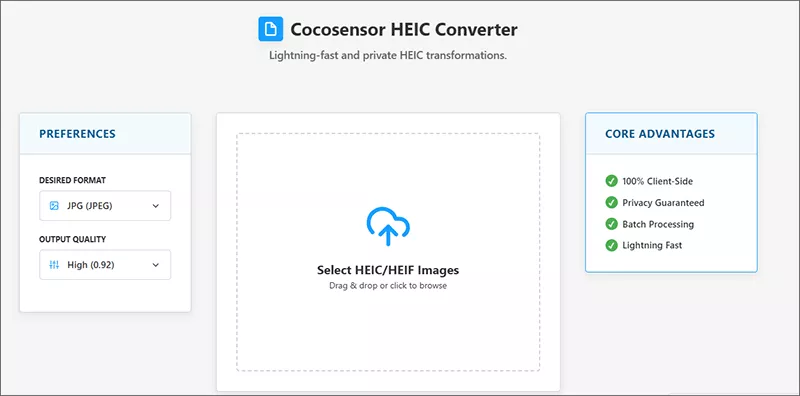
You can also use the online converter to quickly convert the HEIC files to JPG images. Cocosenor HEIC Converter handles your conversions based on the browser (no upload to servers), which protects your privacy. You just need to drag-and-drop the HEIC files, click to convert and download the JPG files. It is simple for everyone to convert HEIC files.
How to Change iPhone Settings to Avoid HEIC
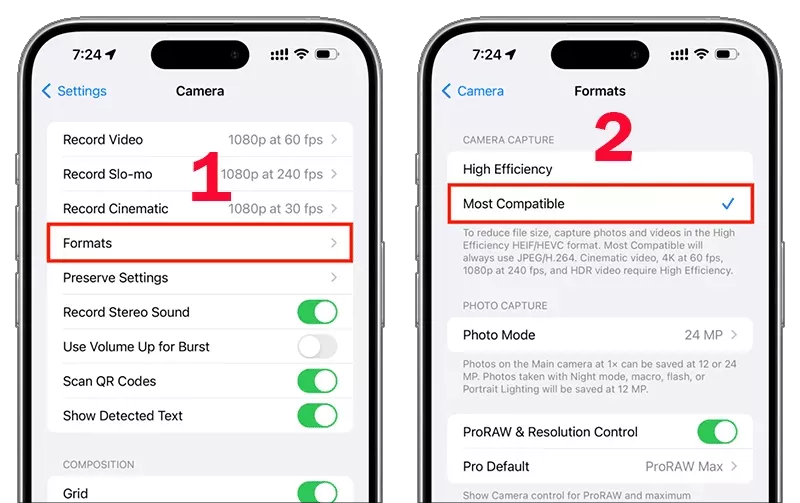
Instead of converting later, you can stop HEIC files from being created in the future. You just need to access Settings> Camera > Formats and choose Most Compatible option in your iPhone camera settings. After that, your photos will be saved as JPG instead of HEIC.
FAQs on HEIC to JPG Conversion on Mac
Q1: Can Mac convert HEIC to JPG without software?
Yes, Mac has built-in tools like Preview and Quick Action that allow free HEIC to JPG conversion without installing additional software.
Q2: How do I batch convert HEIC to JPG on Mac?
You can select multiple images in Preview and use the “Export Selected Images” feature to convert them all to JPG at once. Or you can run command lines in Terminal for HEIC conversion in bulk.
Q3: What is the fastest way to convert HEIC on Mac?
Using Preview for batch conversion is the fastest and easiest method.
Conclusions
Converting HEIC to JPG on Mac is easier than most people think. With built-in tools like Preview, you can quickly convert single images or entire batches—completely free. If you regularly deal with HEIC files, setting up Automator or switching your iPhone camera format can save you even more time in the long run.
Need faster batch conversion? Try a free HEIC converter tool, such as Cocosenor HEIC Converter, for one-click processing and better control over image quality.