
Top 6 Vital Things Should be Done Before iPhone Given away/Traded in/Sold

Here, we will walk you down through top 6 critical things in order that you should do to prevent your personal information from malicious intention before you sell, give away or trade in your iPhone.
- 1. Unlock the iPhone
- 2. Transfer information to the new device
- 3. Unpair anything connected to your old phone
- 4. Turn off FMI and sign out of Apple ID
- 5. Remove the iPhone from the list of trusted devices
- 6. Take SIM card out
1. Unlock the iPhone
Firstly, you should unlock your iPhone if you set a passcode/fingerprint/Face ID on the iPhone.
2. Transfer information to the new device.
If you still have your old iPhone, you can transfer information from your old iPhone to the new one.
For devices carrying iOS 10 or earlier, you can use iCloud, iTunes or the Finder to transfer information.
For devices carrying iOS 11 or later, Quick Start is definitely recommended.
Of course, if you don't want to transfer information, you can choose to store it to iCloud or your computer.
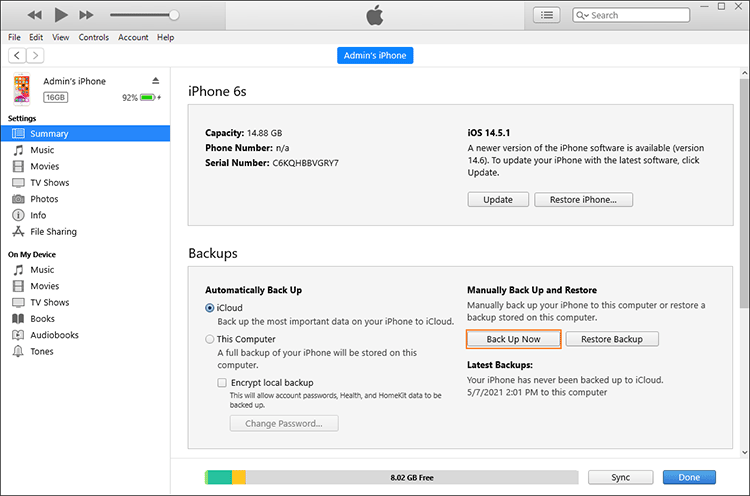
On the account of that iCloud has capacity of just 5 GB for free, it can easily be used out. It's a little more rational to save a backup on computer. Connect your iPhone to Windows PC, locate the iPhone in iTunes.
Find Manually Back Up and Restore section and choose Back Up Now. You can save a full backup of this iPhone on your computer.
Plus, in the case of that your phone number is changing with replacing the old iPhone, you should add the new phone number to trusted list to make sure you won't lose access to any personal safety feature. If the old phone number is not accessible anymore, you can generate a two-factor authentication on your old device if needed.
- See more about two-factor authentication:
- How Does Two-factor Authentication Work
- How to Set up Two-factor Authentication for Apple ID
3. Unpair anything connected to your old phone.
When using this iPhone, you may pair it to your Wi-Fi, Air Pods and other devices. And some devices are set to pair with this iPhone automatically after they get paired once.
If you don't want to have them paired with this iPhone of which you are trying to get rid any more, you should make your iPhone forget these devices.
4. Turn off FMI and sign out of Apple ID.
Generally, it's easy to turn off FMI and remove Apple ID on iPhone with correct password.
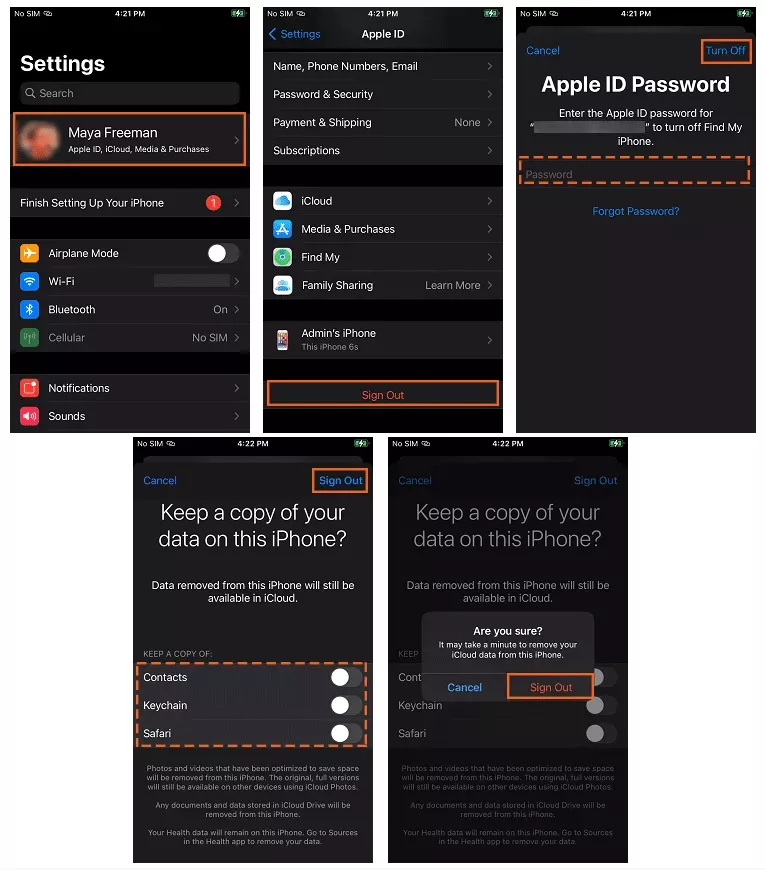
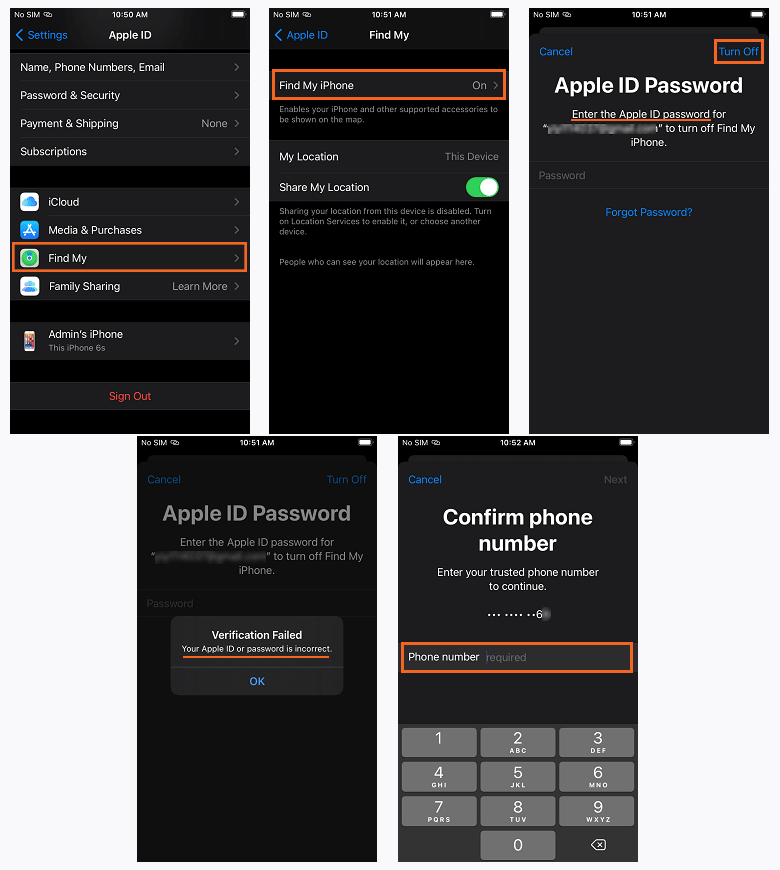
Go to Settings > Apple ID > Find My, switch the status to OFF. Enter your Apple ID password correctly, click Turn Off, then Find My iPhone will be successfully turned off.
Don't forget to remove your Apple ID. Go to Settings > Apple ID, scroll down and tap Sign Out. Enter correct Apple ID password. Do not keep any data on this device if asked.
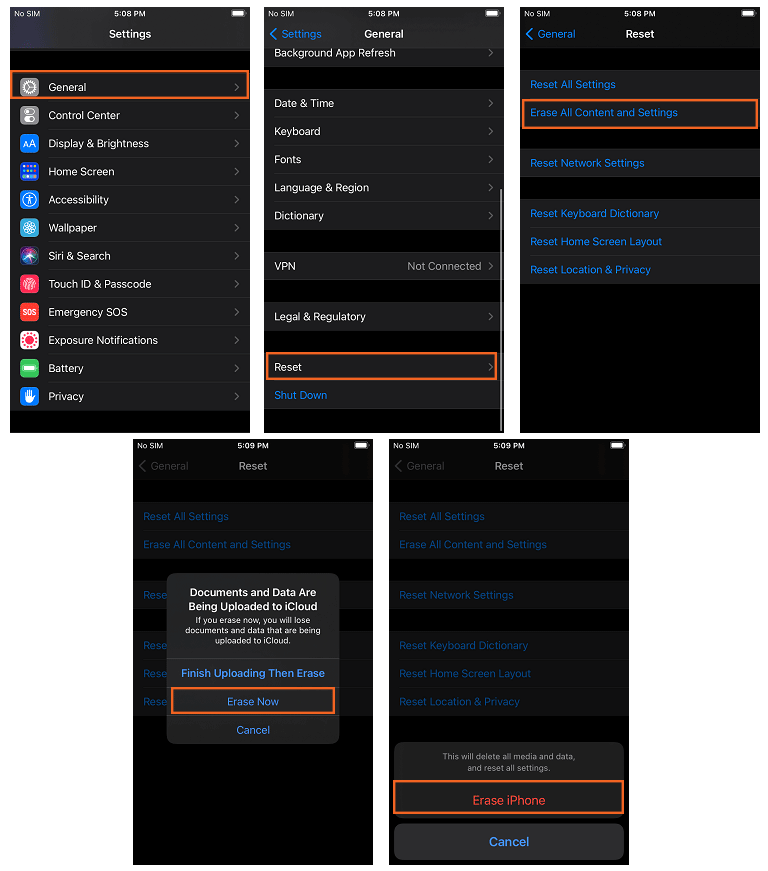
If you turn off FMI and remove Apple ID with correct password smoothly, erase all content and settings from this device. Since Apple ID has been removed, you don't have to enter Apple ID password for confirmation. Otherwise, Apple ID is still required when the iPhone is asked to erase all contents and settings.
If you forget the password, and the trusted phone number is not available anymore, you will be stuck in verification failure.
Now you may be thinking of directly removing Apple ID or erase all contents and settings via Settings.
Will not work. Because when you tap Sign Out, there will be a pop-up asking you to turn off Find My iPhone, which means it couldn't be skipped.
Is there any way to turn off Find My iPhone or remove Apple ID without password?
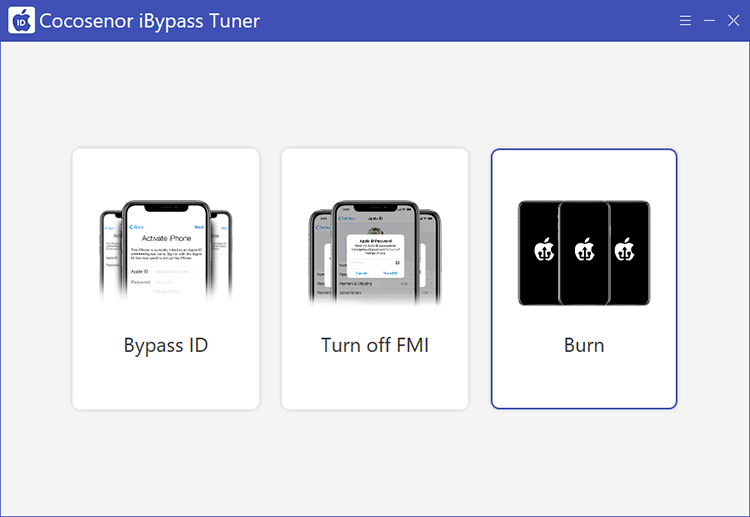
Yes, maybe by a professional third-party software! Here, I strongly recommend you Cocosenor iBypass Tuner. It's a remarkable and powerful software to turn off FMI and remove Apple ID without password in a few clicks.
- There is something you should be aware of before starting:
- 1. Please make sure the computer is in a stable network connection and disconnect the iPhone to internet during the whole progress.
- 2. Note that this process will erase all data on the device.
Follow the steps below to turn off FMI and remove Apple ID without password using iBypass Tuner.
Step 1: Download and install iBypass Tuner.
Step 2: Jailbreak the iPhone first.
You can create a bootable USB flash drive to jailbreak the iPhone with Burn of iBypass Tuner. Then connect the iPhone to the computer and start to jailbreak.
- Go to learn more about how to create a jailbreak USB flash drive.
- Go to learn more about how to use checkran1n to jailbreak iOS devices on Windows PC.
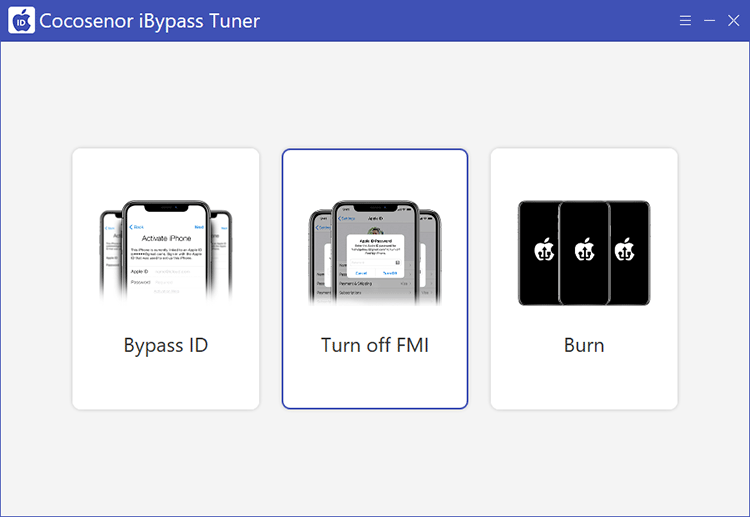
Step 3: Launch iBypass Tuner and choose Turn off FMI.
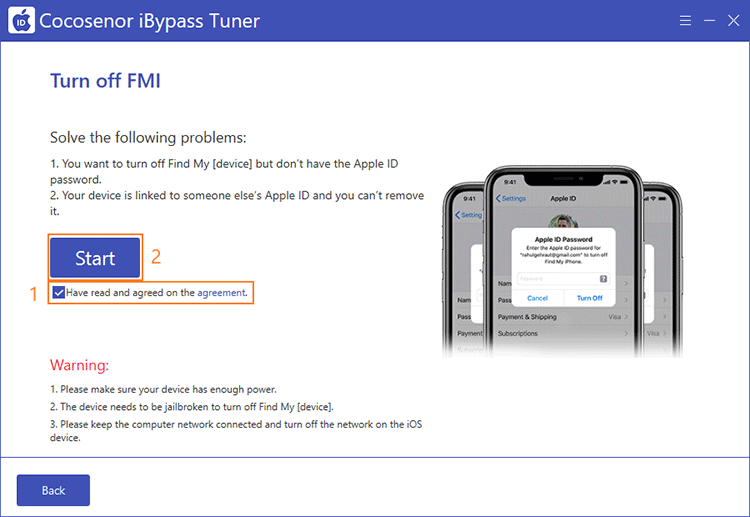
Step 4: Agree with the items and conditions and then click Start.
Step 5: Check on FMI status.
Click Query to open a query website and click Copy to copy the serial number of your iPhone to the website.
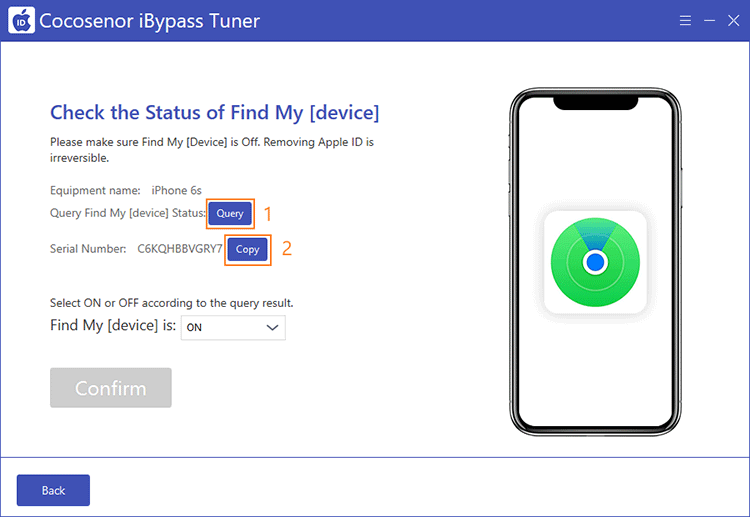
The query result says that FMI of your iPhone is OFF, then switch FMI status on the software to OFF.
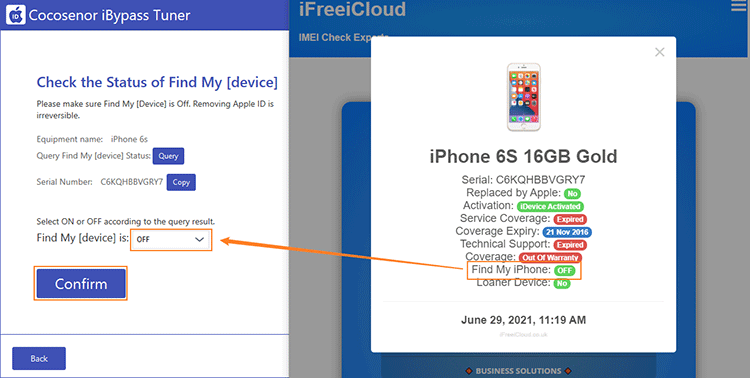
Step 6: Confirm FMI status is OFF and start to remove Apple ID.
After checking, click Confirm to set about removing Apple ID from the iPhone.
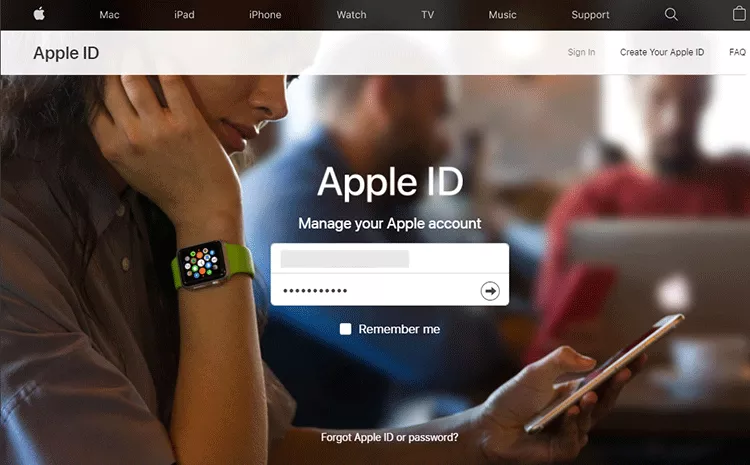
5. Remove the iPhone from the list of trusted devices
Step 1: Go to Apple ID account page.
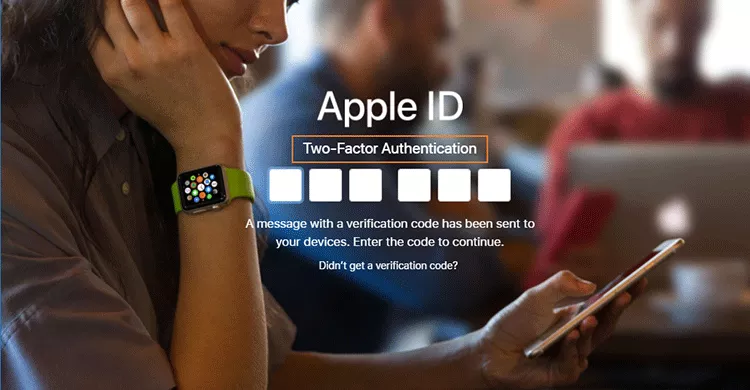
Step 2: Sign in with your Apple ID.
Enter authentication code that shows on your iPhone.
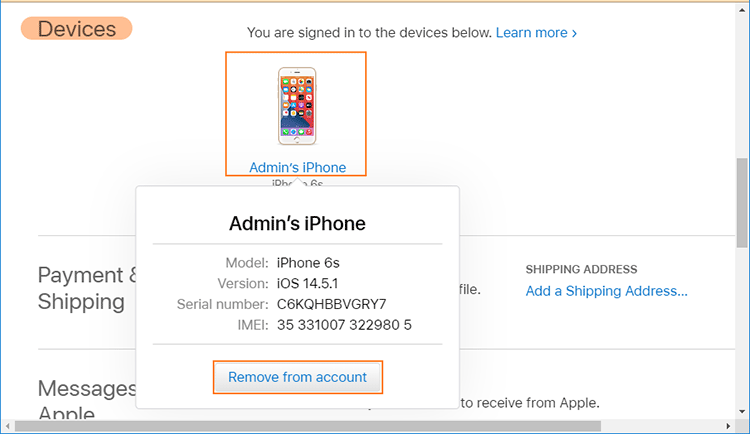
Step 3: Go to Devices session, select the iPhone, and click Remove from account.
Then this iPhone cannot access to any Apple services signed in with this Apple ID.
6. Take SIM card out.
Don't forget to take your SIM card out of the iPhone since the phone number has been linked to so many personal accounts. If you leave it on the old iPhone, others may steal all your personal information.

