
Solved—D Drive is Missing in Windows 11/10
“Suddenly my d drive is missing in Windows 11 and I cannot find it. I do the disk cleanup and it does not show up. What can be the problem of my computer? How to fix it?” –from Microsoft Community
If you find the D drive suddenly disappeared from your Windows 11/10 computer and you cannot find it, how can you do to solve the problem and get all data in D drive back? Here you can learn the effective ways to solve D drive missing issue on Windows 11/10 computer.
- How to Solve D Drive Disappear Issue
- Part 1: Why D Drive not Showing up in Windows 11/10?
- Part 2: Ways to Fix D Drive Missing Issue on Your Computer
- Part 3: Bonus Tips to Back up D Drive Data to Another Drive
Part 1: Why D Drive not Showing up in Windows 11/10?
There are many reasons that can lean to the D drive suddenly not showing up on your computer disk management or missing from the File Explorer. You can check the below reasons for reference.
- 1. The D drive letter gets lost because it is occupied by the CD or DVD drive. This occasion will mainly happen when we use the CD/DVD drive to install updates. You can easily solve this error by changing the CD/DVD drive letter in disk management.
- 2. You cannot find D drive after Windows11/10 update. It is general to see this error message box when you reboot or reconfigure the Windows after updates.
- 3. The D drive is hidden by mistake. If the D drive is set to be hidden, it cannot appear on the Windows File Explorer.
- 4. There is a problem in your disk driver. It could be out of date or other issues.
- 5. The D drive is deleted or formatted by accident. This often happens when you resize or reformat the partitions.
- 6. …
Part 2: Ways to Fix D Drive Missing Issue on Your Computer
Based on the listed reasons, we list the useful ways below to solve D drive disappear issue.
Way 1: Assign D Drive Letter to the Partition via CMD
When you find only the D drive letter is missing, all data can be accessed on the computer. You can assign D drive letter or other drive letter to the partition. Here we will use diskpart command lines to make it done.
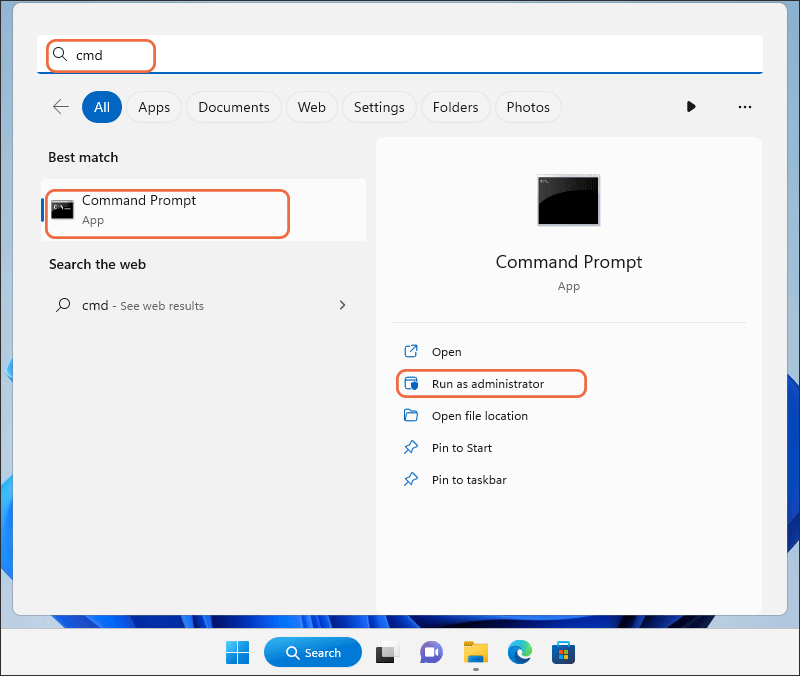
Step 1: Search cmd on your Windows search box and choose Command Prompt. Then click Run as administrator to open CMD. And click Yes when User Account Control prompt comes.
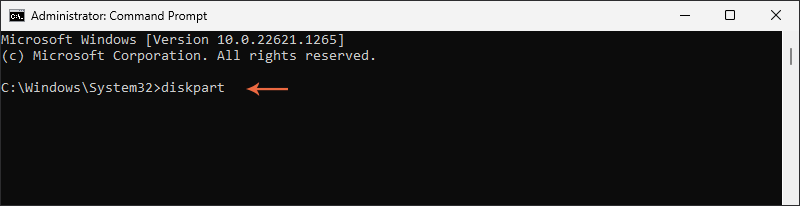
Step 2: Run diskpart command and press Enter to open diskpart utility.
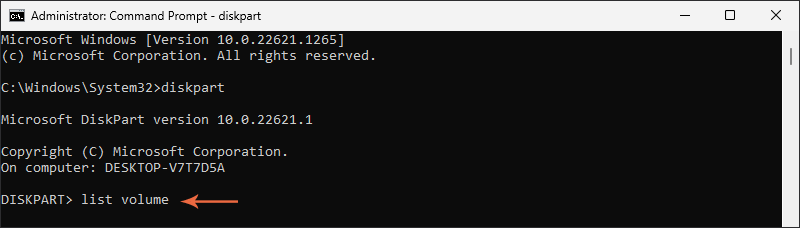
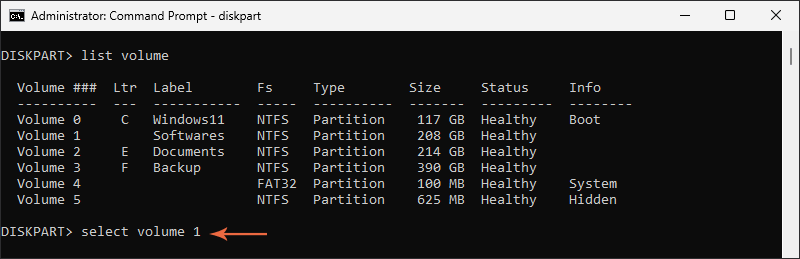
Step 3: Execute list volume command to check all volume details.
Step 4: Select the volume which D drive letter is missing. Here, you can run command: select volume 1.
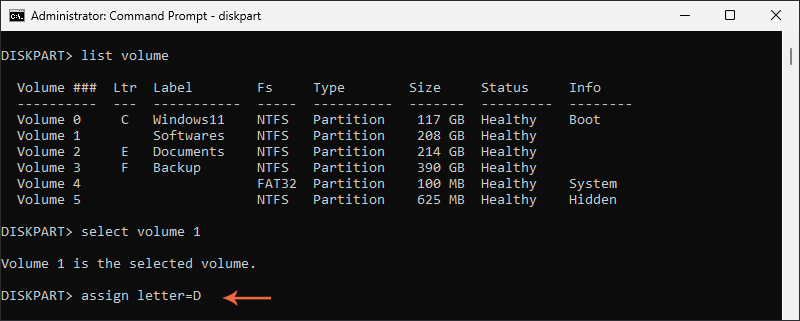
Step 5: Execute command: assign letter=D to assign drive letter D to the selected volume.
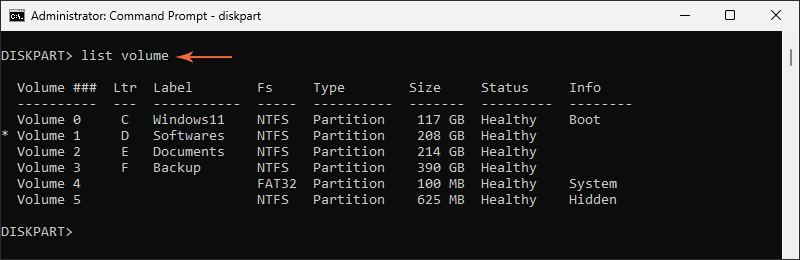
Step 6: Execute command: list volume again and you can check them the selected volume is displayed with D drive letter.
Step 7: Execute command exit to close diskpart utility.
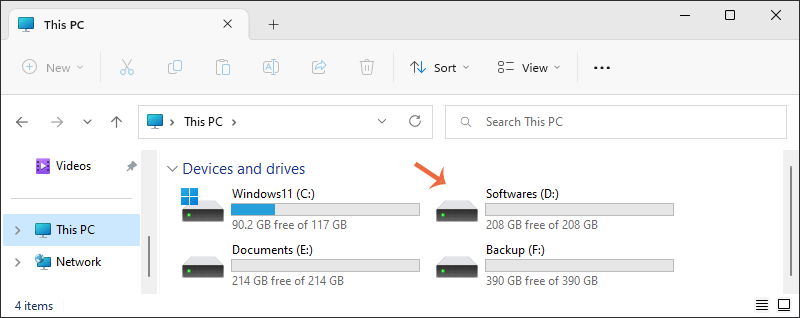
After that, the D drive appears on the File Explorer. You can go to open This PC to have a check.
Way 2: Rescan Disks
You can conduct the operation Rescan disks to scan the target disk to solve the D drive missing error.
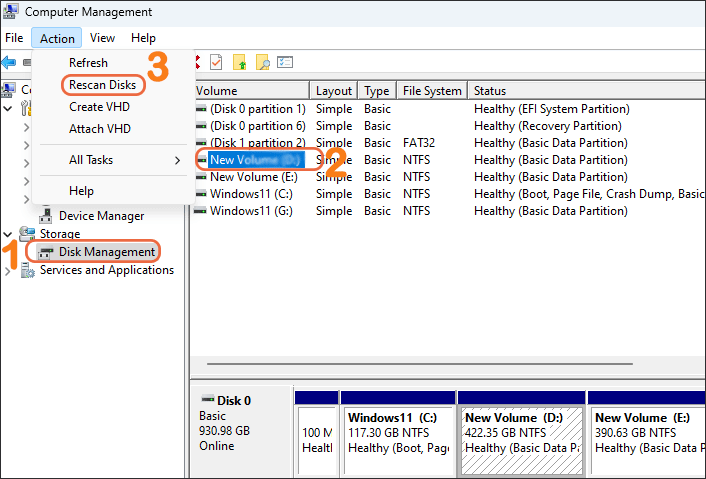
Step 1: Open This PC on your Windows 11/10 and then choose Manage. For Windows 11 users, you need to click Show more options and then you can see the Manage option.
Step 2: Go to choose Disk Management and select the target volume. After that, click the Action option on the navigation bar.
Step 3: Choose Rescan Disks option from the context menu. Then the disk scanning is in progress. You just need to wait. When it completes, you can check whether the D drive shows on or not.
Way 3: Restore Your Computer to Previous Point
If you get used to creating the system restore point regularly in Windows 11/10 computer, you can easily restore your computer to the status where the D drive displays normally.
Step 1: Enter system restore on your desktop search box and then choose Create a restore point.

Step 2: Click System Restore and follow the instructions to revert the computer to a previous restore point.
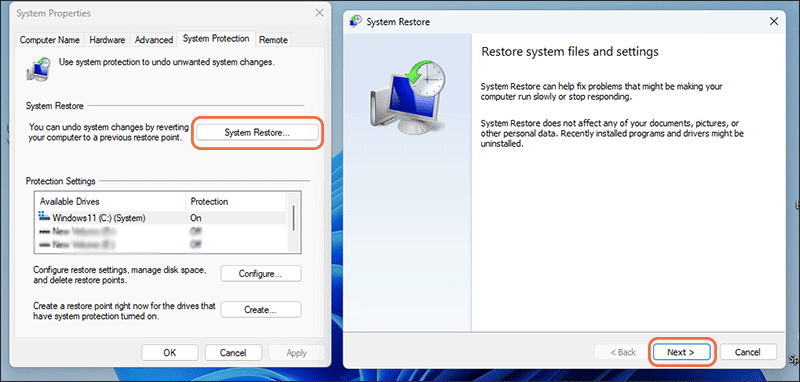
Tips: It is recommended to back up all data before you start the system restore. It cannot be interrupt once the process begins.
Way 4: Make the Hidden Drives Show
If your D drive is missing for the reason that it is set to be hidden by mistake, you can follow the steps below to make it unhidden.
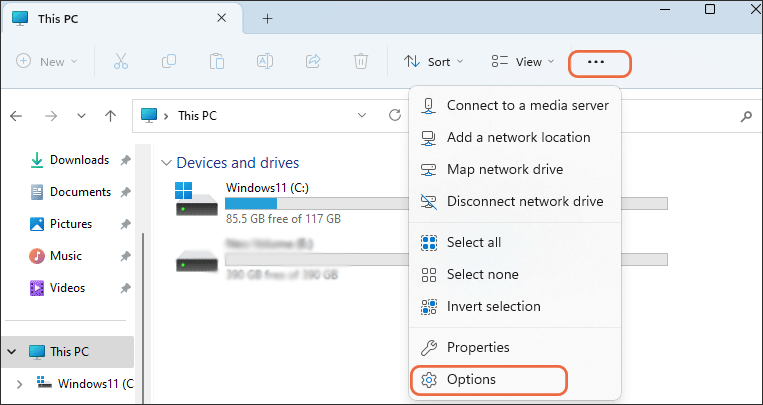
Step 1: Open File Explorer and then click the three dots on the top. Next, choose Options from the drop-down menu.
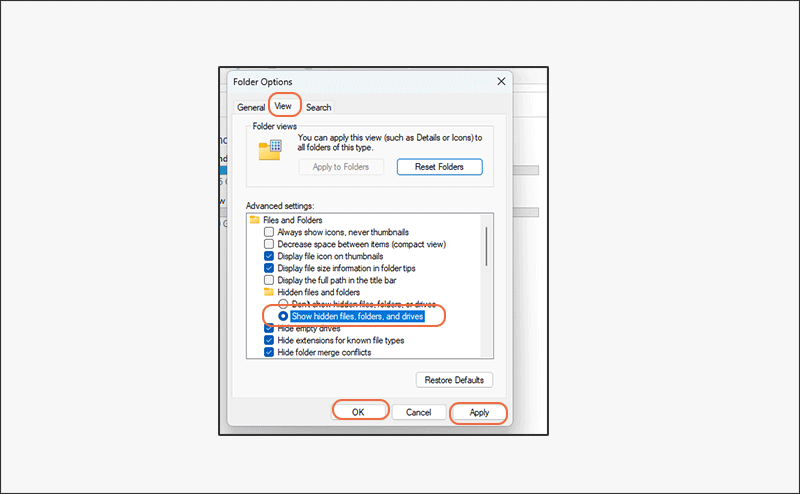
Step 2: On the Folder Options window, hit on the View tab and then check the option Show hidden files, folders, and drives.
Step 3: Hit on the Apply and then the OK button.
Way 5: Update the Disk Driver
If the disk driver is incompatible with your Windows version, it may lead to the D drive missing error. Thus, you can update the disk driver to the latest one.
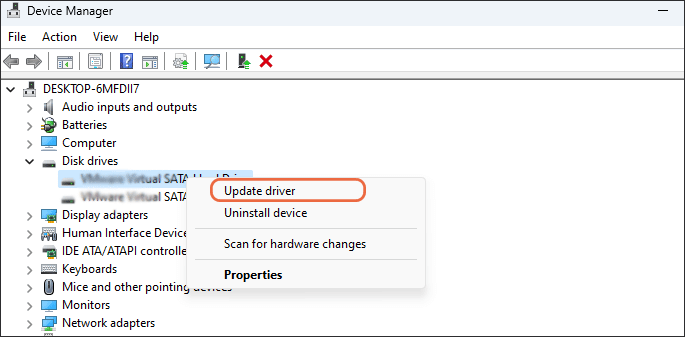
Step 1: Search device manager on your Windows search box and choose Device Manager to open.
Step 2: Double click the Disk drives. You will see all disks of the computer.
Step 3: Choose the disk and then right-click on it. Then you can choose Update driver option.
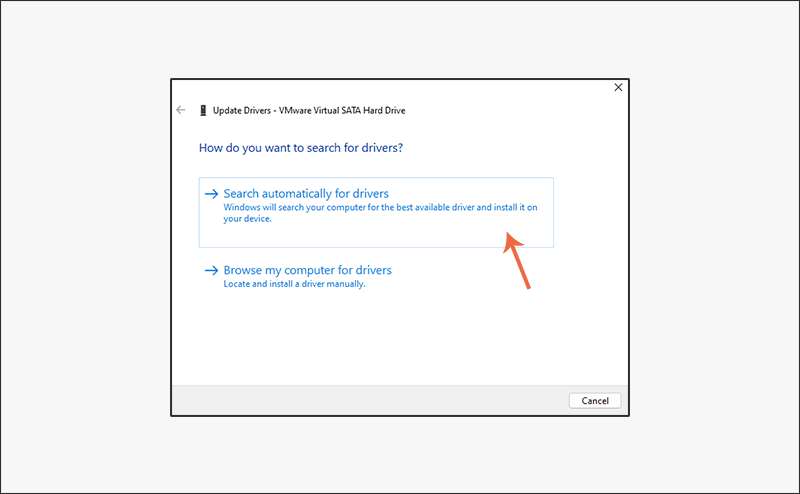
Step 4: Hit on the option—Search automatically for drivers. After minutes, you can install the best available drivers for your devices.
Part 3: Bonus Tips to Back up D Drive Data to Another Drive
If none of the above ways help you to get back the missing D drive, you will lose all the data of it. Thus, it is recommend backing up D drive or other partition data regularly. Cocosenor Backup Tuner can help you to backup any partition on Windows computer to other drive.
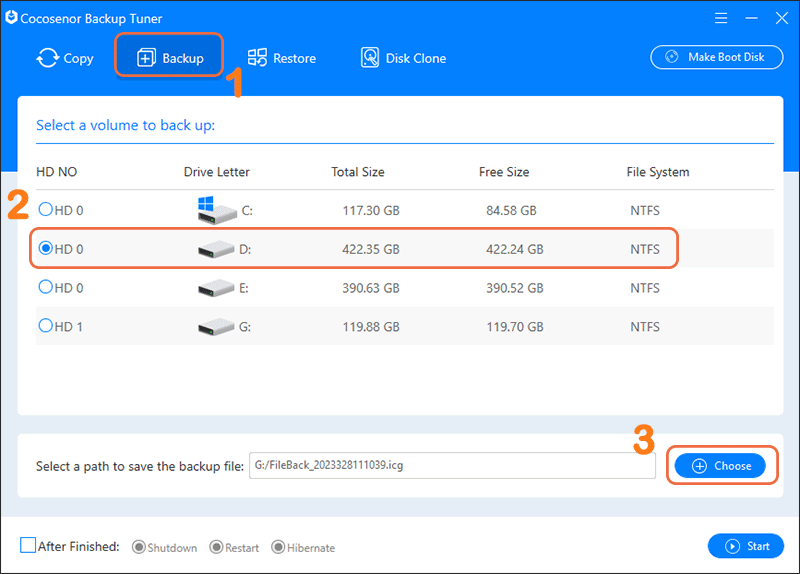
Step 1: Run the software and choose Backup on the top.
Step 2: Select the D drive and then click the Choose button to set the location to save the backup file.
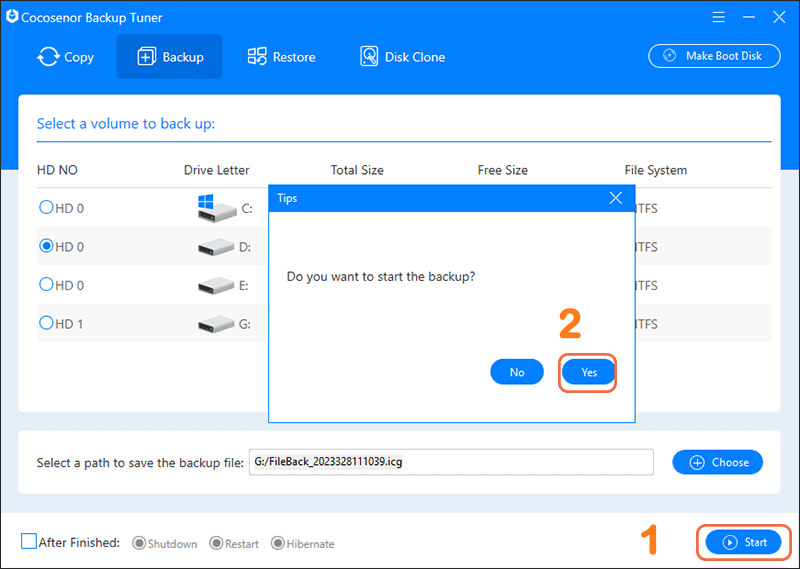
Step 3: Hit on the Start button.
Step 4: On the pop-out box, click on the Yes button.
Minutes later, you will get the successful prompt.

