Useful Ways to Free up C Drive Space in Windows computer
C drive is full and has no free space, which often plagues many users because it leads to terrible using experience. It is imperative to clean up the garbage on the C drive, slim it down, and increase its actual usable space. This article outlines a variety of ways to effectively clean up the C drive. Make a note here and hope it helps you.
If you want more space for C drive, you can make it from two aspects. The first is to clean up files and garbage. The second is to properly extend the drive. And this article is focused on how to effectively free up more usable space of C drive. For users who need to extend C drive, you can find answer here: 6 Ways to Extend C Drive in Windows 10/8/7 Computer.
- 9 Ways to Get More Space for C Drive in Windows Computer :
- Way 1: Use Disk Cleanup to delete files.
- Way 2: Clean the System Junks using Cocosenor System Tuner.
- Way 3: Migrate system Virtual Memory.
- Way 4: Turn off hibernation.
- Way 5: Turn off System Restore.
- Way 6: Compress winsxs folder.
- Way 7: Change Drive Letter and Paths.
- Way 8: Change ProgramFileDir default installation path from C to another disk.
- Way 9: Extend C drive space from D drive.
- Way 10: Release disk space by clearing duplicate files.
Way 1: Use Disk Cleanup to delete files
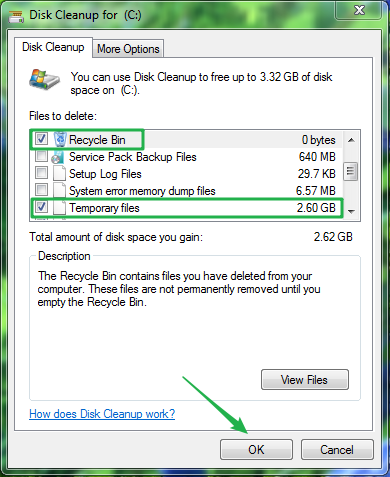
As the official said if you want to reduce the number of unnecessary files on your hard disk to free your disk space and help your computer run faster, use Disk Cleanup. It removes temporary files, empties the Recycle Bin, and removes a variety of system files and other items that you no longer need.
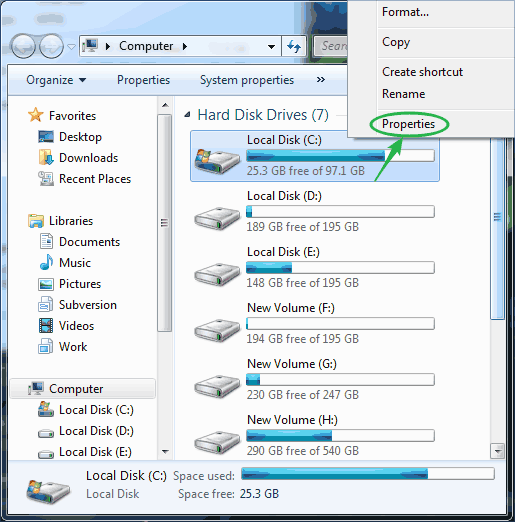
Step-1. Right click on your C drive (Local Disk (C:)) and choose the Properties panel.
Step-2. At the Properties panel, you need to click the "Disk Cleanup" button.
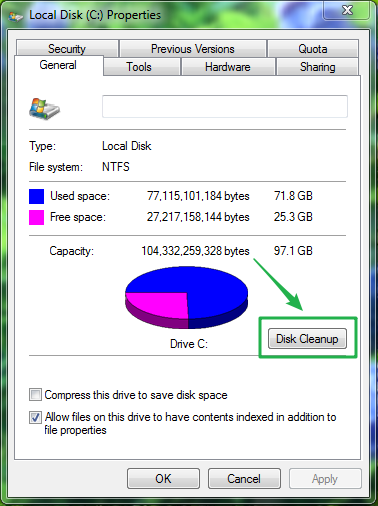
Step-3. Disk Cleanup will calculate how much space you can free up for your system disk C drive. And you can select which files to delete from the list. Mostly, you are recommended to delete Recycle Bin and Temporary files that are taken much space of the disk. In the end, you need to click OK to begin the cleanup.
Way 2: Clean the System Junks using Cocosenor System Tuner
When your C drive is almost full, it is necessary to run an overall scan of the junk files on the system drive. You should delete the system junks to free up the C drive space. Here, Cocosenor System Tuner can help to detect the system junks, including the invalid registry (such as invalid firewall, invalid MUI cache, invalid software information, invalid uninstall program and invalid startup items etc.) and junk files (eg. Temporary files, WinSXS backup cache, recycle bin, scan history, and thumbnail cache etc.) . You can finish the cleaning within simple clicks.
Step-1. Run Cocosenor System Tuner and you will get the computer health status immediately. Then click Scan All button to run an overall scan of the system junks.

Step-2. Seconds later, it will present you the scan result of Registry and junk files. You can view details of the checked files and their space. Then you can click the Clean button.
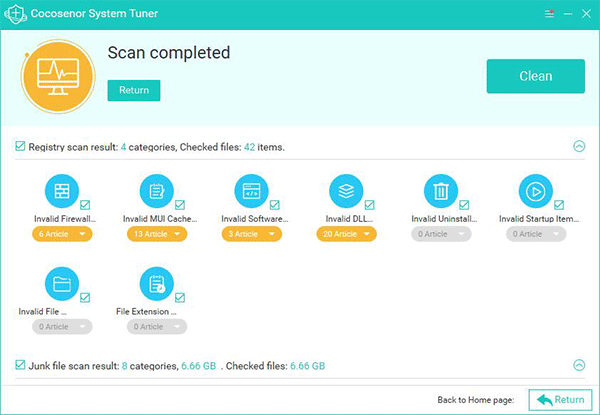
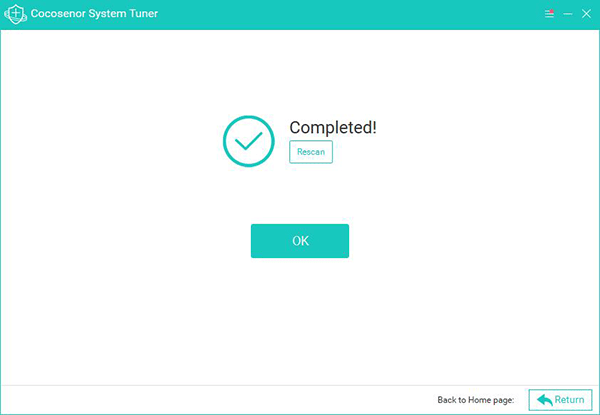
Step-3. The cleaning process will start instantly and you can get more usage space on C drive. Click OK to end the process.
Way 3: Migrate system Virtual Memory.
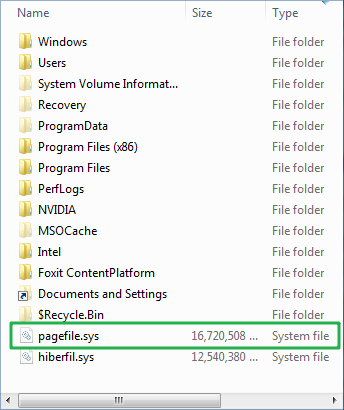
The file of Virtual Memory is pagefile.sys which is generally equal to the size of the physical memory of your PC. In other words, if the computer memory size is 8G, virtual memory will occupy 8G of disk space. Firstly, look at how much space it cost. What a huge file! As big as his sleepy twin brother, hiberfil.sys (we will handle it later).
By the way, this virtual memory file is invisible. Many of us don't know how to show the hidden files but it doesn't matter. We can definitely move it without seeing it.
It is usually recommended to move it to another disk instead of deleting it. After the transfer completed, you usually need to restart your computer for it to take effect. Then at this time, a large space is released fro C drive.
Step-1. Access System panel > System protection > System properties > Advanced > Settings.
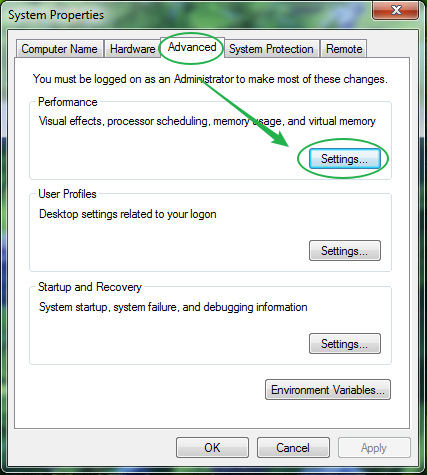
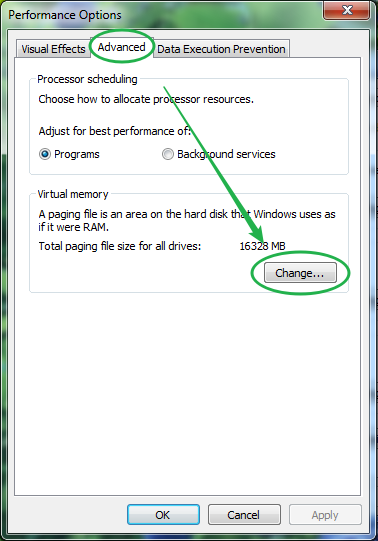
Step-2. After clicking the Setting, you reach to the Performance Option. Select "Advanced" again and click "Change…" button.
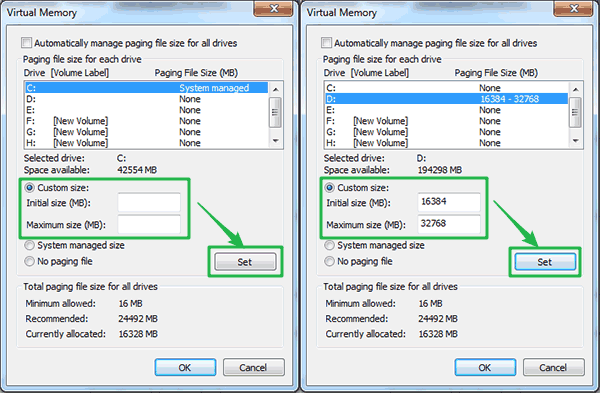
Step-3. Select C drive and manually set the Custom size to zero. Then select drive D (or other volumes you think it suitable) and allocate the Custom size referring to the recommended values it shows below (Initial size goes to be same as memory size, the Maximum size is usually double the memory size).
Way 4: Turn off hibernation
This is recommended for the desktop users or users who do not often use the hibernation function.
Disable unnecessary background programs,run single-task rather than multi-task. Some programs run automatically when your laptop starts, the programs unnecessary take up processor space that will use more battery.
Step. Run Command Prompt as the Administrator, and execute the following command line:
powercfg –h off

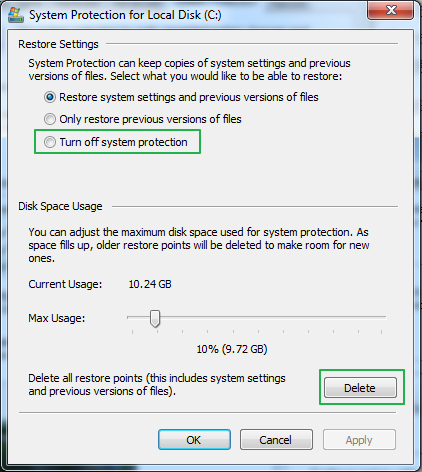
Tip 5: Turn off System Restore.
We have previously released an article on how to use Windows System Restore. Because this function has a certain effect for some users. Under normal situations, it is not recommended to turn off, but if the capacity of your C drive is extremely limited, you can check the following steps to turn off the System Restore. At the same time, delete all the restore points that were backed up before.
Step-1. Open System panel > System protection > System properties > System Protection. Then select your disk drive and click the Configure… button.
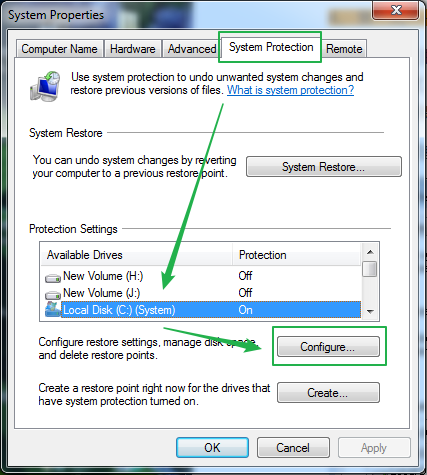
Step-2. Choose Turn off system protection.
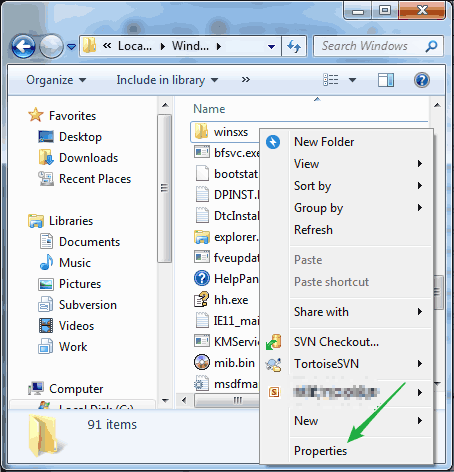
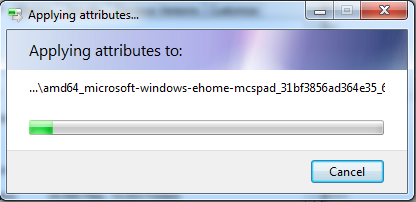
Way 6: Compress winsxs folder.
This file is the installation file of the system. Compressing it will not affect the operation of the running system.
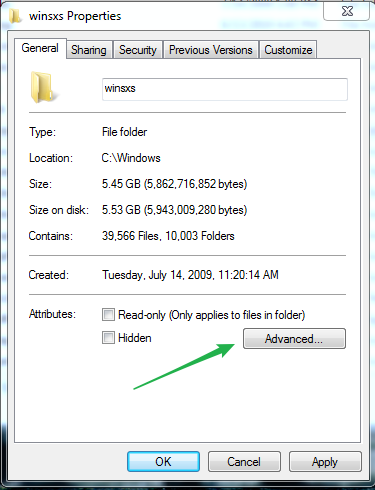
Step-1. Find the file address, C:\Windows\winsxs. Right click at the winsxs and open the properties dialog box.
Step-2. Click "Advanced"
Step-3. Select the option "Compress contents to save disk space" and click OK.
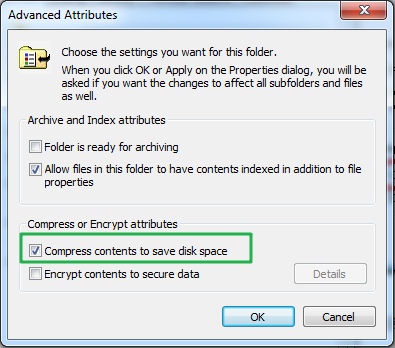
Step-4. Waiting… …
Let's look at how much space we've freed up by this time:

The next part is to introduce how to use some techniques to relatively expand the space of the C drive, or set the default installation path, reducing the application installation to the C drive. The main purpose is to consciously reduce the pressure of the system disk C drive.
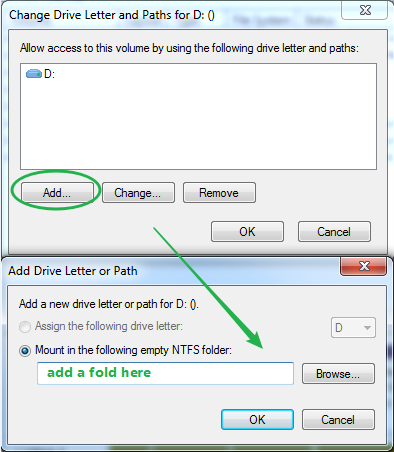
Way 7: Change Drive Letter and Paths.
Step-1. Open Computer Management > Disk Management. Choose a volume besides volume C and right click on it to open the "Change Drive Letter and Paths".
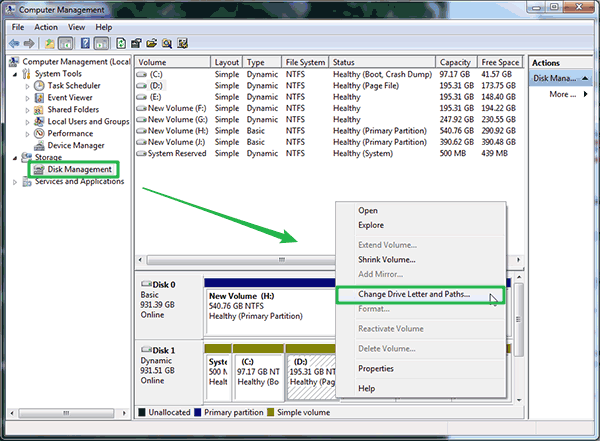
Step-2. Click Add and mount a folder of C drive for D.
Way 8: Change ProgramFileDir default installation path from C to another disk.
Change this default value, and when you install software, they will automatically install to other disks. This can save space on the C drive.
Step-1. Run regedt32.
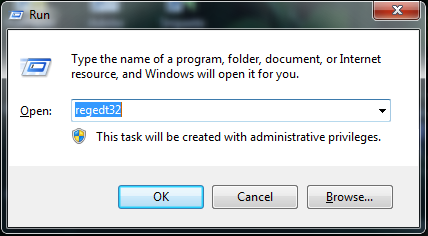
Step-2. Find the ProgramFilesDir (path:HKEY_LOCAL_MACHINE\SOFTWARE\Microsoft\Windows\CurrentVersion)

Way 9: Extend C drive space from D drive.
If there are other partitions besides the C drive on the same physical hard disk, you are suitable to try this method. A part of the capacity space can be divided from the partition adjacent to C partition and merged into the C disk. This requires that the unallocated space divided out must be near to C drive or you need to format the entire partition before extending.
In the following figure, the black unallocated part is divided from drive D but it sits between D and E and far away from C drive. In this case, we cannot merge it to drive C directly.

The only solution to solve this problem is formatting drive D and then extending C drive. If you really have to extend C drive in this way, please backup your D partition in advance. Use a professional backup tool, Cocosenor Backup Tuner to clone the partition next to C drive. Then right click at C drive and hit the "Extend Volume…" to increase space for it.
Way 10: Release disk space by clearing duplicate files.
You may ignore duplicate files on your disk, which arise from regular backups, file transfers or repeated downloads, etc. Over time, more and more useless duplicate files accumulate, wasting disk space and slowing down the computer. This is where Cocosenor Duplicate Tuner is recommended. It is such a tool that can quickly identify the unnecessary duplicate files including documents, videos, audio, images and compressed folders and delete them with only one click. Tons of free space will be reclaimed after eliminating all identical files, especially if you never sort out those duplicates.
Step-1. Start with downloading and installing Cocosenor Duplicate Tuner on your computer.
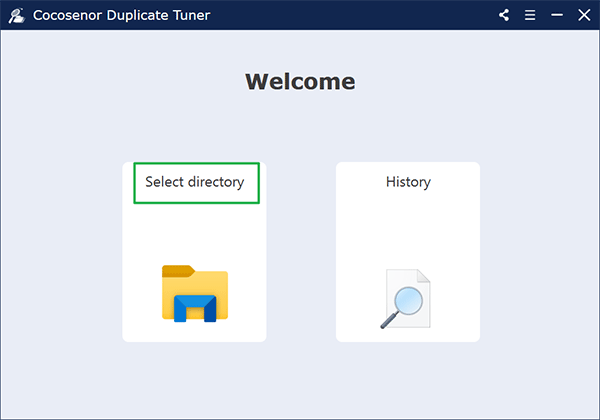
Step-2. Click Select directory after launching the software.
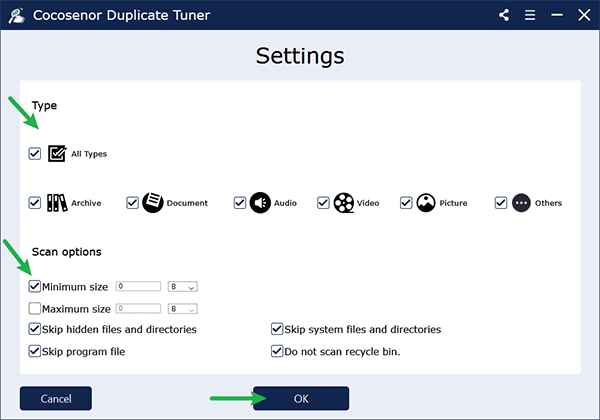
Step-3. Before searching for duplicate files, you can click the Settings icon to configure scan options.
![]()
All the options are selected by default. Hit OK after you finish adjusting the scan rules.
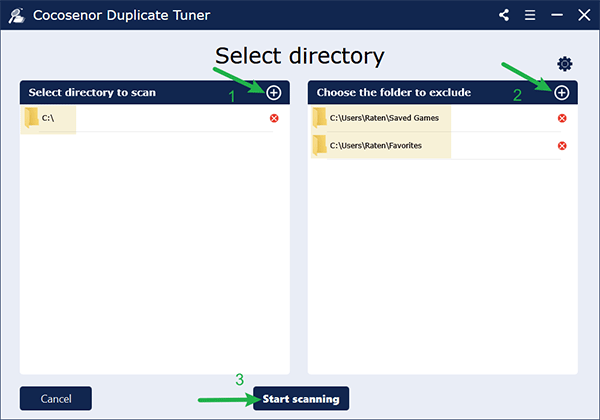
Step-4. Add the C drive as the directory to scan and choose the folder you want to skip during scanning if necessary, then click Start scanning. Multiple folder directories can be selected at once.
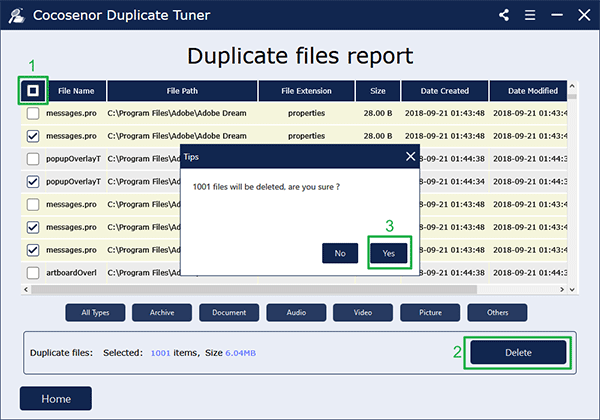
Step-5. Then, you shall see a duplicate files report where a group of duplicates are marked with same colour. Clicking the box next to File Name will auto-select all the redundant copies with one file left. Tap on Delete and ensure your choice with a Yes.