
How to Free Up Disk Space to Get More Storage on Windows 10
As the long time of using your PC, you may find the free space on your hard drive is getting less and less, and you will find your Windows 10 is on low disk space in the end. This may prevent your Windows 10 from installing important updates and affect your Windows 10 performance.

How to free up disk space to get more storage on Windows 10 laptop/desktop computer? Following this article will show you 7 effective ways to free up disk space on Windows 10.
- 7 tips to clean up disk space on Windows 10:
- Tip 1: Use Disk Cleanup to delete temporary files in Windows 10
- Tip 2: Use Storage sense to free up disk space on Windows 10
- Tip 3: Uninstall unnecessary APPs from your computer
- Tip 4: Remove personal files to external storage device
- Tip 5: Remove and Store personal files to the Cloud
- Tip 6: Free Up System Partition Space within Clicks
- Tips 7: Delete Duplicate Files to Free Up Storage Space
Tip 1: Use Disk Cleanup to delete temporary files in Windows 10
Disk Cleanup is the system built-in tool on Windows that can help to clear Download Program Files, Temporary Internet Files, Offline webpages, System created Windows Error Reporting files, DirectX Shader Cache, Delivery Optimization Files, Recycle Bin, Temporary files, and Thumbnails. With Disk Cleanup, you can clean the unnecessary files easily.
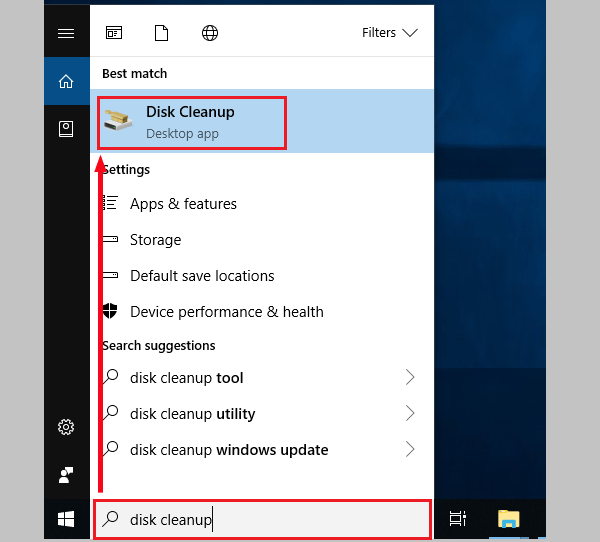
1. Open Disk Cleanup on Windows.
Option 1: On the search box type in: disk cleanup, and then click on Disk Cleanup on the search result.
Option 2: Right click Start icon >> select Disk Management >> right click any disk >> select Properties.
Option 3: Double click This PC >> right click any disk >> select Properties
Option 4: Right click This PC >> select Manage >> click Disk Manage below Storage at the left of Computer Management window >> right click any disk >> select Properties
Option 5: Click Start, and then click Command Prompt.In the Open box, type the following command, and then press Enter: c:\windows\SYSTEM32\cleanmgr.exe /d YOUR DRIVE LETTER. For exmaple, to run disk cleanup for C drive, you can enter the command line: c:\windows\SYSTEM32\cleanmgr.exe /dc .
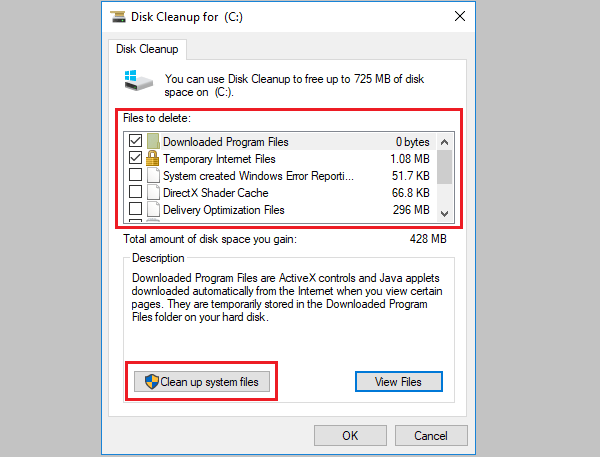
2. Click on the drop-down list to select the drive you want to clean up, here the (C:) drive is selected as example, and click on OK.

3. Check on the box to select the files you want to delete, and then click on Clean up system files.
4. The Disk Cleanup window will close and the Disk Cleanup: Drive Selection window appears again. Click on OK, this will begin to calculate how much space you will be able to free on (C:) drive.

5. And then you can see how much space to free up on this drive. Click on OK button on Disk Cleanup for (C:) window, you will be prompted with the message: "Are you sure you want to permanently delete these files?", if you are sure, click on "Delete Files".

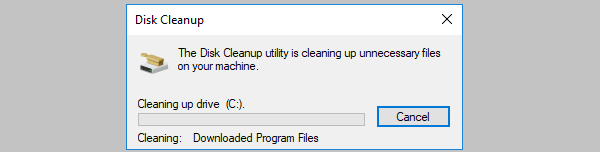
6. Disk Cleanup program will begin to clean up unnecessary files on your PC.
Tip 2: Use Storage sense to free up disk space on Windows 10
Since the April 2018 Update, if you have updated your Windows 10 to the newest version, you also can use Storage sense to free up hard drive space on your Windows 10 computer.
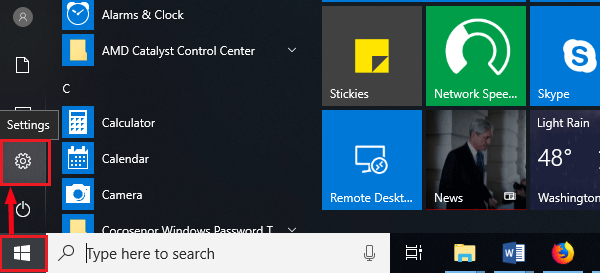
1. Open Storage sense on Windows 10.
Click on Windows icon, and then click on Settings.
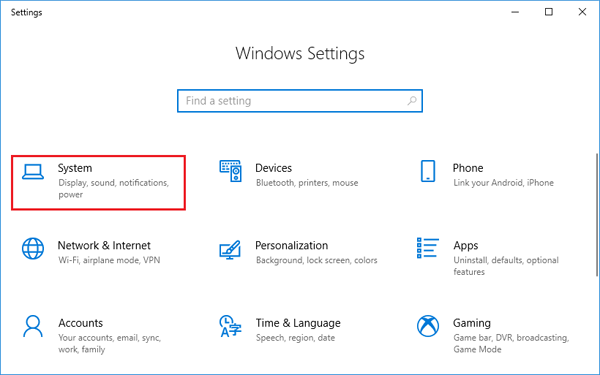
Click on System.
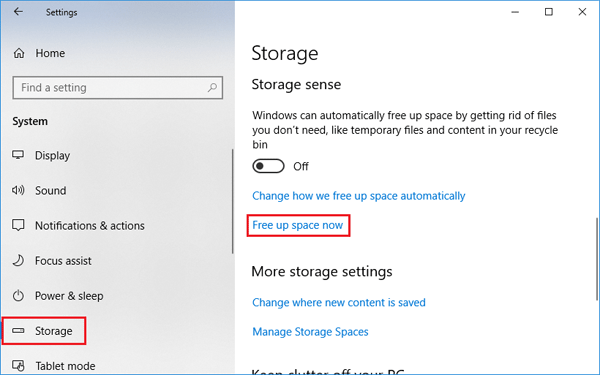
Click on Storage on the left panel, you will find the Storage sense on the right panel.
2. Click on Free up space now.
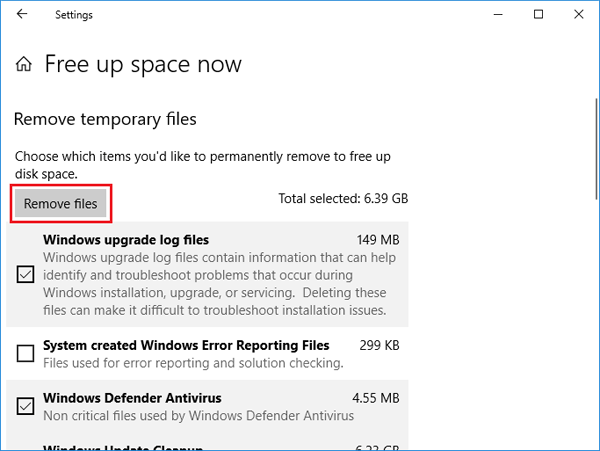
3. Select the temporary files that you want to erase, and then click on Remove files.
4. If you want to automatically free up space on Windows 10 by getting rid of files you don't need, turn on Storage sense.
Click on the link Change how we free up space automatically, to select how often to free up disk space.

Tip 3: Uninstall unnecessary APPs from your computer
If there are apps that you haven't used for a long time, and you are sure you will never use it again, you can uninstall these apps to get more storage for your computer.
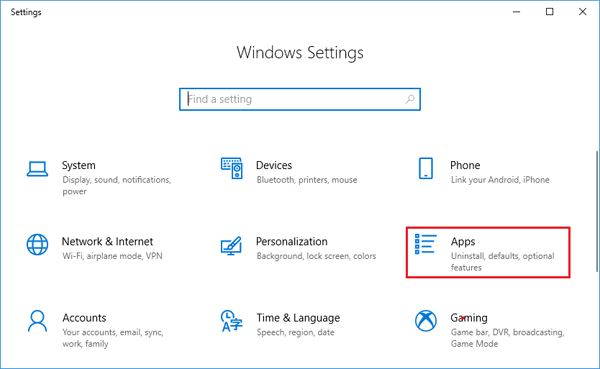
1. Click on Windows icon, select Setting.
2. Select Apps.
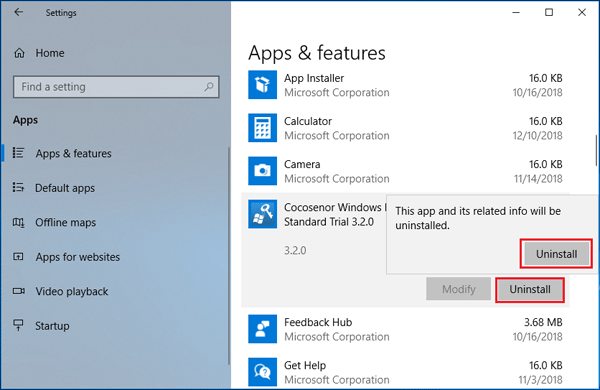
3. Select Apps & features on the left panel, on the right panel stroll down to find the app you don't need any more, click on this unnecessary app, and then click on Uninstall, and then click on Uninstall again to remove this app and its related info.
Tip 4: Remove personal files to external storage device
If you have a large external storage device, such as USB, DVD, SSD or other storage devices, you can move your personal files to the external storage device. The personal files like Music, Videos, and Photos may take up a lot of space on your hard drive.
1. Open the File Explore, and find the personal files that you don't need now.
2. Connect the external storage device to your PC.
3. Select your personal files, and then send or copy them to your external storage device.
4. At last, if you are sure your external storage device is safe enough, delete those source files from your computer to free up disk space.
Tip 5: Remove and Store personal files to the Cloud
You can also remove and store your personal files to the Cloud, like OneDrive, Google Cloud, iCloud or other Cloud services. Here just take OneDrive as example:
1. Install OneDrive on your PC device.
If you don't want to install OneDrive in your PC, you also can sign in from the web.
If your computer is installed with OneDrive, then you don't need to install now, as most of the Windows 10 PC devices will install and update OneDrive on your PC when you update Windows 10.
2. Sign in OneDrive with your Microsoft account.
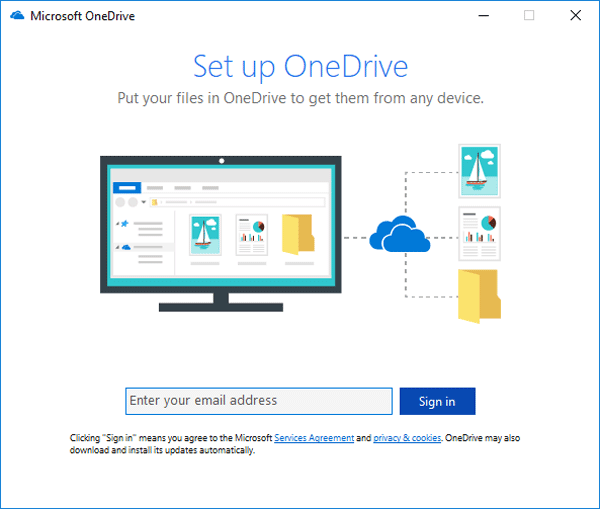
3. After signing to OneDrive, share and transfer your personal files to OneDrive.
Tip 6: Free up System Partition Space within Clicks
As is known to all, Windows system partition plays an important role in whole computer disk. If you get the low disk space on C drive, it means there is less space to maintain the good performance of Windows system. You should take it serious and free up system space. Here you can get a fast way to free up space on local C drive –using Cocosenor System Tuner.
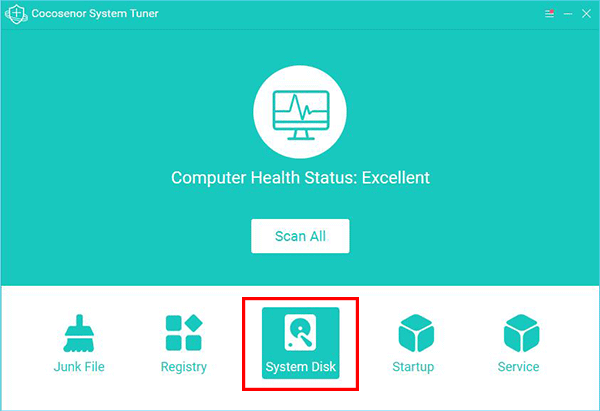
Cocosenor System Tuner is developed to keep your computer health and clean. You can download and run it to clean the system partition within simple clicks. In addition, the software is safe to use and will not damage your computer.
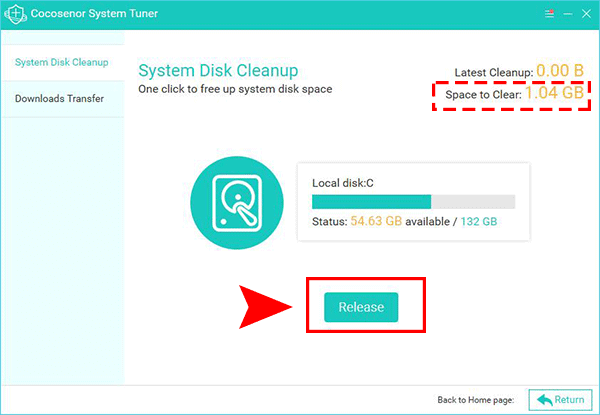
Step 1: Run the program and select “System Disk” option.
Step 2: After that, the program will quickly detect the junk files on your system drive and present you the amount of space you can win after cleaning. With a simple click on the Release button, you will empty all junks from the local disk C.
Step 3: If you want to do a deep clean of the system disk, you can run an overall scan of the computer and clean the system junks as well as invalid registry. You can refer the tutorial in this page: How to Remove System Junks in Windows Computer.
To get more storage and improve the speed of your Windows 10, you can also try to install an SSD in your laptop or desktop computer. For more detail, refer to How to Install A New SSD in Laptop or Desktop Computer.
Tips 7: Delete Duplicate Files to Free Up Storage Space
When you encounter low disk space warning, you can try to delete the duplicate files to win more available space. But, how can we sort out the duplicate files? Check the files one by one? No, there is a time-saving method for you to figure out the duplicates on a folder, drive or even the disk. You can use Cocosenor Duplicate Tuner to scan and remove the duplicate files at ease.
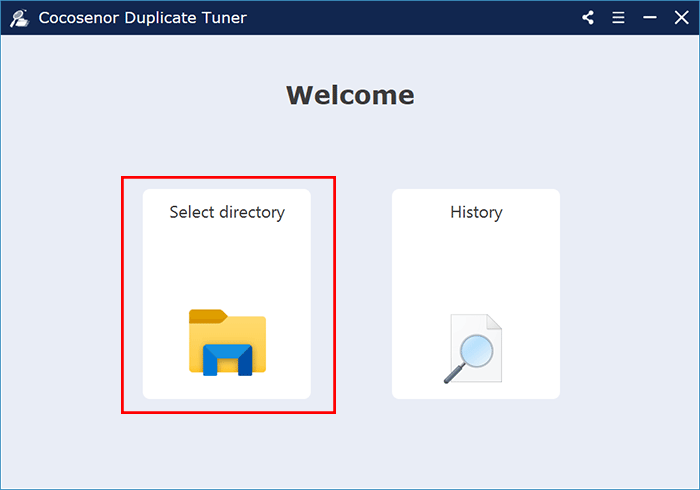
Step 1: Launch the program and choose Select directory option on the main interface.
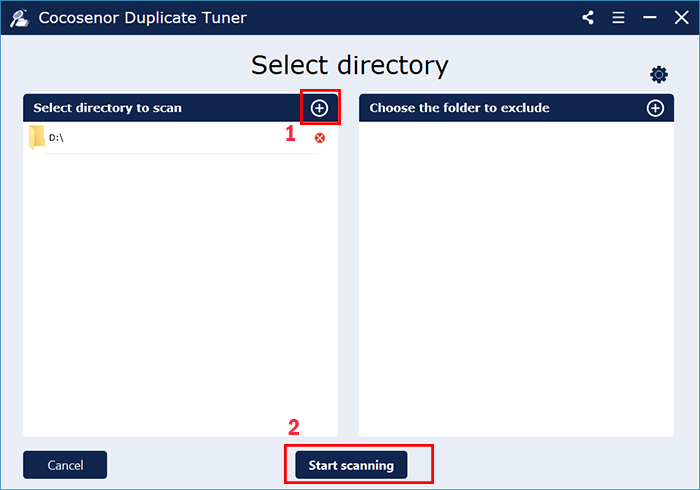
Step 2: Click the Add icon to select your disk /drive/folder to scan. Here a single drive will be chosen as an example. You can also set the folder to exclude on the right part. Then, click the Start scanning button.
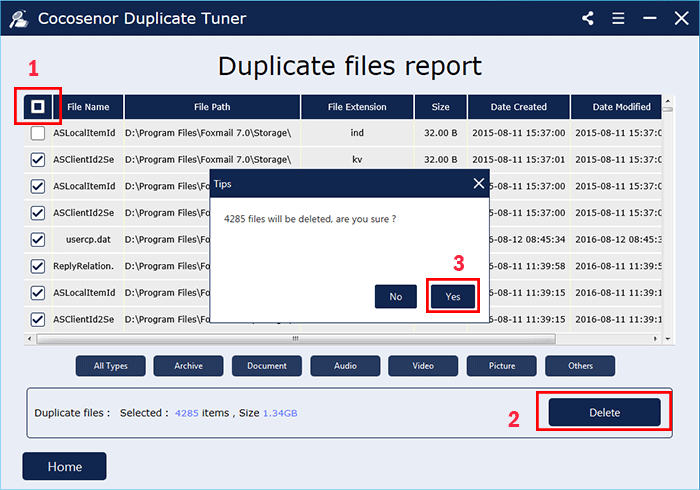
Step 3: You can simple click on the checkbox next to File Name to choose all duplicate files but no the original file. Then, go to click the Delete button. The software will inform you how many files will be deleted. You can click the Yes button to start deleting the duplicates.
Step 4: You will get the successful tips soon. Finally, you can go to Home interface and choose other disk/volume/folder and repeat these operations.

