
Top Ways to Convert Raw to NTFS Without Data Loss
"Location is not accessible. The volume does not contain a recognized file system. Please make sure that all required file system drivers are loaded and that the volume is not corrupted."
"The disk you inserted was not readable by this computer."
Have you ever been blocked by the above error messages or other similar notifications when you try to access a drive volume on local disks, USB flash drive or external hard drives? This usually happens when your partition becomes RAW.
A RAW partition is a partition not formatted to any file system like NTFS, FAT32, exFAT, etc. Since Windows uses the file system to locate and retrieve the file you want to access, the raw partition can not be recognized by the computer and data in this partition will turn into unreadable because the operating system don't know where and how the files are stored. The commonly reasons for RAW issues would involve: suspend formatting process, corrupt or damaged hard disk, sudden system shutdown, virus attack, unsafe ejection of external storage device, power failure and so on. In this article, we'd like to show you how to convert RAW to NTFS without data loss, along with the optimal way to recover raw partition files.
Restore files before converting RAW to NTFS
It seems that you must format the raw drive or partition to supported file system for further data storage, which is indeed the quickest way to access the drive. But what to do if you got important data that cannot be erased? The first thing we need to do is recovering the data from RAW storage device. To get RAW drive data back, the professional recovery software--Cocosensor DataTuner can do you a favor. In case you are denied access to certain locations or files due to wrong partitions, deleted partitions, repartitioning or drive formatting, this software will free you from all these problems. Users without any technical knowledge can easily recover all types of files using DataTuner.
Step 1: Download and install Cocosensor DataTuner on your computer.
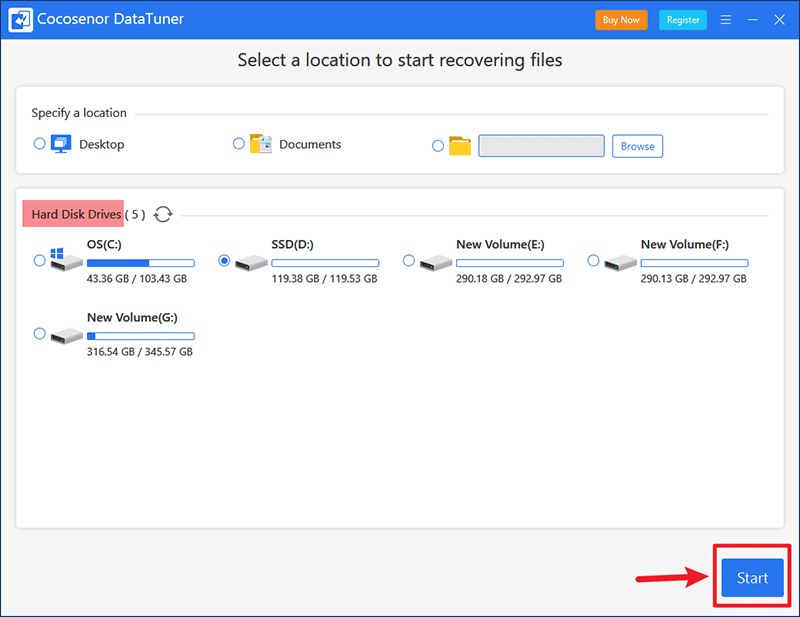
Step 2: Following the launch of this tool, you will be presented with the home interface shown below, which includes all the available hard disk drives. Select the RAW drive and click Start to scan it.
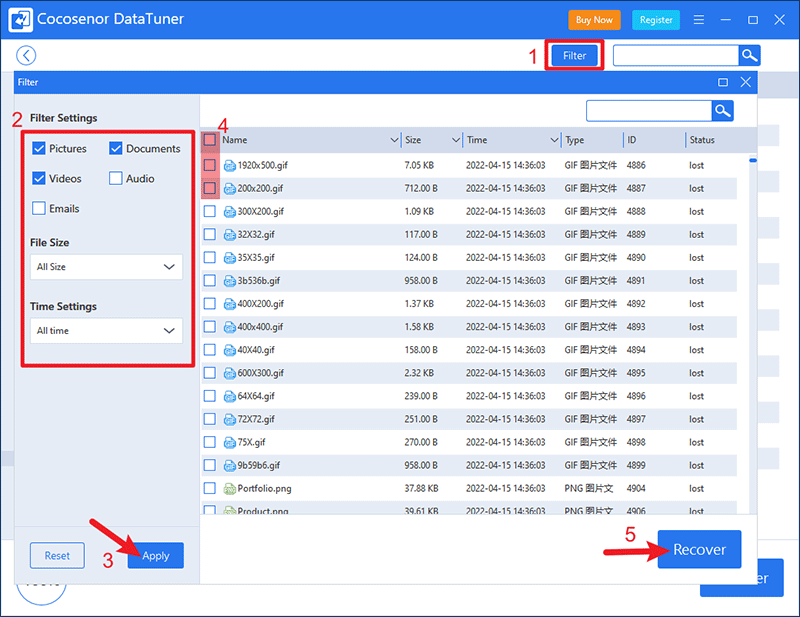
Step 3: A quick scan and deep scan will be performed in succession. You shall see the contained folders and subfolders on the left pane. Expand the folders and check the contents you want to restore. Then click on Recover button. In the Status column, you are able to see if the files are lost or deleted.

If you wonder to recover certain types of file such as pictures and video, use the Filter option. Set the filter settings based on your needs and then click Apply. Select all the files you want to recover and tap on Recover.
Step 4: Choose a safe location on different drives to save the restored files.
After done, you will be prompted with a notification "Data recovery is completed!" and it is up to you whether to open the recovery folder immediately.
How to convert RAW to NTFS?
If you run CHKDSK trying to fix the RAW drive, you probably find it infeasible with an error message "CHKDSK is not available for RAW drives." It's recommended to format the RAW to NTFS. Upcoming section outlines three methods to change the RAW file system to NTFS by fully formatting it.
Way 1: Via File Explorer
Step 1: Press Windows+E to open File Explorer. Navigate to the RAW drive, right-click on it and select Format.
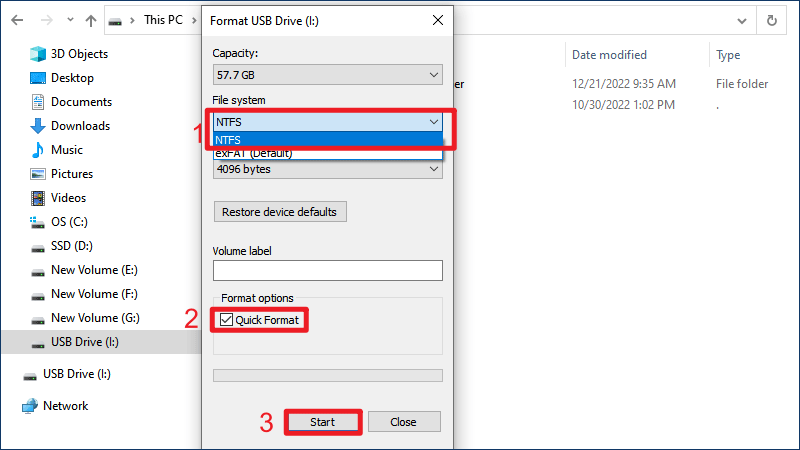
Step 2: In the pop-up prompt, choose NTFS as the target file system.
Step 3: Tick the checkbox of Quick Format and Click Start.
Wait until the process finishes and you shall change the file system into NTFS. But chances are that you may encounter an error message "Windows was unable to complete the format". In such case, move on to other methods.
Way 2: Via Command Prompt
Step 1: Search cmd in the search bar and select Run as administrator from the results.
Step 2: Type diskpart in the Command prompt to start disk management and hit Enter.
Step 3: Enter the following command lines one by one:
list disk
select disk n (the number of your RAW drive)
attributes disk clear readonly
clean
create partition primary
select part 1
active (if the RAW drive is the boot drive)
format fs=ntfs
assign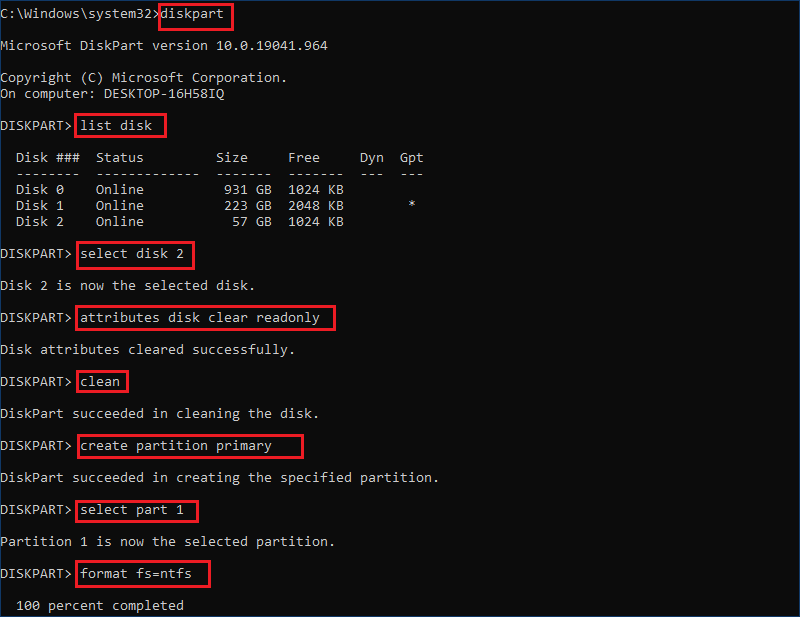
Step 4: Type exit to exit Diskpart utility and close Command Prompt once finished.
Way 3: Via Disk Management
Step 1: Press Windows+X and select Disk Management from the context menu.
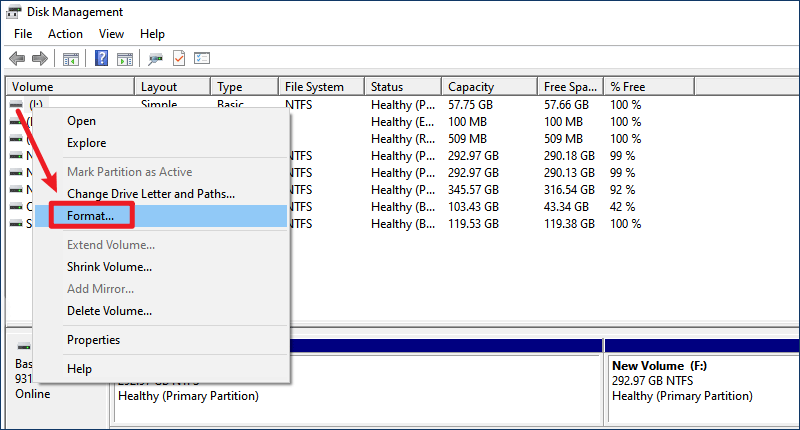
Step 2: Locate the Raw drive in Disk Management, right-click it and choose Format.
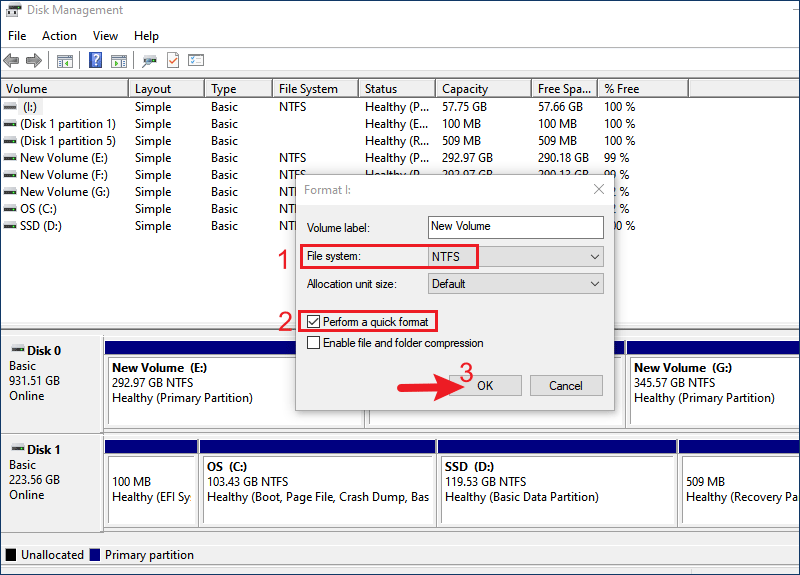
Step 3: Choose the NTFS as the file system and tick the box of Perform a quick format. Then click OK.
After formatting, check if you can access the RAW partition and use it to store data.
Related Articles
- How to Recover Data From a Hard Drive That Won't Boot
- How to Recover Deleted Files from an SD Card on Windows 10
- How to Install A New SSD in Laptop or Desktop Computer
- How to Clean C Drive without Formatting on Windows 10/8/7
- How to Recover Files from Formatted Hard Drive on Windows
- How to Unlock A BitLocker Encrypted External Hard Drive in Windows

