
How to Turn On USB Debugging Mode On Android

If you encounter a problem when you use an Android phone, you may have searched forums for solutions to problems, you’ve probably heard the term “USB Debugging” every once in a while. It sounds like a high-tech term, but it really isn’t; it’s quite simple and useful. USB Debugging is also necessary if you ever want to root your Android device.
USB Debugging Mode is a mode that can be enabled in Android after connecting the device directly to a computer with a USB cable. The primary function of this mode is to facilitate a connection between an Android device and a computer with Android SDK (software development kit). As the name might suggest, Android SDK is a software suite that’s designed to aid in the development of Android apps.
Now lets learn how to turn on USB Debugging Mode on Android. It varies from one Android version to another.
Part 3. Android 4.2.x and higher
Part 4. Android 6.0 and later version
Part 1. Android 2.0-2.3.x
Open Settings, then navigate to Applications --> Development --> USB debugging, select the checkbox after it.

Part 2. Android 3.0- 4.1.x
Open Settings, scroll down, find the Developer options, turn it on, select the checkbox after USB debugging. You will see a prompt window, tap OK.
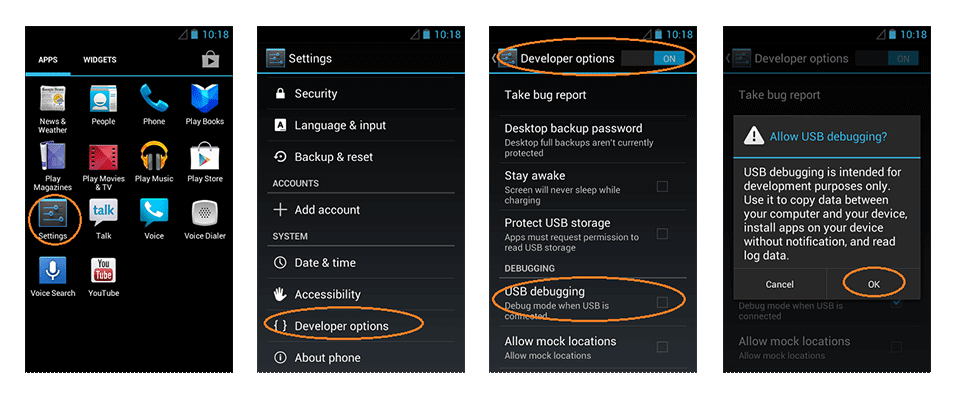
Part 3. Android 4.2.x and higher
In Android 4.2 and later versions, the Developer Options menu and USB Debugging option have been hidden. In former 4.X versions of Android, USB Debugging option is under Developer Options menu.
First, you need to enable "Developer Options Menu".
Step 1. Click Menu to the main screen.
Step 2. find Settings App.
Step 3. Scroll down to find About phone or About Tablet
Step 4. Scroll down to find the Build Number
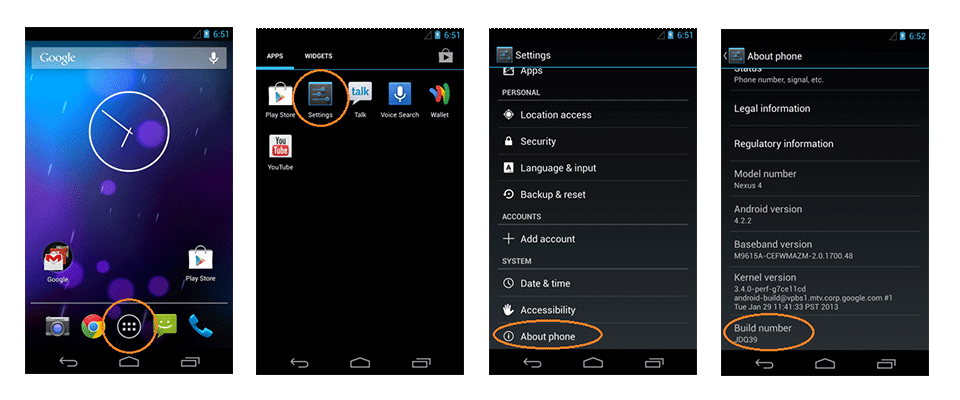
Step 5. Tap the Build number field seven times to enable Developer Options.
Step 6. When you see a message "You are now a developer!", you have already enabled the developer mode.
Step 7. Then return to Settings, you'll see the Developer options menu under System on your Settings screen. Tap it, you can select the checkbox after USB debugging.

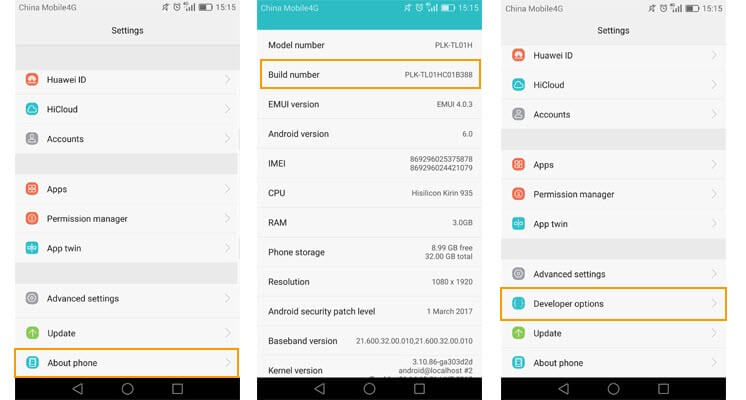
Part 4. Android 6.0 and later version
The steps of enabling Developer options is same as Android 4.2.x.
Open Settings App, scroll down to find About phone, then find Build number, tap 7 times, you can see Developer options when you return to Settings.
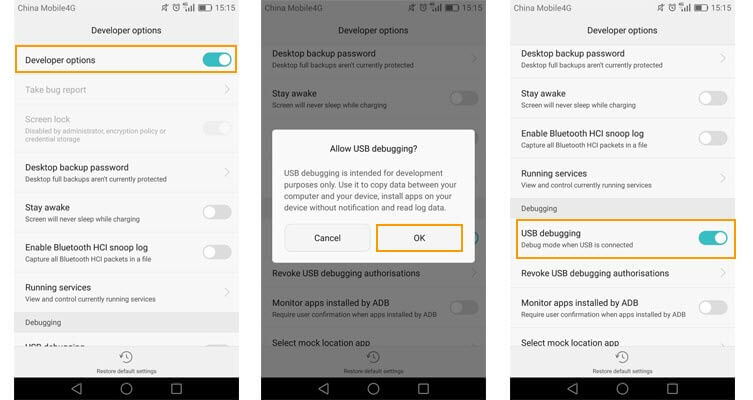
Tap the Developer options, turn it on. Then scroll down to find USB debugging under Debugging, when you want to turn it on, you will see a prompt window, click OK.
Important: USB Debugging should only be enabled when you need it. If you leave it on all the time, you might put your device in a high security risk situation. Say if you connect your Android phone to a USB charging port in a public location, the port could use the USB to access data on your phone or install malware. This could happen when and only when USB debugging mode is enabled. When you don't need it, you can turn it off at the top of screen of Developer options.

