
How to Transfer Photos from One iPhone to Another
Photo is very important in our life partly because it can transfer infinite information in limited space. But do you know how to share the same picture with others, or transfer pictures from your old iPhone to your new one? This article aims to help you find the answer.
- The article is divided into 2 parts:
- Part-1. Transfer photos from one iPhone to another without computer
- Part-2. Transfer photos between iPhones with computer
Situation 1. Transfer photos from one iPhone to another without computer
There are four transmission methods in this situation:
- 1. Transfer photos using iCloud
- 2. Transfer photos using AirDrop
- 3. Transfer photos using Shared Album
- 4. Transfer photos using Quick Start
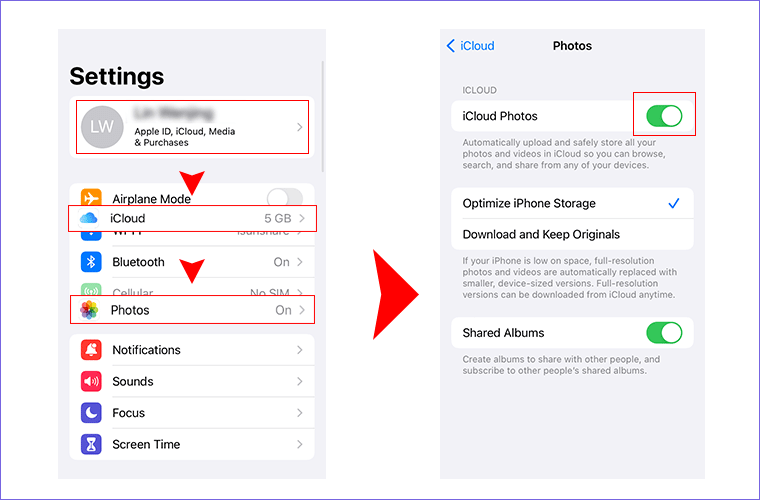
1. Transfer photos using iCloud
Ensure your iCloud storage is enough, otherwise some of your data wouldn't be transferred and stored in iCloud.
Step 1: In your old iPhone, you should ensure the photo button is on: go directly to iCloud >>Photos, and keep iCloud Photos button on.
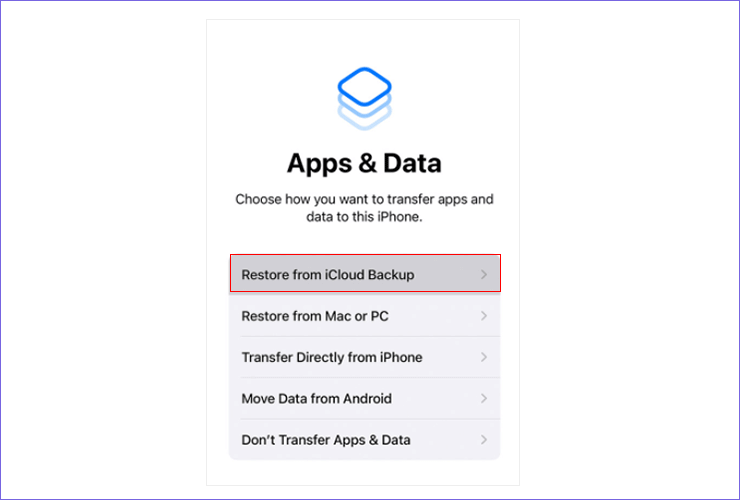
Step 2: On your new iPhone, you can follow the screen instructions from the hello screen until you reach the Apps & Data screen.
Step 3: Click into Restore from iCloud Backup, and then the data you backed up on your old iPhone would transfer to your new one once you entered into with your account.
Or, you can choose to sign in with your Apple ID on your new iPhone and enter Album > All photos to see all iCloud photos if you have already set up your iPhone.
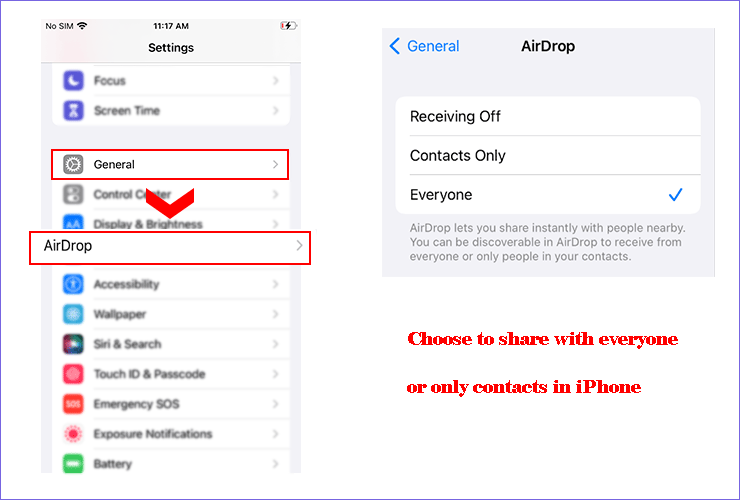
2. Transfer photos using Airdrop
Before you do the following operations, you need to make the iPhoneconnected to Internet and turn on Bluetooth as a preparation.
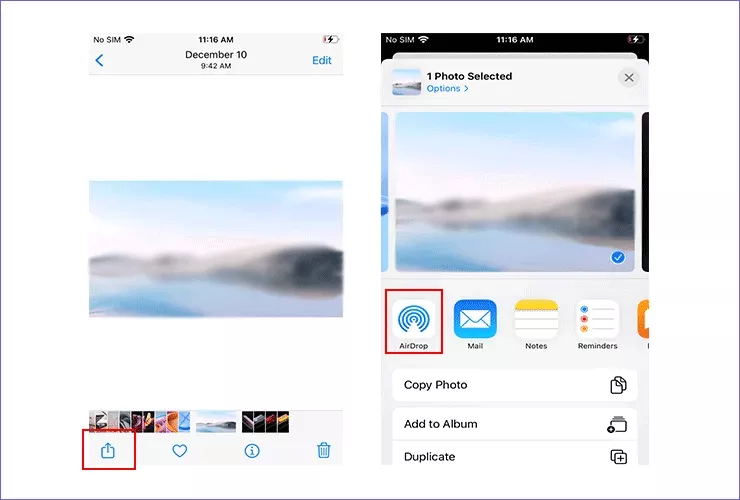
Step 1: You can first go General then Airdrop and choose whom to share with.
Step 2: Open your album and choose the photos that you want to share.
Step 3: Click into the share button at the bottom of your screen.
Step 4: Click into the Airdrop icon, you can choose a certain users or everyone to share with. When your iPhone succeed in connecting with the other, the other device will pop up a dialog on the screen.
And all the other iPhones need to do is to accept this transmission to finish the process, the premise is that the other iPhone has turn on the Airdrop function already.
3. Transfer photos using Shared Album
Step 1: Enter your Photos app, and click into Album.
Step 2: Find the Plus icon at the top of the screen and click into it.
Step 3: When it pops up a dialog box, choose to establish a New Shared Album.
Step 4: Add the name and the contact you want to share with, you will finally get a shared album.
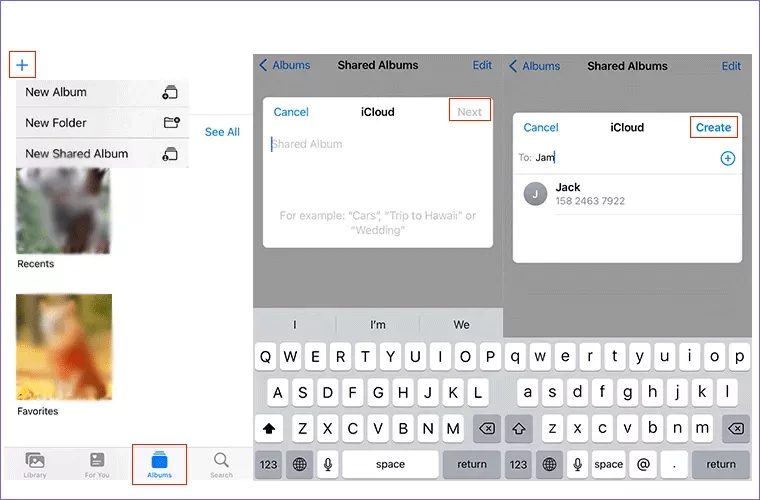
In shared album, you can add any photos stored in your iPhone, then iPhone user you set to contact will find all photos almost simultaneously.
4.Transfer photos using Quick Start
Make sure that both iPhones are connected to the same internet, and both have enabled the Bluetooth. Beyond these, you should confirm that both iPhones are running iOS 12.4 or later.
Step 1: Turn on your new device and place it near your previous one.
Step 2: Then your new iPhone will pop up a Quick Start screen. At the same time there is an option appears on your previous iPhone, you should tap Continue.
Step 3: Then your new iPhone appears an animation and your previous one appears a viewfinder. You can center the animation in the viewfinder, or you can click Authenticate Manually to input the Authentication Code appears on the screen of the new iPhone.
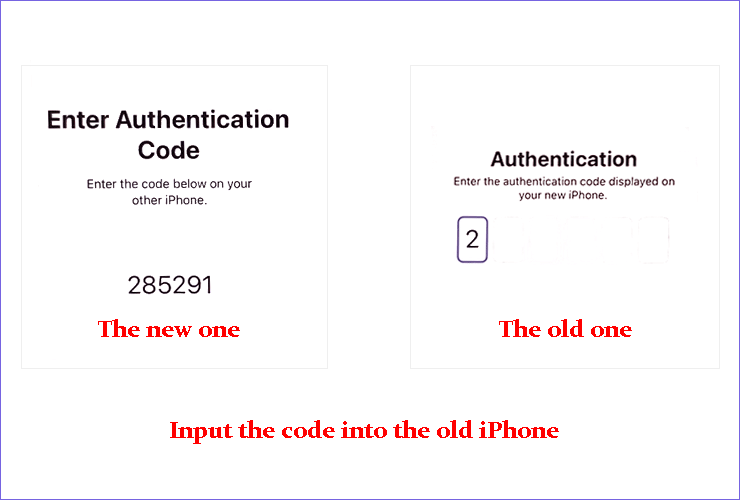
Step 5: Keep the two iPhones together and at the same time do some elementary settings on the new one like set up Touch ID and passcode.
Step 6: When you reach the Transfer Data from "[your device]" screen, click Continue and then follow the instructions on screen.
Once the progress bar under the Apple icon has finished loading, you'll have a new iPhone with all of the original's data.
Among the above discussed methods, each of them has its Pros and Cons:
Quick Start is a built-in function of Apple, which is used to quickly set up a new iPhone when changing devices. It can transfer most of the data of the original iPhone but it takes a lot of time, sometimes several hours. iCloud relies on an apple account. All data in the iCloud space can be shared, but each account only gets 5GB of free space. AirDrop can transfer photos quickly but what if the other device can't enable the function. Shared Album sounds like a good idea, but it requires to share photos already exist in iCloud.
Is there any way to transfer photos from one iPhone to another via the computer, not affected by space and Internet speed? You can deep into the article to get details.
Part-2. Transfer photos between iPhones with computer
In this situation, there are two ways:
- 1.Transfer photos from one iPhone to another using iTunes
- 2. Transfer photos from one iPhone to another using Cocosenor iPhone Backup Tuner
1. Transfer photos from one iPhone to another using iTunes
Before using iTunes, you should back up your data stored in the old iPhone firstly and connect your target iPhone to the computer. But usually, iTunes won't allow you to back up a single category, which means you have to back up all data of the old iPhone on the computer. You can check the ways in the arctile to back up photos of your old iPhone to Windows computer .
Step 1: Click into the little iPhone icon.
Step 2: Hit the Photos, and check Sync Photos.
Step 3: Choose the location the photos where all the photos from your old iPhone is backed up, and select All folders or Selected folders.
Step 4: Click Sync and after the process finished, tap on Done.

For Apple users, iTunes is a relatively versatile tool. But its process is a little cumbersome. When you need to transfer photos with iTunes, you should first have backed-up data on your computer. And there you have a more flexible choice: Cocosenor iPhone Backup Tuner.
2. Transfer photos from one iPhone to another using Cocosenor iPhone Backup Tuner
Cocosenor iPhone Backup Tuner, unlike other transfer methods, it is not so cumbersome. No need to log in with account, no need to turn on Bluetooth and Wi-Fi, it only requires you to connect both iPhones to your computer with USB cables to operate and trust the computers which saving you a lot of energy and time.
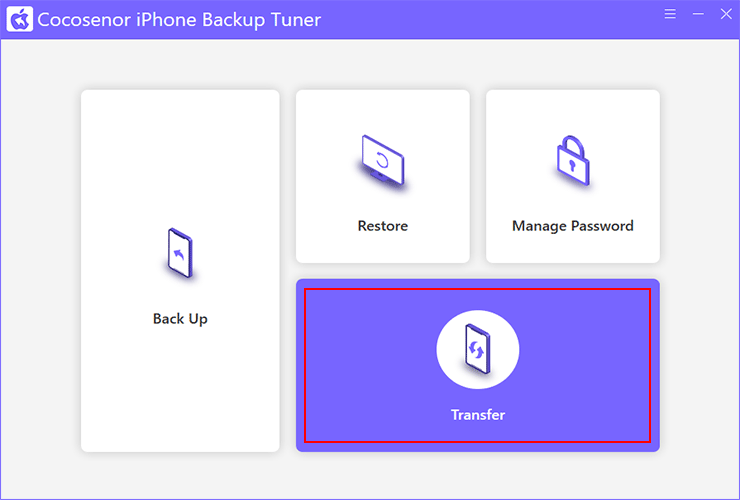
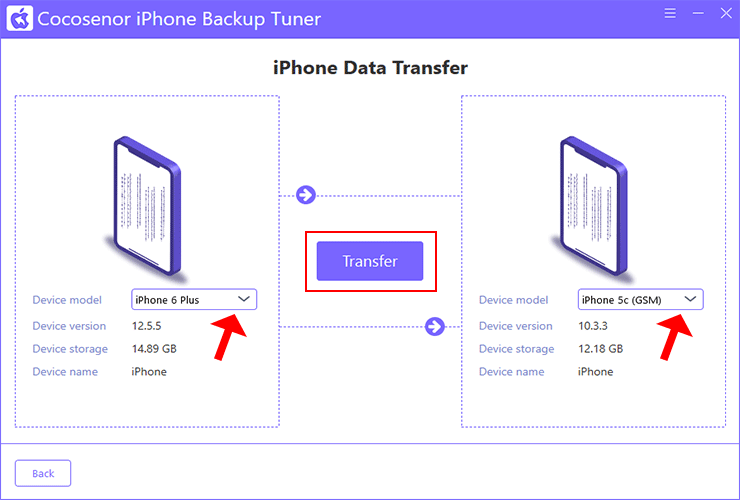
Step 1: Open the app and click into Transfer.
Step 2: Make sure your iPhones' positions are right: The iPhone that appears on the left side is your original iPhone, which stores the pictures you want to transfer, and the iPhone that appears on the right side is the target iPhone that receive these pictures.
Otherwise, you need to change the source iPhone and target iPhone by clicking the arrow.
Step 3: Keep your devices connected to the computer simultaneously and then click Transfer.
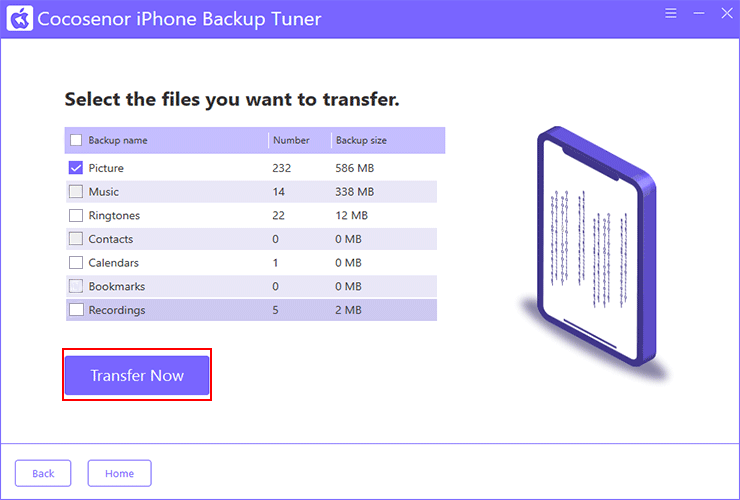
Step 4: Check Picture, and then click Transfer Now.
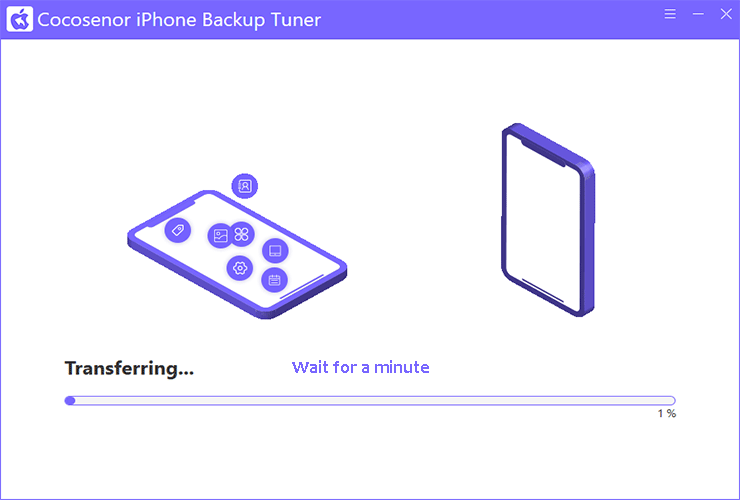
Step 5: Wait for the process to the end. After restarting the target iPhone, you will find it has the same photos as the previous one.
Conclusion:
In this article, we cover the many possibilities for transferring photos in different situations, and you must have found one that works best for you. iCloud gives each account 5GB of free space, but that space can often be used up in everyday life without even knowing it. iTunes can't just back up photos seperatly from your iPhone to your computer. Quick Start is handy when setting up a new iPhone, but it takes a long time to do so, and you may not be able to use your iPhone for hours.The AirDrop and Shared Album may have the potential of not connecting to the device.
Cocosenor iPhone Backup Tuner is the easiest yet most efficient way to transport your photos to and from your iPhone. Just open the software and make a simple operation to send data back and forth.

