
An Easy Way to Clone GPT HDD to SSD in Windows 10/8/7
As we all know, compared with a traditional hard drive, SSD does a better job in speed, durability, features, as well as other aspects. If you have a GPT disk, you may want to clone your GPT hard drive to a larger SSD so as to get a better performance of your computer. Well, is it possible to clone GPT HDD to SSD in Windows 10/8/7 without reinstalling the Windows OS and applications? The answer is “YES”! You can get the job easily done by using a professional GPT disk clone utility, and Cocosenor Backup Tuner is such a powerful tool which supports you to successfully clone GPT disk to SSD without difficulties.
As there is lots of disk clone software online for your selection, you may wonder why to choose Cocosenor Backup Tuner. Actually many software are untrusted and imperfect, so quite a few users give feedback that they encounter some unexpected errors during the cloning process or their computers fail to boot from the SSD after cloning HDD to SSD. After experimentation, Cocosenor Backup Tuner is turned out to be a professional tool which performs well in copy/backup/restore Windows system and partitions and disk cloning one hard drive to another drive. So you can trustingly use it to clone GPT disk to SSD.
How to Clone GPT HDD to SSD in Windows 10/8/7 with Backup Tuner
Before you start to clone GPT HDD to SSD, prepare a new SSD with enough space to receive all the data from the original GPT disk (if what you use is not a new SSD, back up the data in the target SSD in advance as the disk clone operation will overwrite all the data in the destination disk). Then have Cocosenor Backup Tuner downloaded and installed on your Windows 10/8/7 computer. Now you can continue to use it to clone GPT disk to SSD.
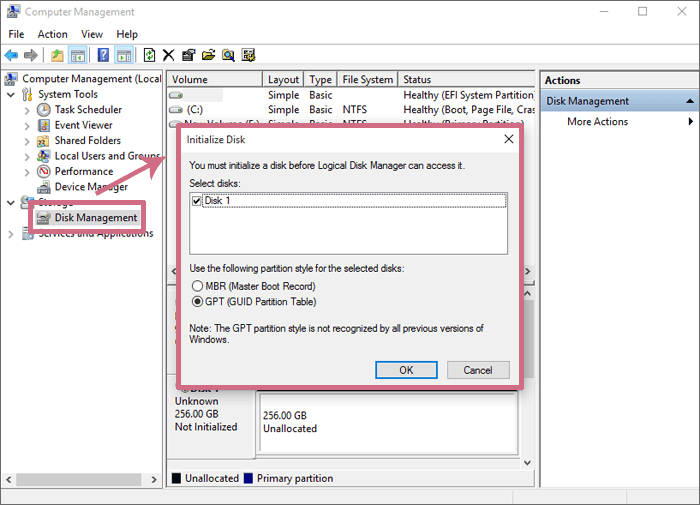
Step 1: Initialize the new SSD with GPT partition style.
After you have prepared a suitable SSD, connect the new SSD to your Windows 10/8/7 computer first of all. Then you need open the Disk Management to initialize the new SSD. You will see the Initialize Disk window pops up and asks you to choose a partition style for the selected disk, choose the option of GPT (GUID Partition Table) and then click the button of OK to go on.
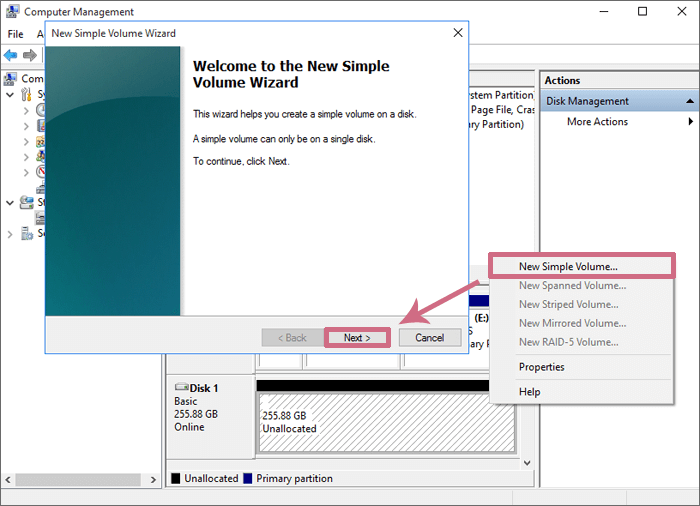
Then right click any space on the SSD and choose the option of New Simple Volume to create at least a new simple volume on the disk according to the New Simple Volume Wizard.
Step 2: Run Cocosenor Backup Tuner and choose the function of “Disk Clone”.
Now that you have completed Step 1 and after you have downloaded and installed the utility of Cocosenor Backup Tuner on your Windows computer successfully, you can be ready to start up the software. As you can see, there are four functions on the top menu ribbon. To clone GPT disk to SSD, select the function of “Disk Clone”. It can help you clone the whole data from the GPT HDD to the new SSD.
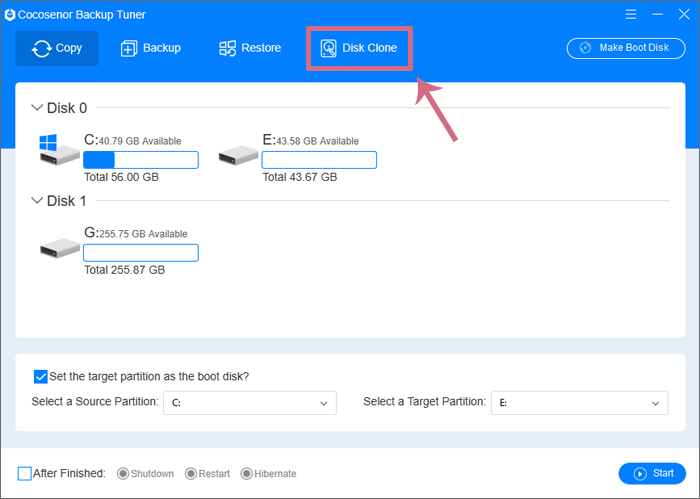
Step 3: Select the source disk and target disk on the interface.
On the Disk Clone interface, you can identify all the disks and partitions on your computer. Then you need go to the part of “Select a Source Disk” and select the GPT HDD as the source disk. In a similar way, then go to the part of “Select a Target Disk” to select the SSD that you have connected to your computer as the target disk.

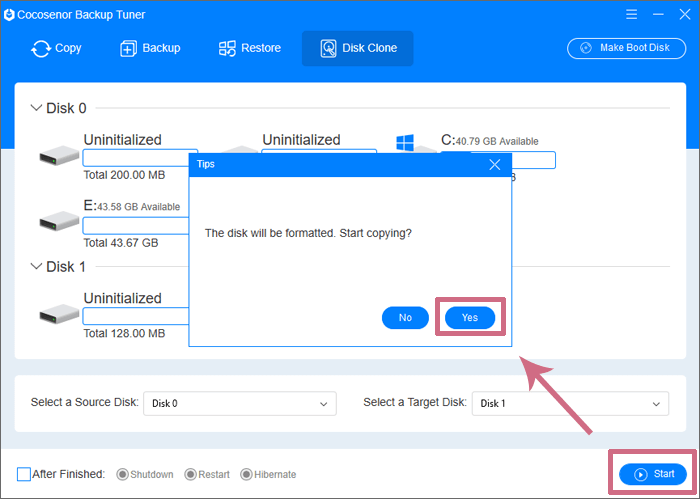
Step 4: Click the “Start” button to start to clone GPT HDD to SSD.
Now you can check the information one more time and please don’t mix up the source disk and the target disk. After you have checked the information carefully and make sure there is nothing wrong, you can click the Start button to begin the disk cloning operation. To confirm your operation, click the Yes button to continue. Then the software will begin cloning the GPT disk to the SSD immediately.
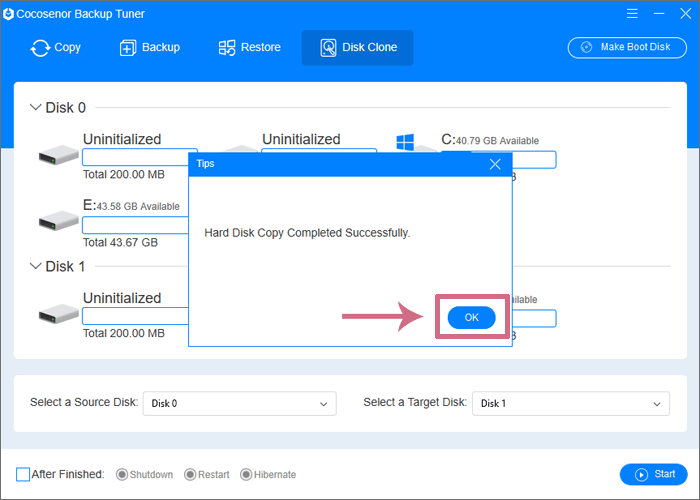
Step 5: Get the GPT HDD cloned to the SSD successfully.
After you have completed the above 4 steps, you just wait for the disk cloning process to end patiently. Finally you will get the GPT HDD cloned to the SSD successfully, which means that all the data in the original GPT hard disk have been cloned to the SSD successfully without any data loss.
Related Articles
- How to Install another Hard Drive--SSD on Your Computer
- How to Clone Windows OS to New HDD/SSD without Reinstalling
- An Easy Way to Migrate Windows 10 from HDD to SSD
- How to Copy One Hard Drive to another Hard Drive in Windows Computer
- Clone Windows OS from Larger HDD to Smaller SSD without Reinstalling

