


How to Clone Windows 11 to a Smaller NVMe SSD Without Boot Issues
Upgrading from an old hard drive or larger SSD to a faster NVMe SSD is one of the best ways to improve Windows 11 performance. However, many users hesitate when the new SSD has less storage capacity than the original drive.
The good news is that you can clone Windows 11 to a smaller NVMe SSD as long as the used space on your current drive is smaller than the available capacity of the new SSD.
A successful migration requires more than simply copying files. Windows 11 relies on special boot partitions, UEFI firmware settings, and system files. If these components are not copied correctly, you may encounter problems such as:
- • Cloned SSD not booting
- • Windows 11 stuck on the loading screen
- • “No bootable device found” error
- • Blue screen after SSD migration
- • New NVMe SSD not detected as a boot drive
This guide explains how to safely clone Windows 11 to a smaller NVMe SSD and avoid common boot issues.
- Contents
- Can You Clone Windows 11 to a Smaller NVMe SSD?
- Before Cloning Windows 11 to a Smaller NVMe SSD
- How to Clone Windows 11 to a Smaller NVMe SSD
- How to Boot Windows 11 from the Cloned NVMe SSD
- Why Does Windows 11 Fail to Boot After SSD Cloning?
- Fixes to Windows 11 Not Booting After SSD Clone
- FAQs on Windows 11 Clone to a Smaller NVMe SSD
Can You Clone Windows 11 to a Smaller NVMe SSD?
Yes, you can clone Windows 11 to a smaller SSD if the destination drive has enough space for all existing data.
For example:
- • Original SSD with only one volume: 1TB
- • Used space: 300GB
- • New NVMe SSD: 500GB
This migration will work because the data stored on the original drive is smaller than the new SSD capacity. However, if your original drive contains more data than the smaller SSD can hold, you need to delete unnecessary files, move large files to another drive, uninstall unused applications, and clean temporary files.
If the original hard disk is separated to several volumes, you just need to check the used space of the system drive. Although the new NVMe SSD is smaller than the original disk, if there is enough space to store the system drive data, you can go ahead to clone Windows 11.
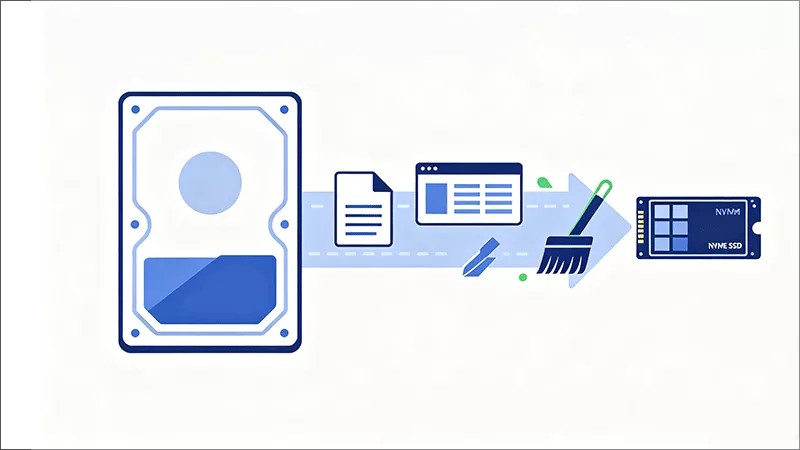
Before Cloning Windows 11 to a Smaller NVMe SSD
Following these preparation steps can prevent most migration problems.
1. Check the Used Space
You can open Settings > System > Storage or directly go to File Explorer > This PC. Then check how much space is currently used on your Windows drive. Make sure the used space is smaller than the new SSD capacity.
2. Back Up Important Files
Although cloning is generally safe, unexpected interruptions can happen. Before migration: back up important documents, save important photos and videos and create a recovery option if possible.
3. Initialize the New NVMe SSD
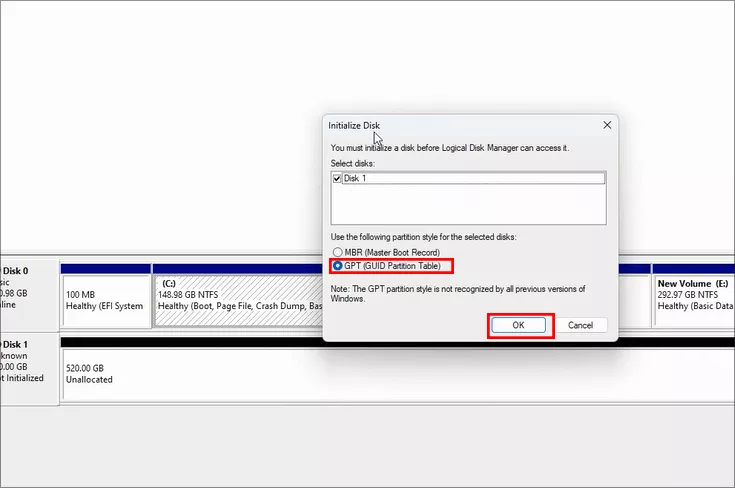
If your SSD is brand new, connect the NVMe SSD to your computer. Then, open Disk Management and initialize the disk. You should choose GPT partition style from the prompt because Windows 11 works best with GPT and UEFI systems.
How to Clone Windows 11 to a Smaller NVMe SSD
If you want to clone Windows 11 to a smaller NVMe SSD without reinstalling the operating system, using reliable backup and migration software can make the process much easier.
Cocosenor Backup Tuner is designed to help users protect their data and migrate Windows systems efficiently. It allows you to clone your Windows system, copy important files, and move your operating environment to a new SSD while keeping your applications, settings, and personal files.
Tip: Before cloning, check the amount of used space on your original drive. The destination SSD must have enough capacity to store all required Windows files and data.
Why Choose Cocosenor Backup Tuner for SSD Migration?
- • Clone Windows 11 to a new SSD without reinstalling Windows
- • Support SSD upgrades, including NVMe and SATA SSDs
- • Migrate system partitions and boot files required for Windows startup
- • Clone to a smaller SSD when the used space fits the destination drive
- • Backup and restore Windows data for additional protection
- • Keep your existing applications and settings after migration
Step 1: Install and launch Cocosenor Backup Tuner on your Windows PC. Meanwhile, connect the new NVMe SSD to your computer.
Step 2: Open Backup Tuner and you are in the default Copy function. Select your current Windows 11 drive as the source disk. Make sure you select the correct drive to avoid accidentally cloning the wrong disk.
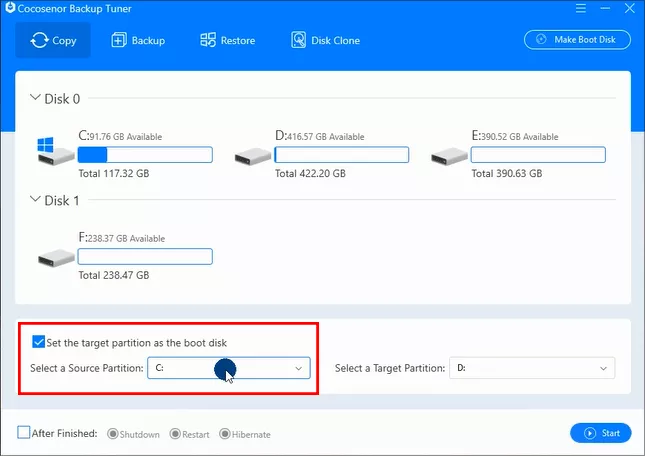
Step 3: Select the new NVMe SSD as the destination drive.
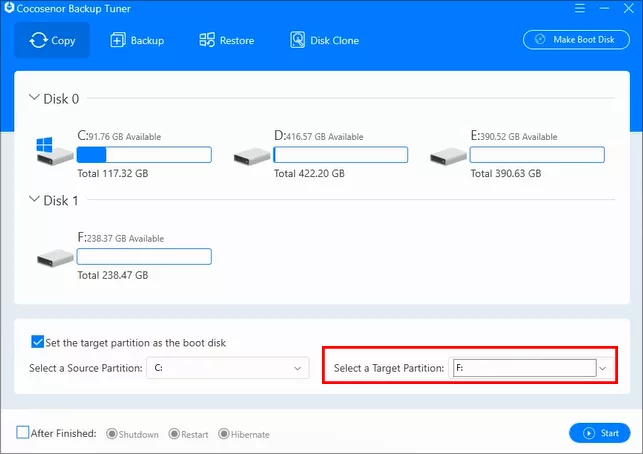
Step 4: Click the Start button to begin the cloning process and make a confirmation. The time required depends on amount of data, SSD speed, USB connection speed and computer performance.
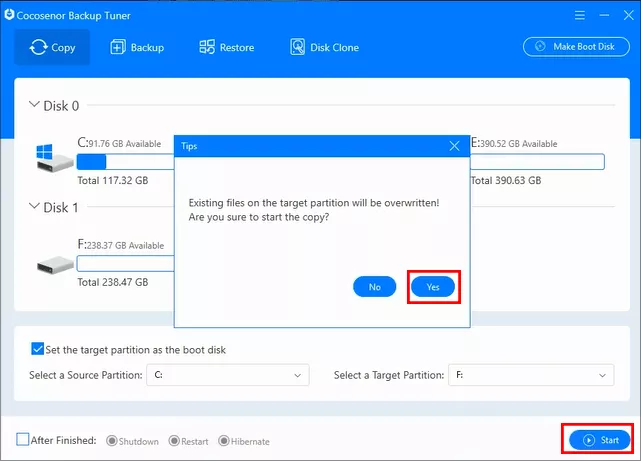
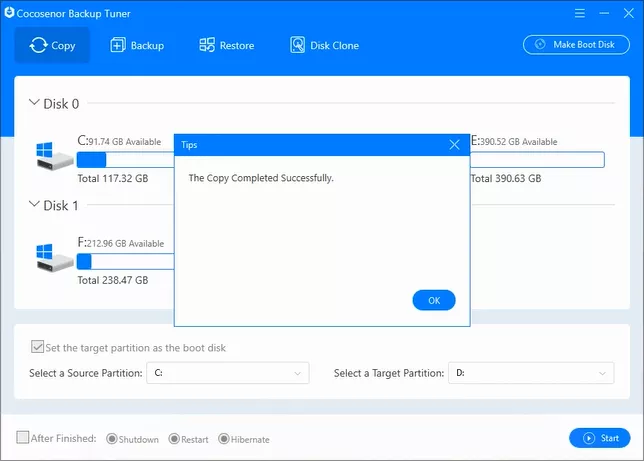
After the migration is complete, your Windows 11 system, installed programs, user accounts, and personal files will be available on the new NVMe SSD.
How to Boot Windows 11 from the Cloned NVMe SSD
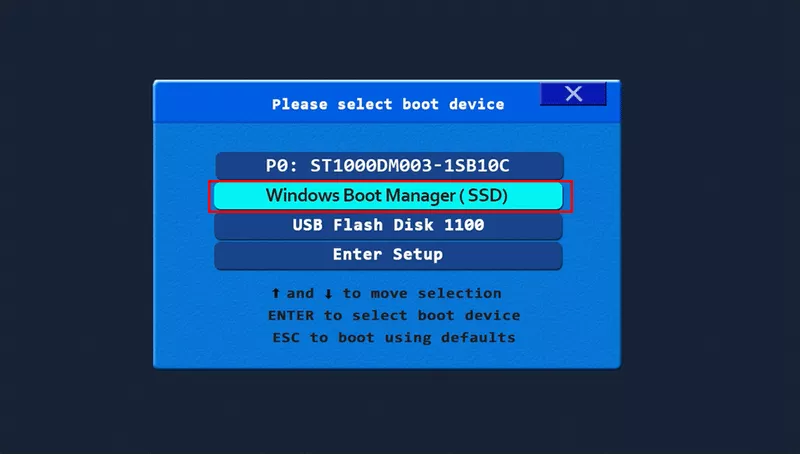
After cloning finishes, you can shut down your computer. If possible, remove the old SSD and install the new NVMe SSD. Otherwise, make the new NVMe SSD connected as the external hard drive. Then turn on your PC and enter BIOS/UEFI settings. Here, you need to select the new SSD as the first boot device. After that, save changes and restart. Windows 11 should start normally from the cloned SSD.
Why Does Windows 11 Fail to Boot After SSD Cloning?
Numerous users complete drive cloning successfully, only to find Windows 11 fails to boot from the new SSD. This usually happens because the cloning process did not correctly transfer important boot information.
Common causes include:
1. Missing EFI System Partition
Windows 11 normally uses UEFI boot mode and requires an EFI System Partition (ESP) to start. If this partition is not cloned correctly, the SSD may contain Windows files but cannot boot.
2. Incorrect Boot Order in BIOS
After installing the cloned NVMe SSD, your computer may still try to boot from the old drive. You may need to manually select the new SSD as the first boot device.
3. UEFI and Legacy Mode Conflict
Windows 11 requires UEFI mode on most modern computers. If your old installation uses UEFI but BIOS is set to Legacy mode, Windows may fail to load.
4. Incomplete System Clone
A normal file copy is not enough. A proper Windows migration must include: Windows system files, EFI partition, recovery partition, boot configuration data, installed applications and user files.
Fixes to Windows 11 Not Booting After SSD Clone
If your cloned SSD does not boot, try these solutions.
Fix 1. Check BIOS Boot Priority
Restart your PC, and press F2, F10, F12, or Delete during startup. Now Boot Settings is opened, you can select the cloned SSD as the first boot option. Finally, save the change and restart.
Fix 2. Enable UEFI Boot Mode
In your BIOS settings, make sure the boot mode is set to UEFI, secure boot settings are compatible, and GPT partition style is used.
Fix 3. Repair Windows Boot Files
If your cloned SSD contains Windows files but cannot boot, the EFI boot files or Boot Configuration Data (BCD) may be damaged.
1. Enter Windows Recovery Environment.
2. Select Troubleshoot > Advanced Options > Command Prompt.
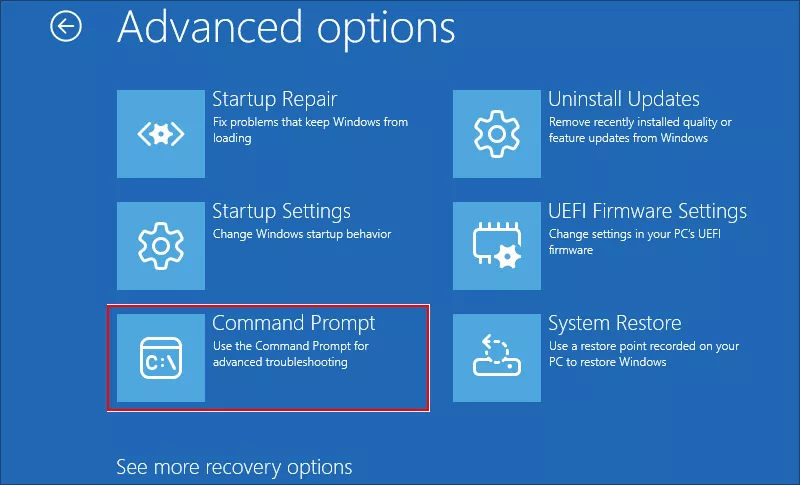
3. Run the following commands:
bootrec /scanosbootrec /rebuildbcdIf Windows 11 still does not boot, rebuild the UEFI boot files using:
bcdboot C:\Windows /s S: /f UEFIAfter completing the repair, restart your computer and select the cloned SSD as the boot device in BIOS.
Fix 4. Reconnect the SSD
Sometimes the SSD is not detected correctly. You can remove and connect the NVMe SSD again. Or change another USB port and update the BIOS firmware.
FAQs on Windows 11 Clone to a Smaller NVMe SSD
Q1: Can I migrate Windows 11 to SSD without reinstalling?
Yes. Disk cloning software, such as Cocosenor Backup Tuner, allows you to move Windows 11, applications, and personal files to a new SSD without reinstalling the operating system.
Q2: Will Windows 11 boot after cloning to an NVMe SSD?
Yes, if the cloning software correctly copies the Windows boot partitions and the BIOS is configured properly.
Q3: Why won’t my cloned SSD boot Windows 11?
Common reasons include incorrect BIOS settings, missing EFI partitions, incompatible boot modes, or incomplete cloning.
Q4: Do I need to activate Windows again after cloning?
Usually, Windows activation remains unchanged if you clone the same system to new hardware. However, major hardware changes may require activation verification.
Conclusion
Moving Windows 11 to a smaller NVMe SSD is completely possible and can save time compared with reinstalling everything from scratch. The key is using a proper cloning method that copies not only your files but also the Windows boot partitions required for startup.
Before cloning, make sure your data fits on the smaller SSD, use GPT/UEFI settings, and verify the new drive is selected as the boot device afterward.
With the right preparation and cloning software, you can upgrade to a faster NVMe SSD while keeping your Windows 11 system, applications, and files exactly as they were.