
Set and remove password protection for Excel 2013
This article will show how to set a protection password on an excel file/sheet/workbook for Office 2013, to prevent unauthorized person from reading, editing the data on Excel document. If don't need a password to protect your Excel files any more, remove the password from them following the instructions below.
This article mainly applies to Excel 2013, and the steps on Excel 2010, Excel 2013, and Excel 2016 are similar.
- Guide Steps
- Part 1: How to set and remove an opening password on Excel file
- Part 2: How to set and remove password protection on Excel sheet
- Part 3: How to set and remove password protection on Excel workbook
- Part 4: How to protect Excel workbook from modifying
- Part 5: Easily set and remove password protection on Excel files in bulk
Part 1: How to set and remove an opening password on Excel file
How to Set an encrypted password on Excel file 2013
1. Click File > Info > Protect Workbook > Encrypted with Password.
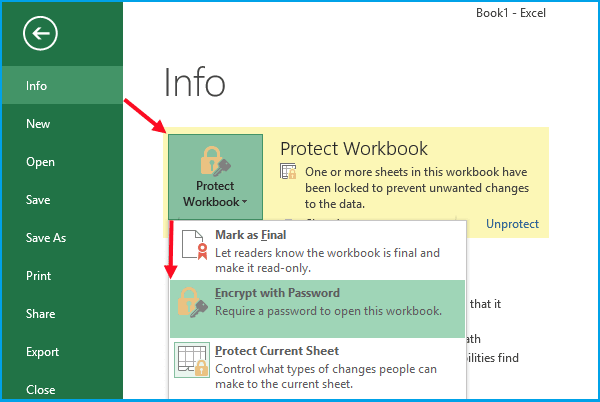
2. Enter and reenter the encrypting password.
After setting encrypted password on Excel file, you will need to enter the password to open the excel file, or you can't read it.
The Excel file can't be opened without password, so restore the password to a safe place. However, if forgot the opening password, see How to open the protected excel file if forgot password.
How to Remove opening password from Excel file 2013
1. Open the Excel file with password, click on File > Info> Protect Workbook > Encrypted with Password.
2. Clear the password from the text box on the Encrypt Document dialog, and then click on OK.
After removing password, everyone who can reach the Excel file, can open, read, and edit it too.
On MS Excel 2013, you can't remove the opening password directly without the old password, so if you forgot Excel file 2013 opening password, try to recover the forgotten password with Excel Password Tuner, and then remove password following the steps above.
Part 2: How to set and remove password protection on Excel sheet
How to Set a password to protect Excel sheet from editing
1. Click on Review > Protect Sheet.
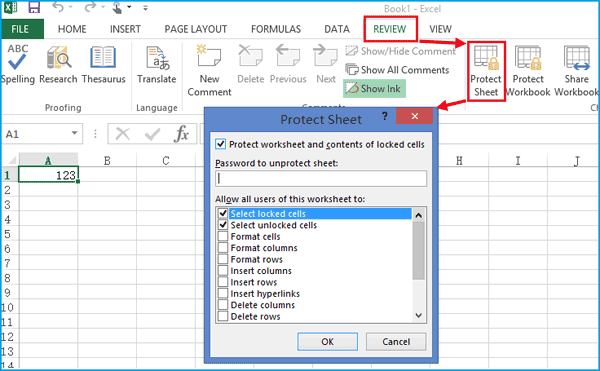
2. Enter the password and remember to check the options to allow users of this worksheet to do.
If the Excel sheet is protected with a password, then the content on the sheet can't be edited, and it is read-only until you unprotect the sheet. Save the password to a safe place, because you can't unprotect the sheet on Excel 2013 without password, unless you get help with Workbook Unprotect Tuner.
How to Remove password protection from Excel sheet
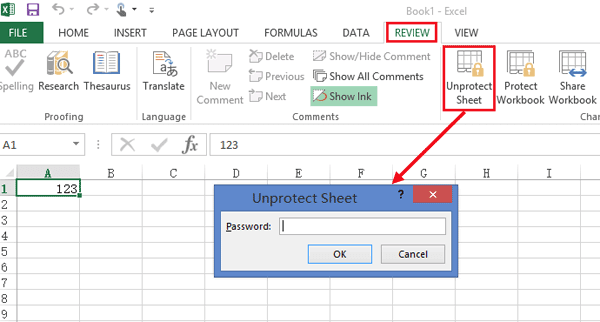
1. Click on Review > Unprotect Sheet.
2. Enter the unprotect password, and click on OK or press Enter.
And then the Excel sheet can be edit again. If forgot the unprotect password, you can try to copy the content to a new excel sheet to edit it. Or Unprotect you Excel sheet with Workbook Unprotect Tuner.
Part 3: How to set and remove password protection on Excel workbook
How to Password protect Excel workbook structure from editing
1. Click on Review > Protect Workbook.
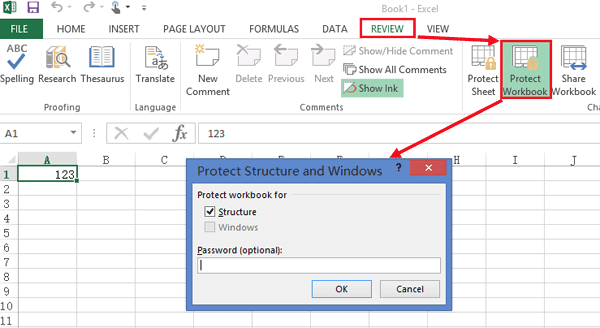
2. Enter and reenter the password to protect the workbook structure.
If the workbook is password protected, you can't delete or add worksheet on the workbook, unless the workbook is unprotected. The workbook can't be unprotected without password, unless get help with tool, so save the protection password to a safe place.
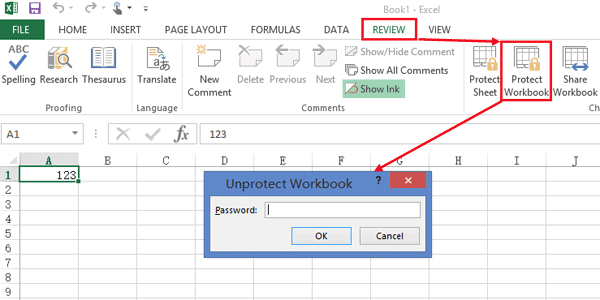
How to Remove password protection from Excel workbook
1. Click Review > Protect Workbook.
2. Enter the password to unprotect workbook and click on OK or press Enter.
Part 4: How to protect Excel workbook from modifying
1. Click on File > Save as.
2. Click on Tools on the left side of Save button, and then select General Options.
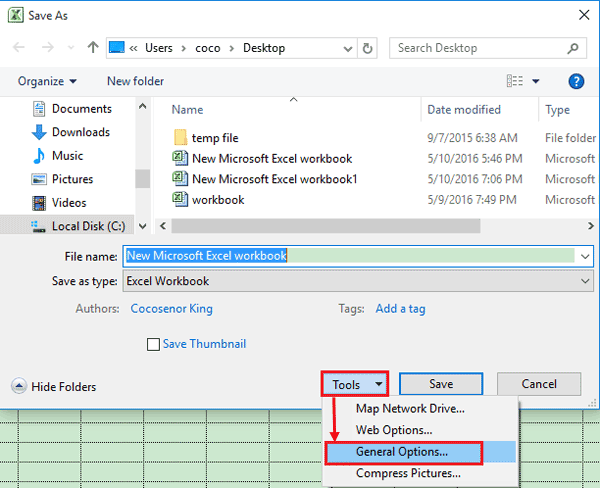
3. Type the password on the Password to modify box. The read-only option is recommended.
If open the workbook on the read-only mode, then everything on it can't be modified.
Part 5: Easily set and remove password protection on Excel files in bulk
If you have a great number of Excel documents and you want to attach great protection to them, Cocosenor File Lock Tuner can help you. You can easily set the password to encrypt Excel files in bulk. What you need to do is put the Excel files into a folder in advance. Of course, you can easily remove the password protection on Excel files if needed.
How to Set the password on Excel files in bulk.
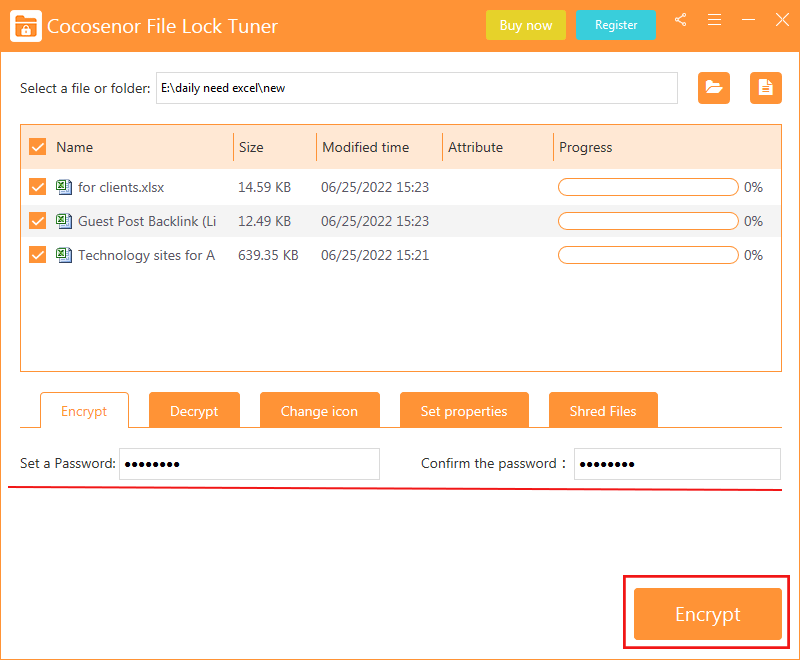
1. Open File Lock Tuner and click the Folder icon to import your Excel files.
![]()
2. Check Excel files you want to password protect.
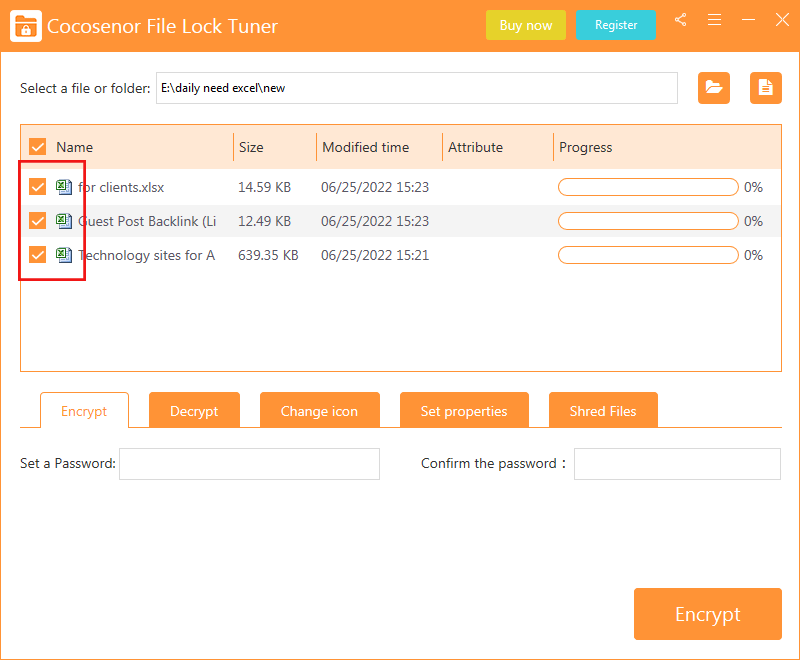
3. Enter the password twice and click the Encrypt button.
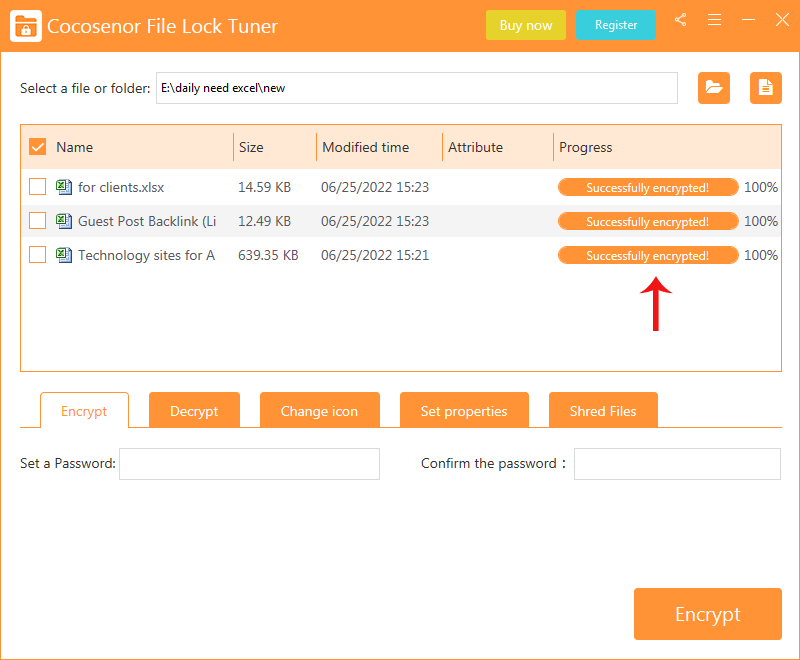
4. Minutes later, all Excel files are encrypted with the same password. But you should note that all encrypted Excel files are kept as the inaccessible file format—XEP. It is better for you to delete the original files for the data security.
How to Remove the password protection on Excel files in bulk.
If you want to reach the content on the encrypted Excel files which is password protected by File Lock Tuner, you need to decrypt them and get back those files in Excel format without protection.
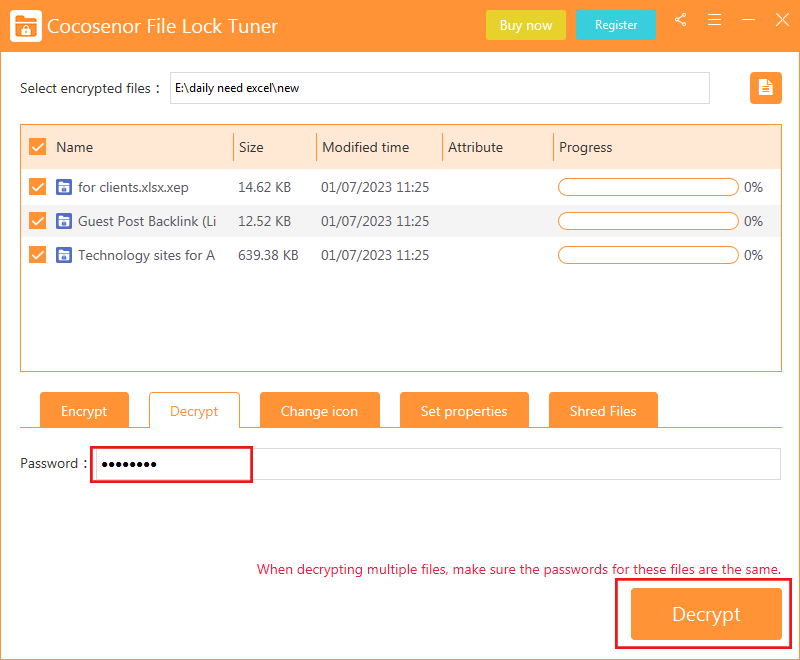
1. Run the software and then click the Decrypt tab.
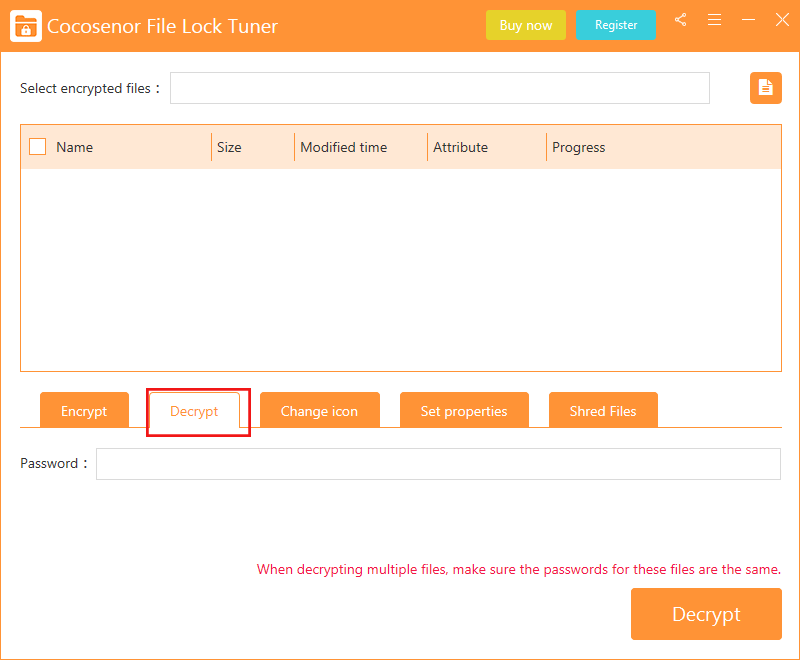
2. Hit on the file icon and then choose the encrypted Excel files which are encrypted in bulk before.
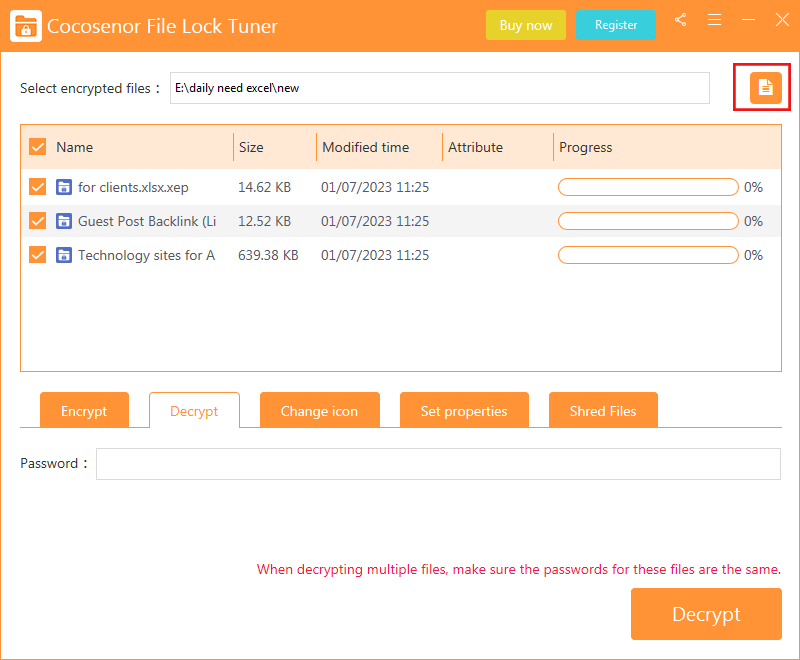
3. Enter the correct password and click the Decrypt button on the bottom right.
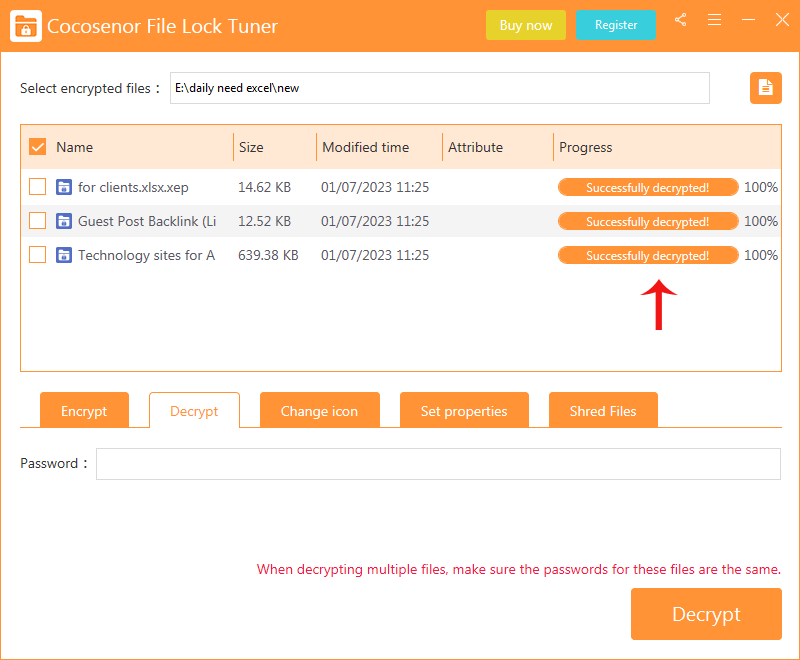
4. In minutes, the XEP files are decrypted. You can get back the Excel content in Microsoft Excel type.
Related Articles
- How to unprotect Excel Workbook and Worksheet with or without password
- Remove MS Access database protected password
- Remove password protection from PowerPoint 2013, 2016
- Remove Protection Password from Word 2016 Document
- How to Open a Password Protected Excel File if Forgot Password
- How to extract password protected RAR files without password
- How to unzip password protected zip file without password
- How to open password protected PDF file without password

