
How to Create Windows 11 Bootable USB from ISO File
If you have Windows 11 bootable USB on hand, what can you do with it? Most people say they can clean install or reinstall Windows 11 OS easily. Besides, it is also possible to upgrade the Windows OS or troubleshoot your PC with such bootable USB. Beyond these, you can even directly run Windows 11 from the bootable USB without installing on PC now. How can you do that? Here are three methods to teach you how to create Windows 11 bootable USB from ISO image file.
- How to Create Windows 11 Bootable USB from ISO File
- Before—How to Download Windows 11 ISO Image File
- Method 1: Create Windows 11 Bootable USB with Rufus
- Method 2: Create Windows 11 Bootable USB via Cocosenor OS2Tuner
- Method 3: Create Windows 11 Bootable USB via Cocosenor ISOTuner
- Method 4: Create Windows 11 Bootable USB using Windows PowerShell
Before—How to Download Windows 11 ISO Image File
To create the Windows 11 bootable USB drive, you need to download the Windows 11 ISO image in advance. It is necessary to get the official Windows 11 ISO file to make the bootable USB.
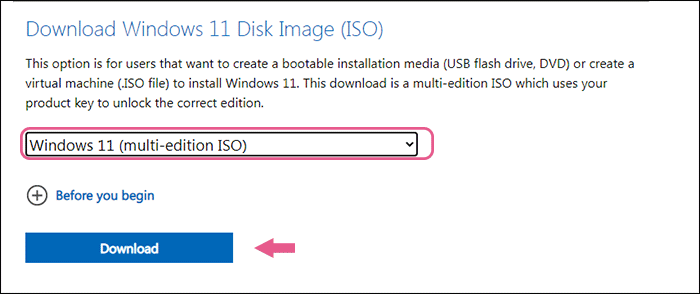
Step 1: Visit Microsoft Windows 11 official website and then go to Download Windows 11 Disk Image (ISO) section and select Windows 11 (multi-edition ISO) from the drop-down menu.
Step 2: Click the Download button.
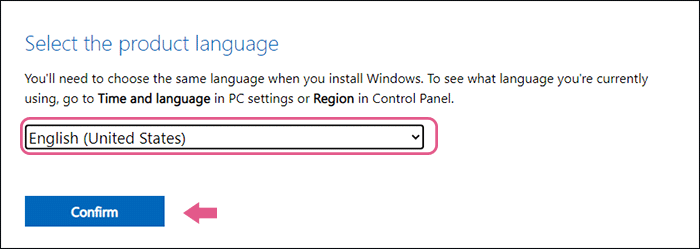
Step 3: Select the language you are currently using and click the Confirm button.
Step 4: Click 64-bit Download button and the ISO image file will be downloaded immediately.

It may take some time to download this Windows 11 ISO image file. You just need to wait patiently.
Method 1: Create Windows 11 Bootable USB with Rufus
Rufus is the free utility for you to create Windows 11 bootable USB flash drive. You can create a bootable USB drive for standard Windows 11 installation or extended Windows 11 installation. Besides, you can also make the Windows 11 directly run from the bootable USB. Rufus has added the Windows To Go options for all users.
Step 1: Download Rufus latest version from its official website.

Step 2: Open Rufus program and then connect the USB flash drive to your computer. When Rufus detects it, it will appear in the Device section.

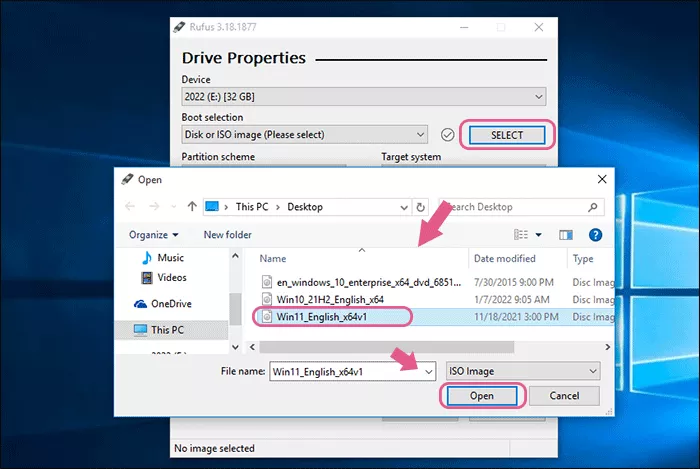
Step 3: Click the SELECT button in Boot selection section and then choose the downloaded Windows 11 ISO file to open.
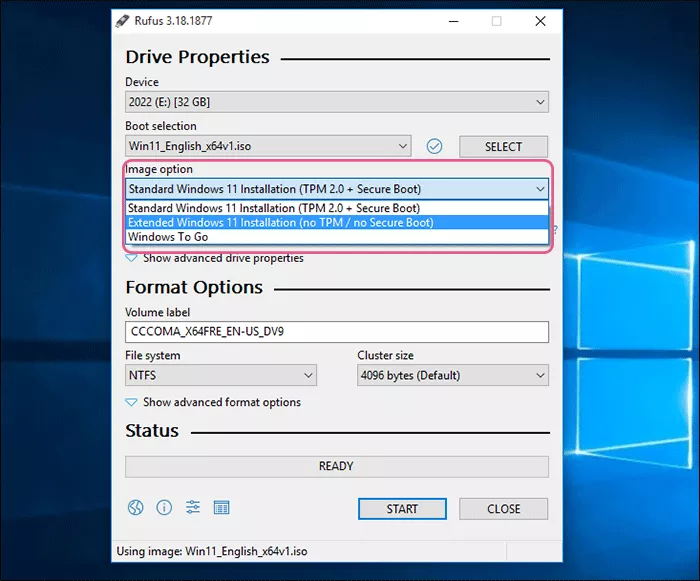
Step 4: After the Windows 11 ISO image file is imported, you can click the drop-down under the Image option to select one option you need:
- 1. Standard Windows 11 Installation (TPM2.0 +Secure Boot): This option allows you to install Windows 11 to any computer that has enabled TPM2.0 and secure boot after the bootable USB is created.
- 2. Extended Windows 11 Installation (no TPM/ no Secure Boot): You can create a bootable USB for a computer that does not meet Windows 11 system requirement. With such bootable USB, you can bypass the system requirement to install Windows 11.
- 3. Windows To Go: If you choose this option, Rufus will directly burn the ISO image file into your USB drive and make it bootable. After that, you can boot any computer from this USB and run Windows 11 directly without installing on the computer.
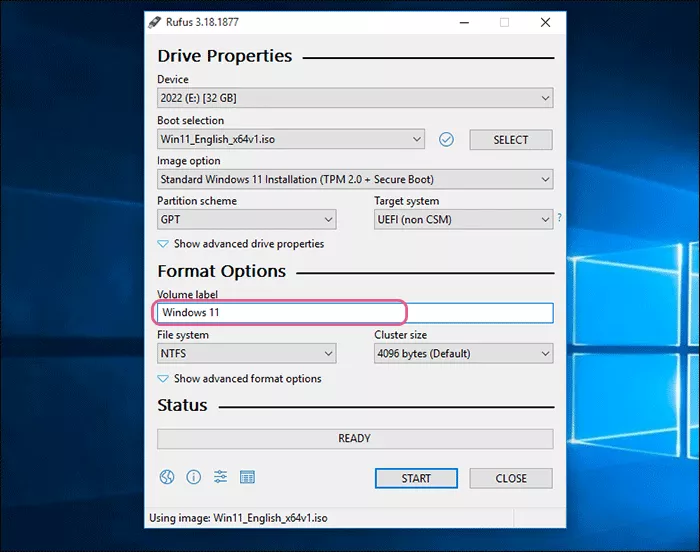
Step 5: You can leave the Partition scheme, Target system, File system, and Cluster size as default. It is better to enter a name for your bootable USB drive under Volume label.
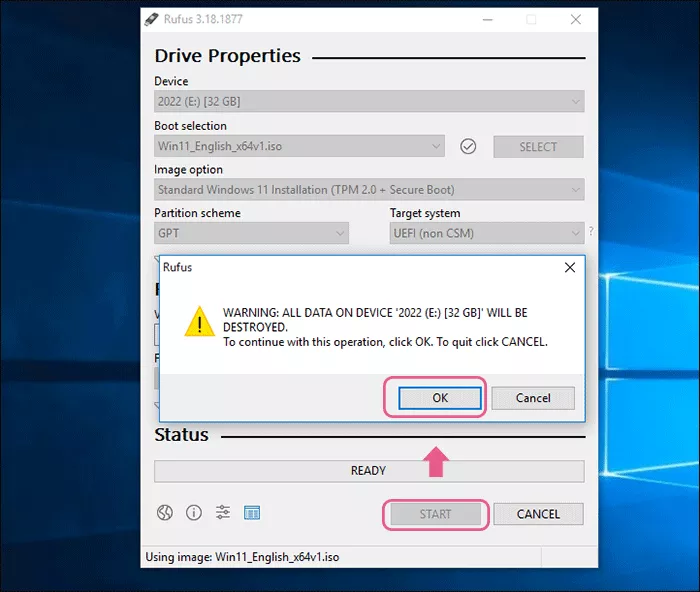
Step 6: Click the Start button and you will get the formatting warning. Just click OK to continue. Then you can just wait for Windows 11 bootable drive to build successfully.
Method 2: Create Windows 11 Bootable USB via Cocosenor OS2Tuner
Cocosenor OS2Tuner is the Windows To Go creator that can help to make bootable and portable USB drive from ISO image file. It is compatible with Windows 7/8/8.1/10/11 computer. You can use it to create a Windows 11 bootable USB which you can use directly at anywhere. As for the USB drive, it is better for you to get a USB hard drive or a USB flash drive in large size.
Step 1: Plug a large USB drive into the computer and then get Cocosenor OS2Tuner from its official website. It takes a few minutes for you to finish the installation.
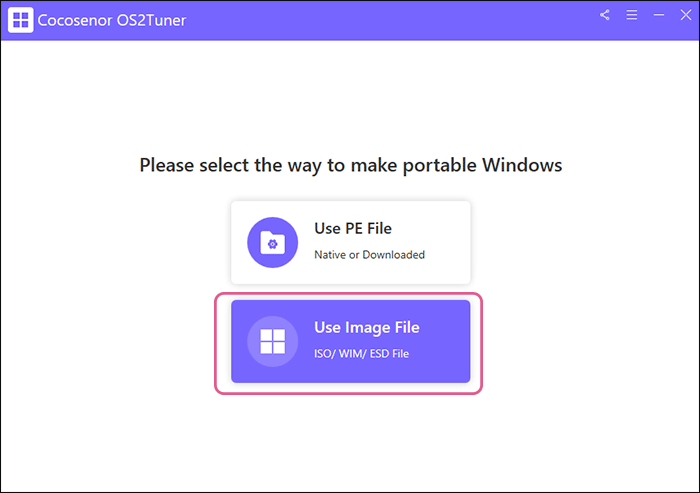
Step 2: Run Cocosenor OS2Tuner program and then choose Use Image File option from the home screen.
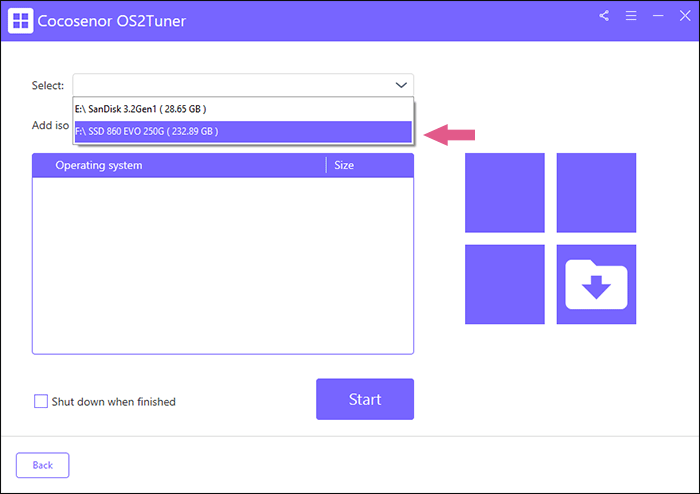
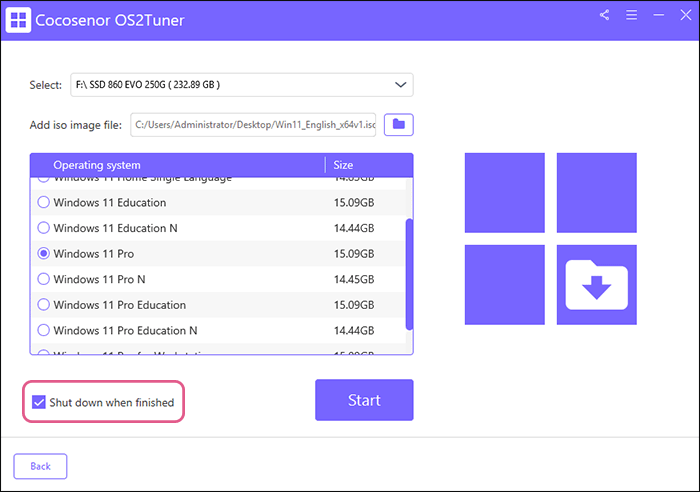
Step 3: Choose your USB drive from the drop-down menu in Select section.
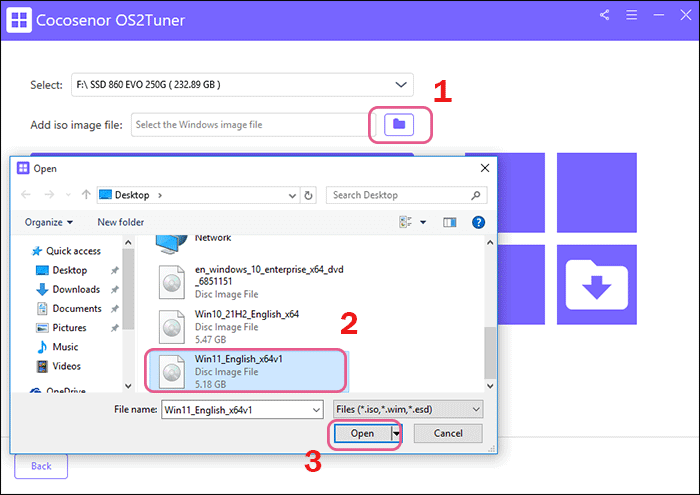
Step 4: Hit the folder icon and then choose the Windows 11 ISO image file to open. After that, the software will decompress the ISO image file.
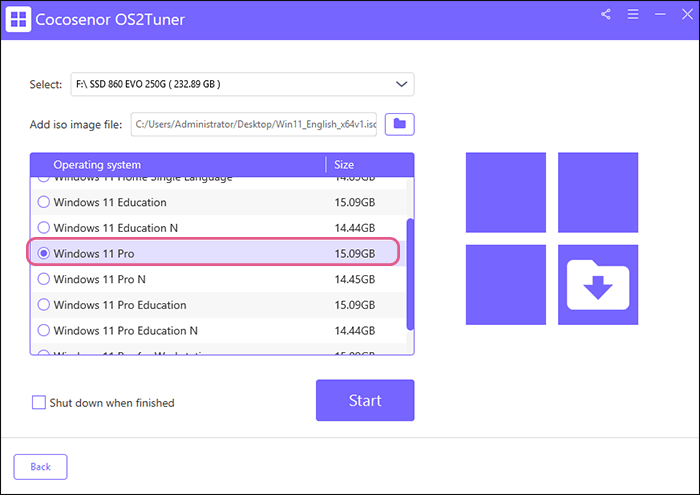
Step 5: After that, you need to select the Windows 11 edition that you want to install on the USB drive.
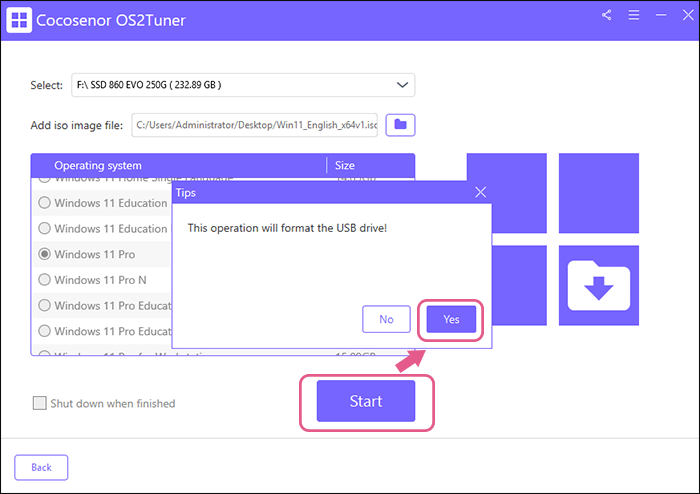
Step 6: Click the Start button and then you will be informed that the USB will be erased. Click Yes to go ahead.
If you have no time in waiting for the USB bootable drive creation, you can check the box of Shut down when finished option before clicking the Start button. In this way, the computer will automatically shut down when bootable USB is created.
Step 7: The Windows 11 bootable USB is made. You can disconnect the USB drive and then take it to any Windows computer to boot into Windows 11.

Method 3: Create Windows 11 Bootable USB via Cocosenor ISOTuner
Cocosenor also develops a free ISO to USB burner—ISOTuner for Windows users to create bootable USB from iSO file. After the creation, you can use the bootable USB to install or reinstall Windows 11.
Step 1: Download and install this software on your computer. Then run it and add the ISO file from your Windows computer.
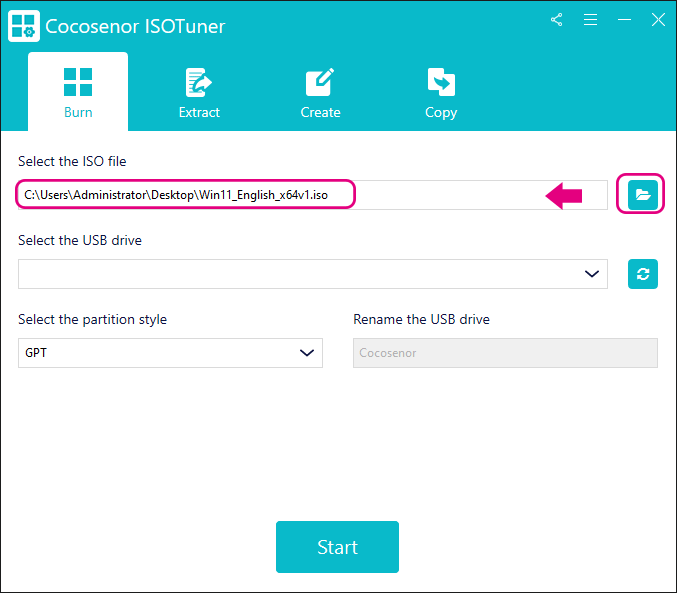
Step 2: Plug in the USB drive and then select it.

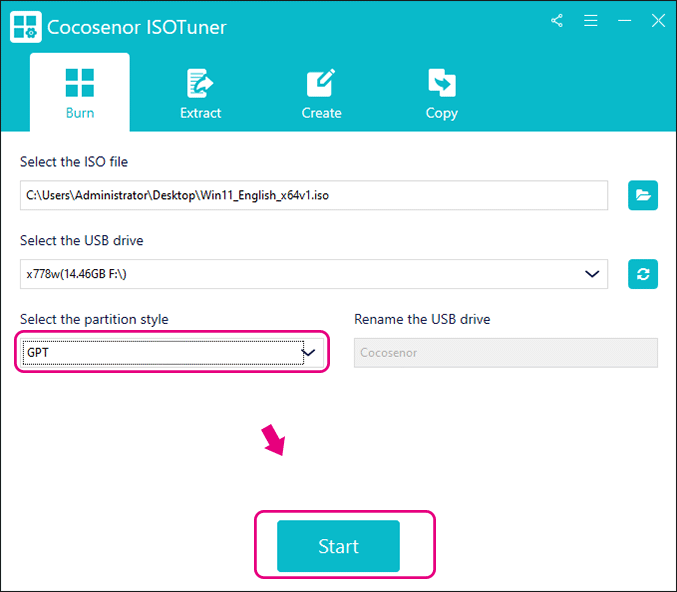
Step 3: Change the partition style and click the Start button.
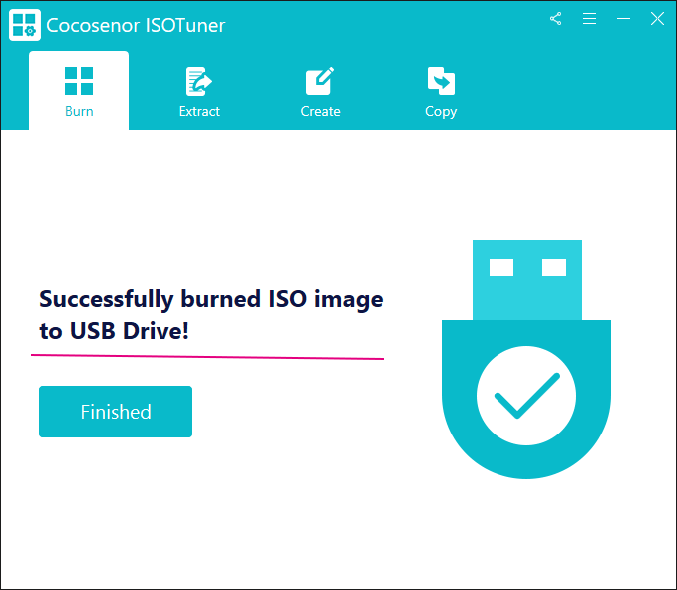
Step 4: Just wait minutes and the burning would be complete.
Method 4: Create Windows 11 Bootable USB using Windows PowerShell
If you do not want to use a third-party tool to create a Windows 11 bootable USB from ISO image file, you can use Windows PowerShell to make it done. But this process will be time wasting for the people who knows nothing about the computer.
Step 1: Run Windows PowerShell as the administrator.
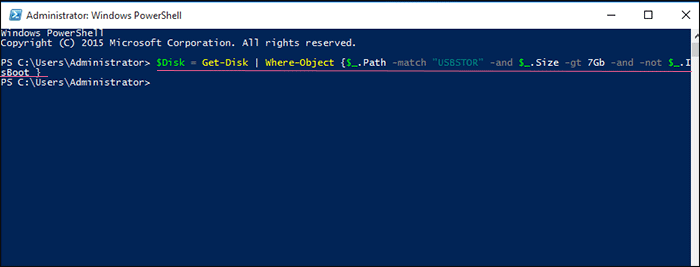
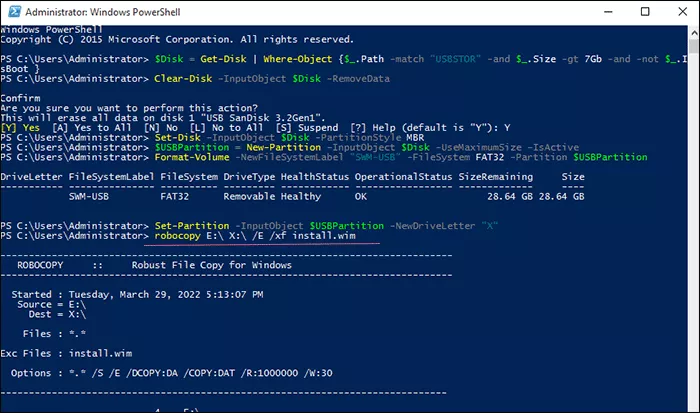
Step 2: Input the following command and press Enter: $Disk = Get-Disk | Where-Object {$_.Path -match "USBSTOR" -and $_.Size -gt 7Gb -and -not $_.IsBoot }
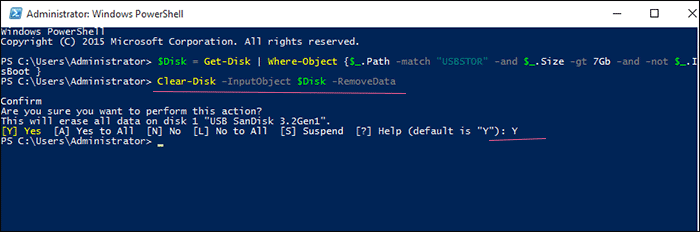
Step 3: Execute the command line to clean USB drive: Clear-Disk –InputObject $Disk –RemoveData
Step 4: In no time, you will be asked for the confirmation to erase all data on the USB drive. Type in Y and then press Enter key. The formatting will be finished in minutes.
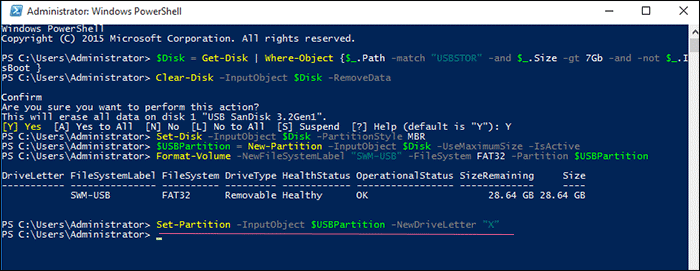
Step 5: Execute the command line to set the partition style of USB drive to be MBR: Set-Disk –InputObject $Disk -PartitionStyle MBR
Step 6: Execute the command line to create new partition in the USB drive and active the partition: $USBPartition = New-Partition –InputObject $Disk -UseMaximumSize –IsActive
Step 7: Execute the command line to set the USB label as SWM-USB and format the partition as well as set its file system to FAT32: Format-Volume -NewFileSystemLabel "SWM-USB" -FileSystem FAT32 -Partition $USBPartition

Step 8: Execute the command line to set the drive letter of the USB drive as X: Set-Partition -InputObject $USBPartition -NewDriveLetter "X"
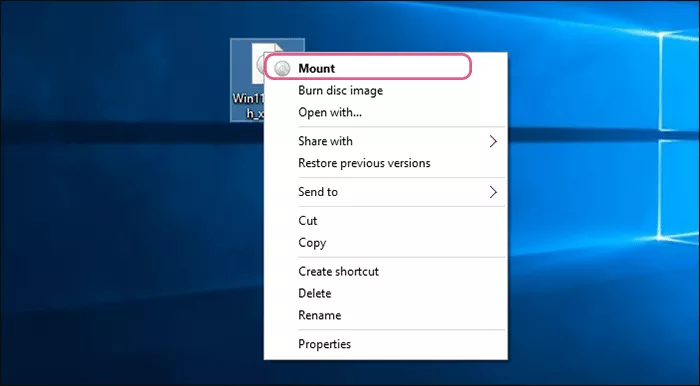
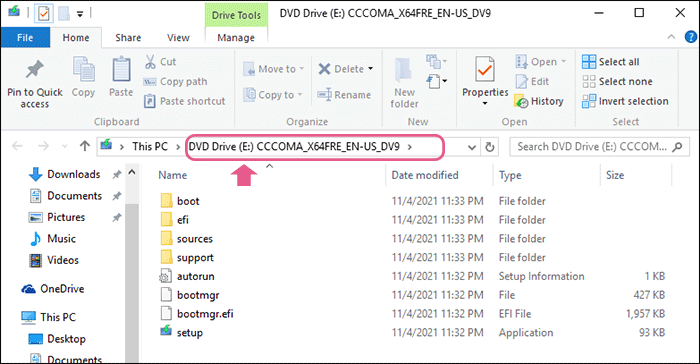
Step 9: Go to find the downloaded Windows 11 ISO image file on your computer. Then right click it and choose the Mount option.
Step 10: After it is mounted, you can check its drive letter is E. Keep E in mind as the drive letter of the mounted files.
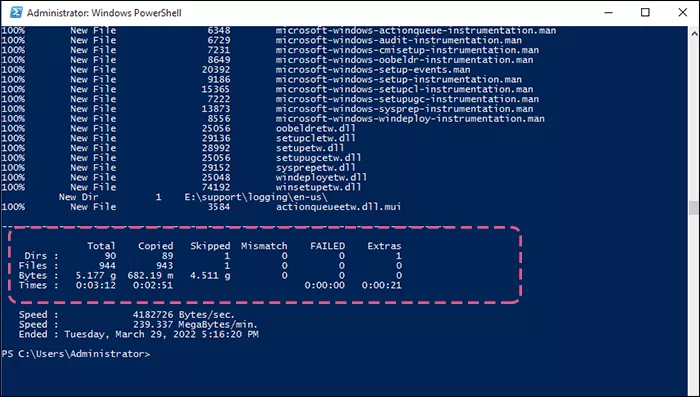
Step 11: Go back to Windows PowerShell and then execute the command line to copy all mounted files except install.wim to your USB drive: robocopy E:\ X:\ /E /xf install.wim
Minutes later, you get all required files copied to the USB drive.
Step 12: Execute the command lines to copy install.wim to your USB drive: Dism /Split-Image /ImageFile:E:\sources\install.wim /SWMFile:X:\sources\install.swm /FileSize:2500
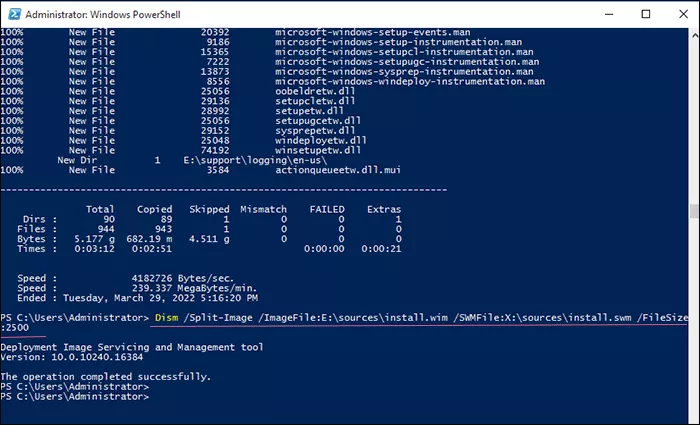
Now, you succeed in creating the Windows 11 bootable USB via the Windows PowerShell. You can make use of this bootable USB to install Windows 11 if the computer meets Windows 11 requirement.
