- Backup
- More Tools
- Support
- Store
If your iOS devices, such as iPhone and iPad, are encountering the following issues: iPhone cannot turn on, iPhone restart, stuck on recovery mode/spinning wheel/Apple logo/boot loop and receiving the iTunes errors etc., you can use this iOS repair software –Cocosenor iOS Repair Tuner to get it to normal.
![]()
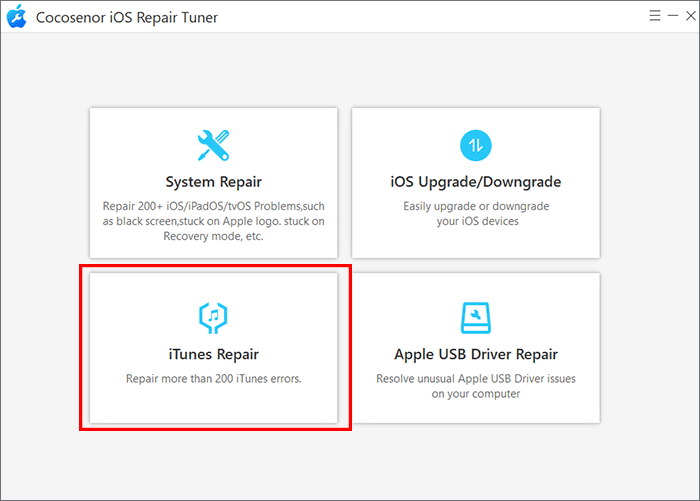
Cocosenor iOS Repair Tuner is designed to fix all kinds of iOS system issues and iTunes errors on iOS devices. Also, it can help iPhone/iPad users to upgrade or downgrade the iOS/iPadOS version without jailbreak. You can learn details below.
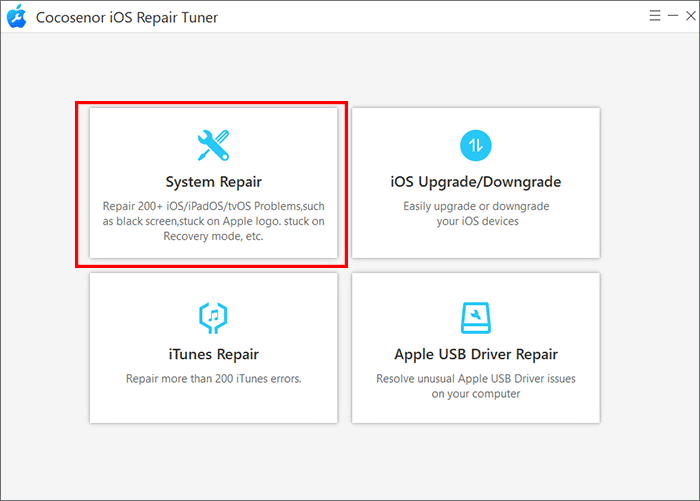
You need to download the software and then install it on your Windows computer. After the installation, you can launch the software and select System Repair on the Home page.
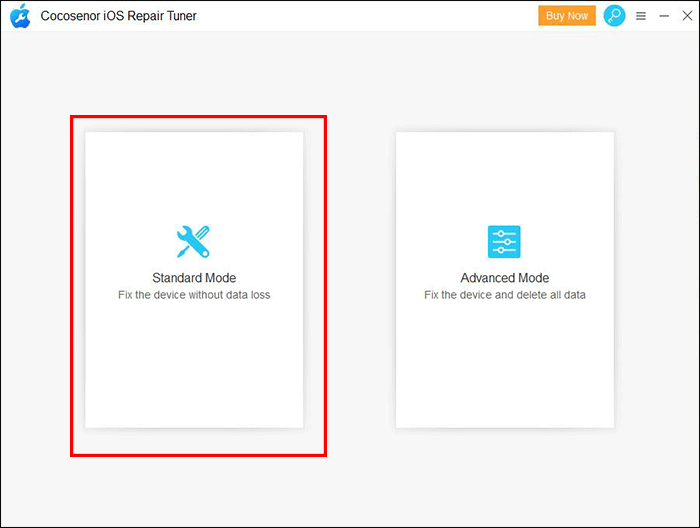
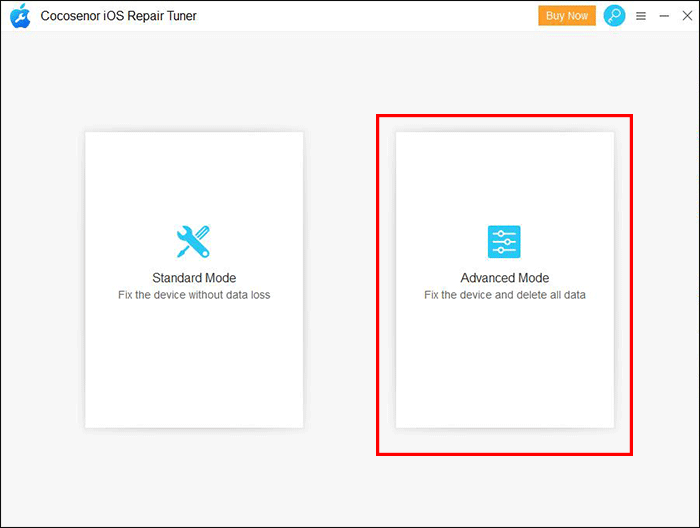
Then select Standard mode , This mode will not delete your iPhone data after repairing.
Notice: Make sure iTunes is installed on your Windows computer.
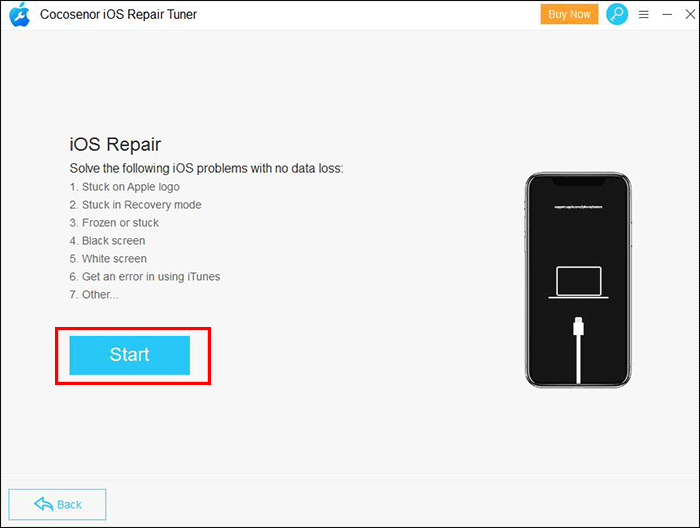
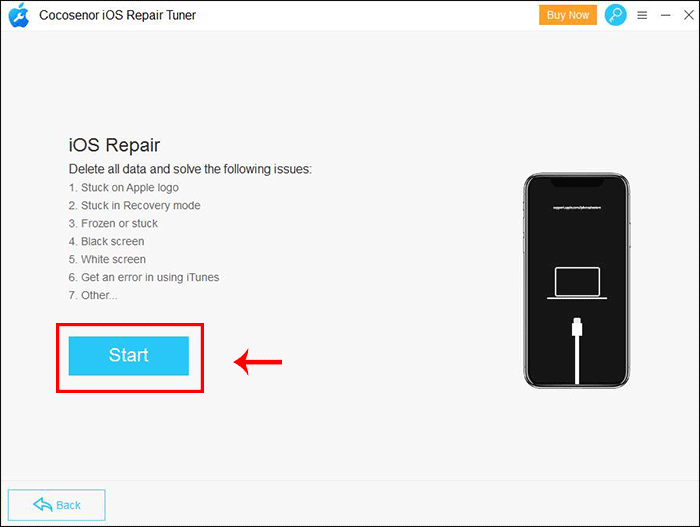
You need to click the Start button for iOS repair.
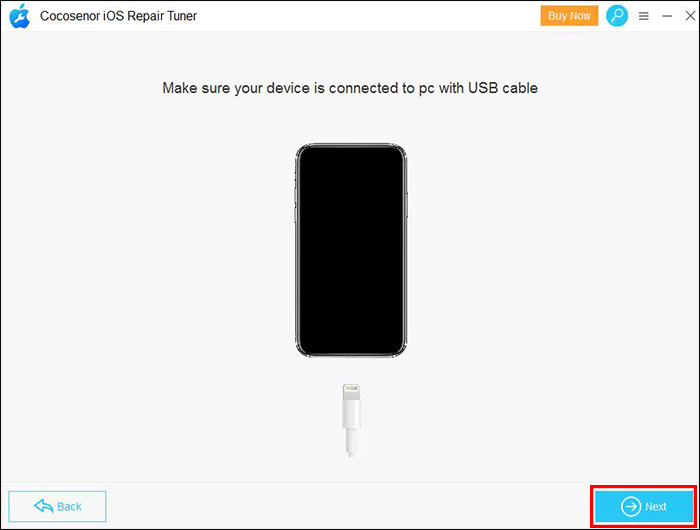
After you click the Start button, you will see the screen which asks you to connect the device to PC via USB cable. When you finish building the connection, you can click the Next button.
Then the program will move on to the next step. If not, you will be asked to put your device in DFU or Recovery Mode. The on-screen instruction will show you the details to make your device in DFU or Recovery Mode.
Here is how to put your iPhone into recovery mode.
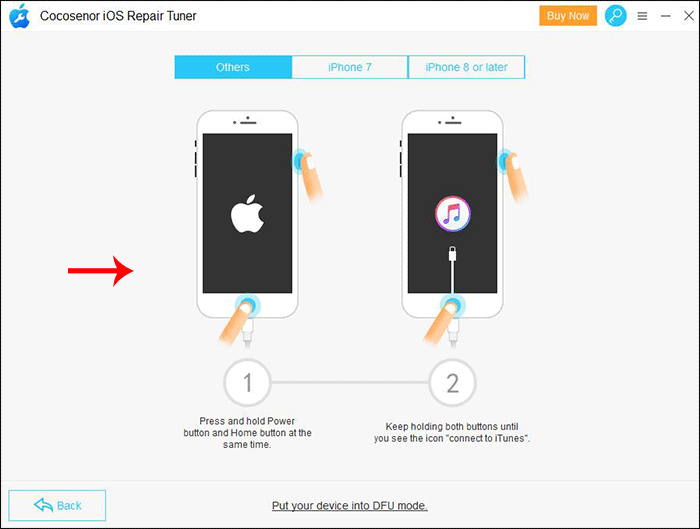
Here is how to put your iPhone into DFU mode.

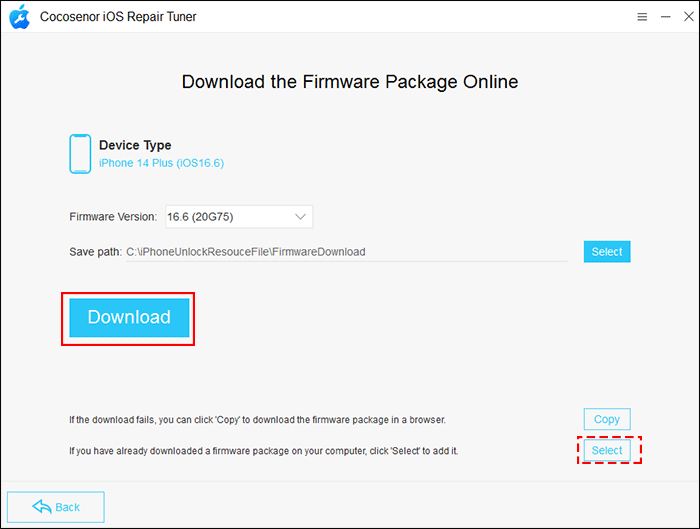
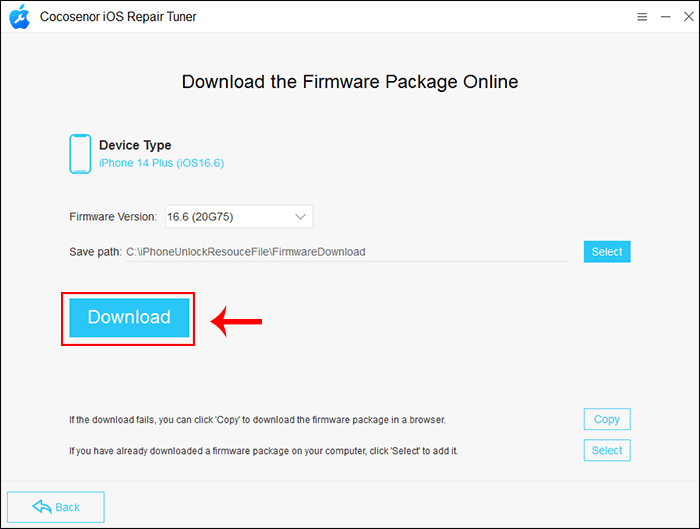
Now your iPhone device will be recognized and the firmware version will be automatically detected. You can click the Download button to get the firmware package online. Of course, you can set the Save path for the package.
If you have already downloaded a firmware package on your computer, you can click the Select button on the bottom right corner to add it.
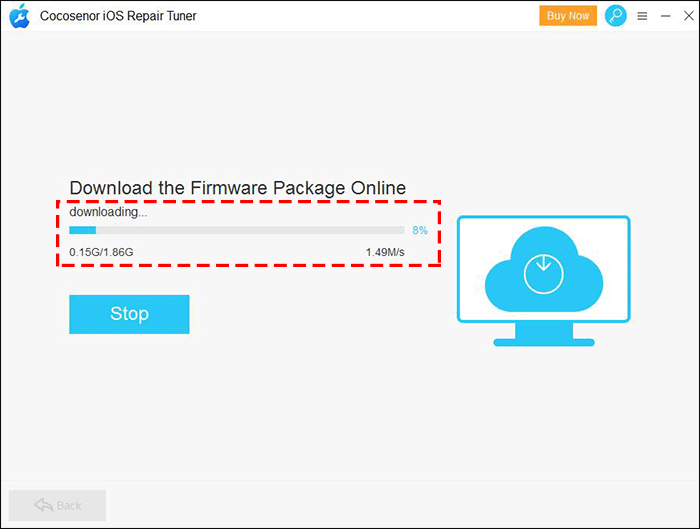
The download process will take several minutes.
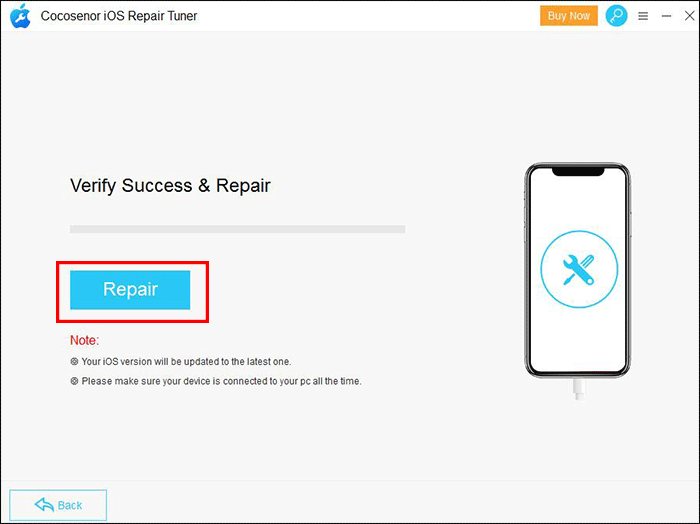
When the firmware is verified successfully, you will go to the repair interface. You can click the Repair button to get the iPhone to normal.
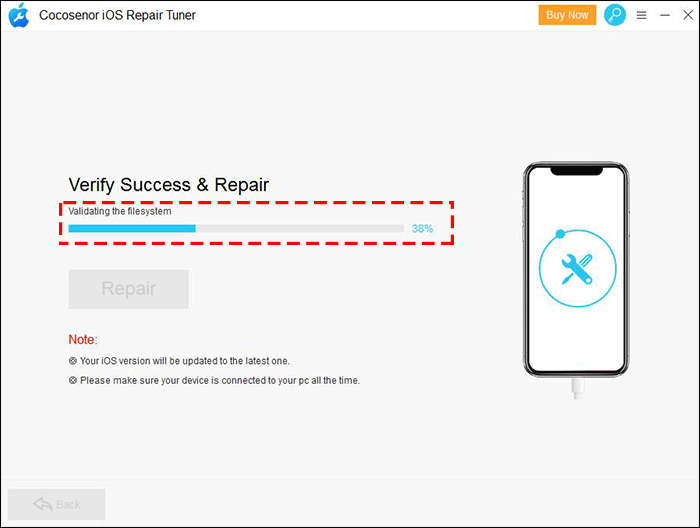
The program will automatically start to fix the iPhone. And you need to make the iPhone connected during this process.
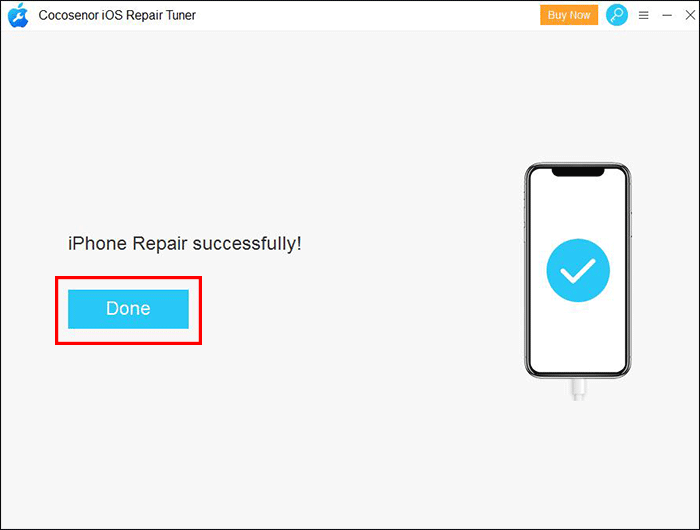
When you get the successful prompt, you can check whether your device can turn on normally or not after the repairing.
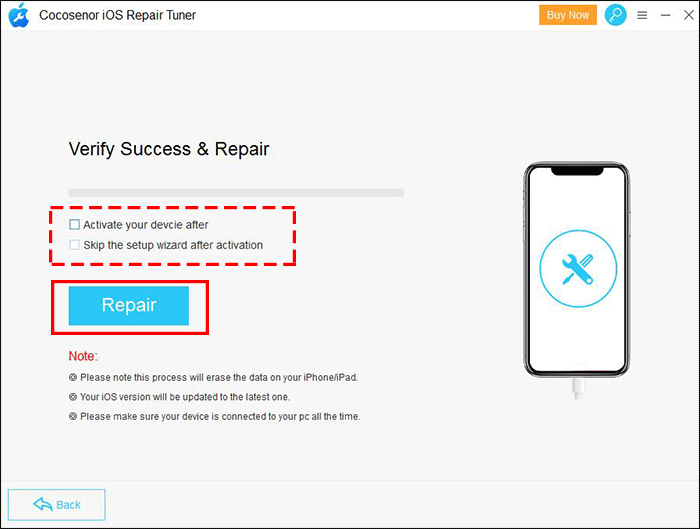
If the Standard Mode cannot help you to fix the iPhone issues, you can use the Advanced Mode. Firstly, you should know that this repair process will delete all your data from the iPhone.
Here you can check the option Activate your device and Skip the setup wizard after activation. After that, click the Repair button to begin the repairing process.
Minutes later, your iPhone is repaired successfully and restart normally.
If you fail to upgrade the iOS version in your iPhone software update section, you can simply upgrade the iOS to a signed IPSW with this software. And, there is no data loss during the entire process.
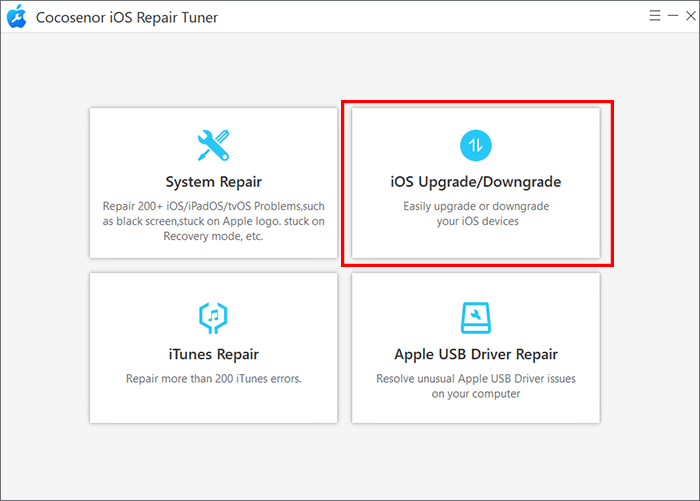
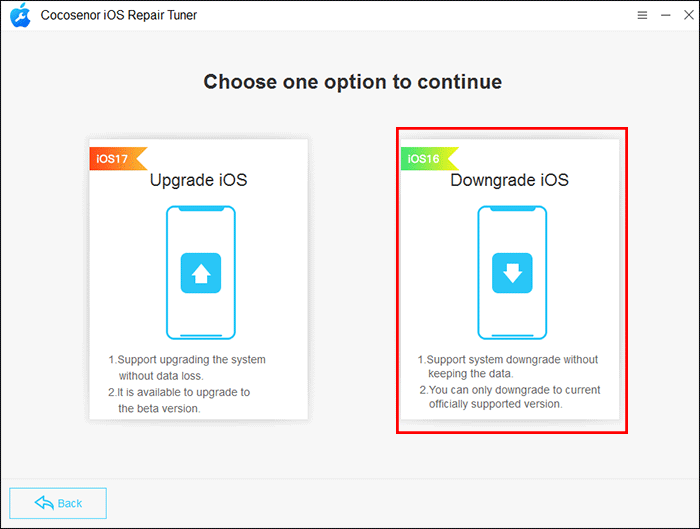
After installing the software on your Windows computer, you can double-click to run the program and choose iOS Upgrade/Downgrade option on the right side.
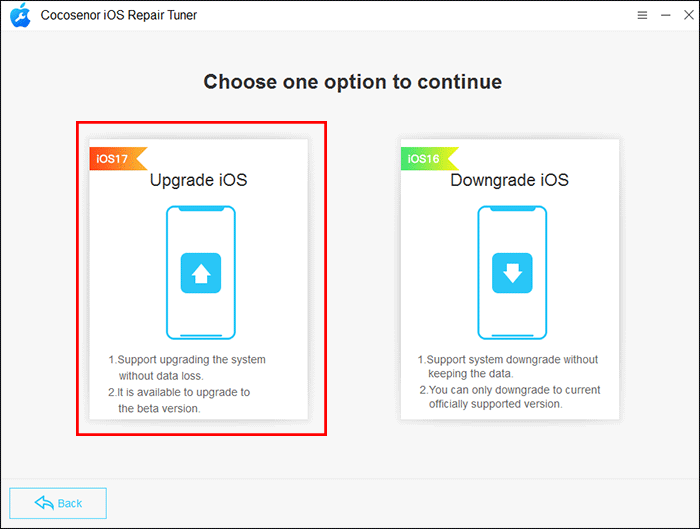
There are two options for you to choose. You can choose Upgrade iOS to updating the iOS to iOS 27 if the iPhone model is supported. Yes, it is possible to update the iPhone to any beta iOS version.
You should build the connection between the computer and your iPhone. After that, unlock your iPhone if there is screen lock and tap Trust on the Trust prompt. Then you can go back to the software and click the Next button to proceed.
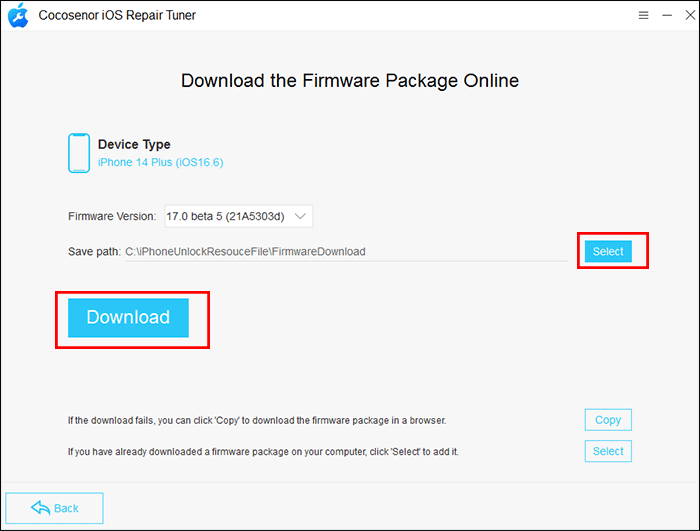
In this interface, you can know the current iOS version and the upgradable versions in the drop-down menu. You can choose one for your iPhone.
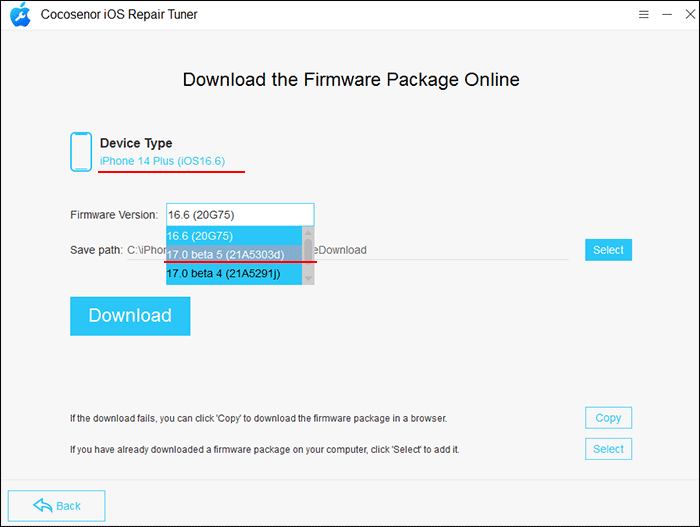
After that, you can change the save path to keep the downloaded firmware by clicking the Select button. When everything is ready, you can click the Download button to download the firmware software. It will take minutes to finish the downloading.
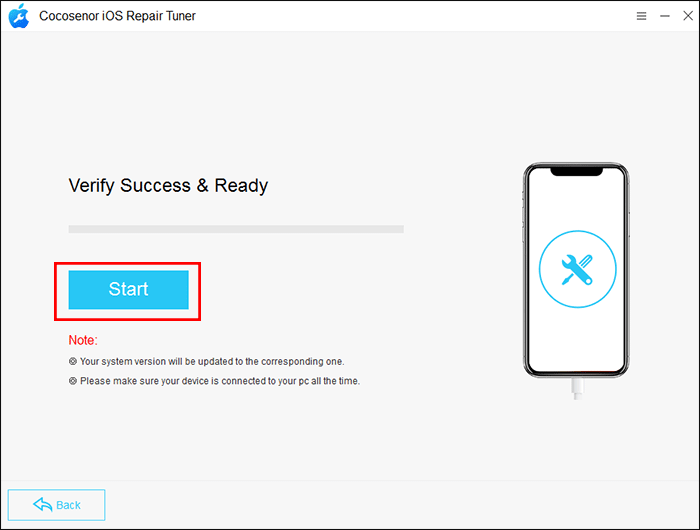
Minutes later, the downloading process ends. And the software will automatically verify the firmware. Finally, you can hit on the Start button to begin updating the iOS version to the corresponding one.
When you get the successful message on the software, your iPhone will restart and attempts data recovery. Minutes later, you will see the message—Software Update Complete Your iPhone has been updated to iOS 27.0. You can tap Continue to access your iPhone.
If you want to get rid of the new beta version of iOS and revert to the previous one, how can you do that? Cocosenor iOS Repair Tuner can help you to do that. You can downgrade the iOS version to any supported version.
Open the software and choose iOS Upgrade/Downgrade on the main interface.
Then click on Downgrade iOS option on the right side.
Plug the USB cable of your iPhone into the computer. Meanwhile, you should enter the screen password to unlock it. If it asks you to trust the computer, tap on Trust. After that, click the Next button on the software. Soon, your iPhone details will be loaded.
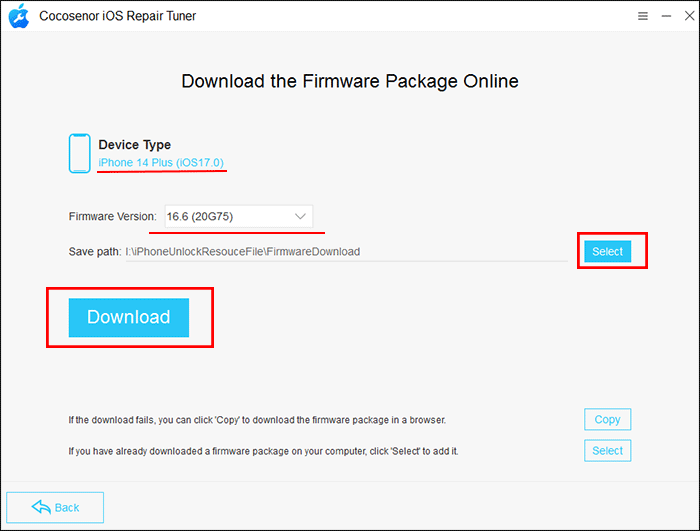
The current iOS version of your iPhone is displayed here. Besides, in the Firmware Version part, you can click the down-arrow to get more options. Just choose the one you want. After that, you need to hit on the Select button behind the Save path field to set the destination to save the firmware package. Now, you can click the Download button to get the firmware package.
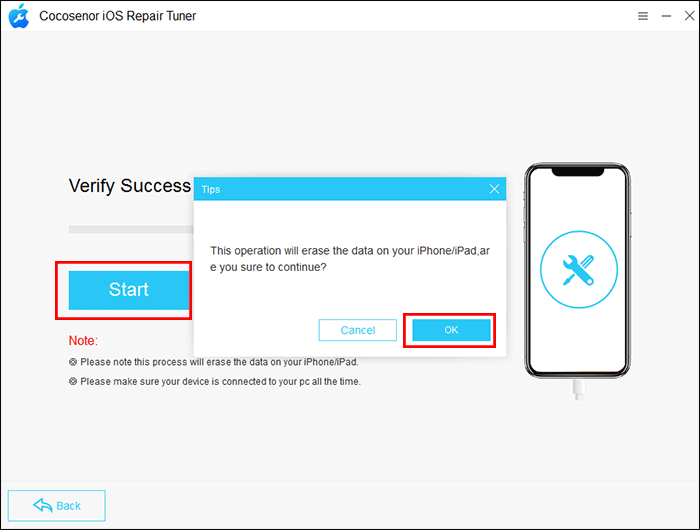
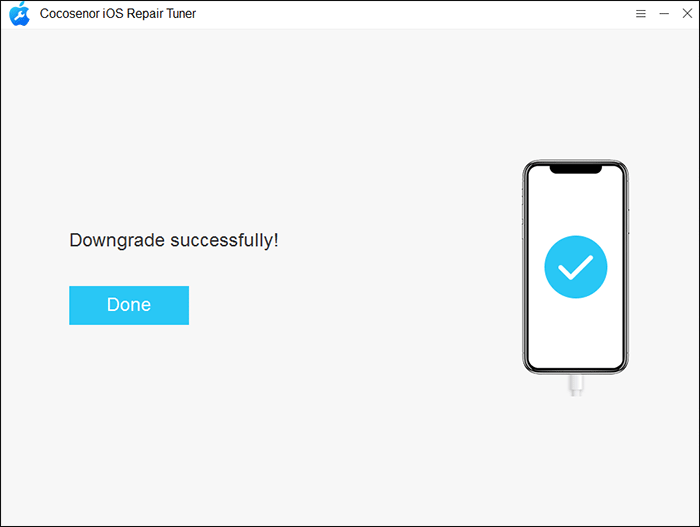
After downloading the firmware, you can start to downgrade the iOS version now. Just click the Start button and then a prompt comes to inform you that this operation will lead to data loss. Click OK and the process begins.
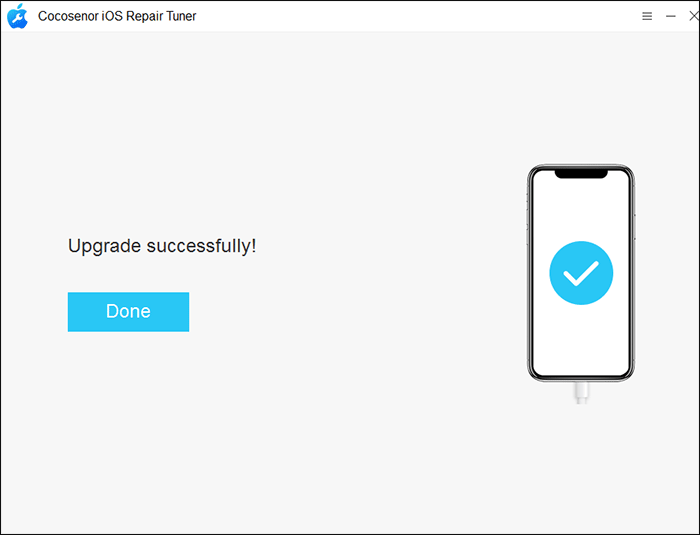
Minutes later, the successful message displays on the software. And your iPhone restarts with all data erased. You need to set up the iPhone from scratch.
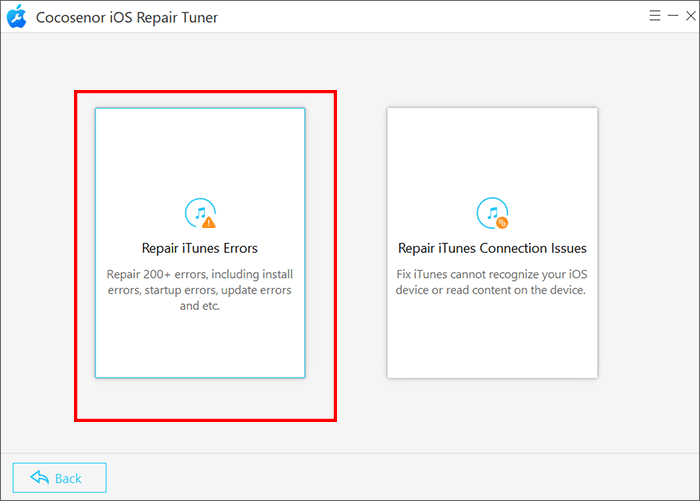
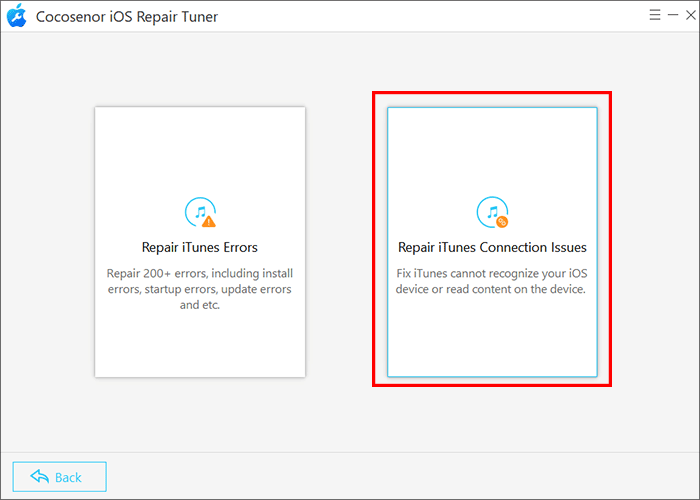
According to your iTunes error, you can select the proper option to get it fixed.
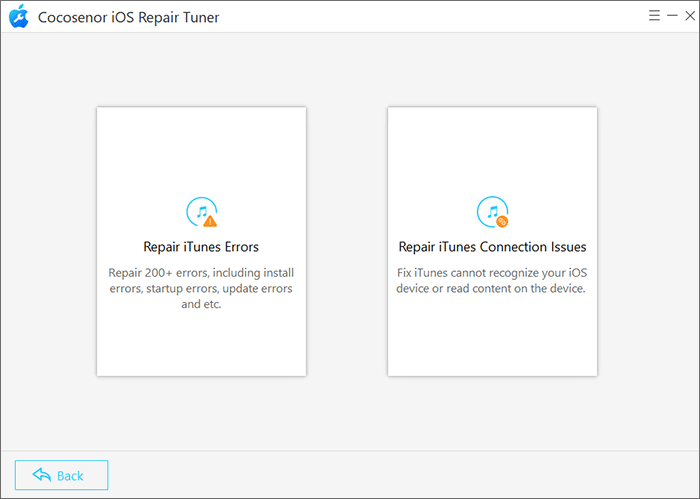
This option can help you to solve the iTunes installation, startup, and update errors.
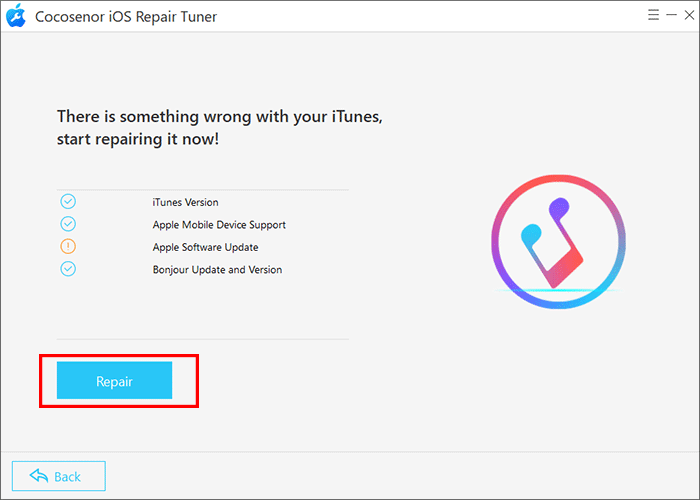
1. Click Repair iTunes Errors to continue.
2. Minutes later, the scanning result is displayed. You can hit the Repair button to fix it.
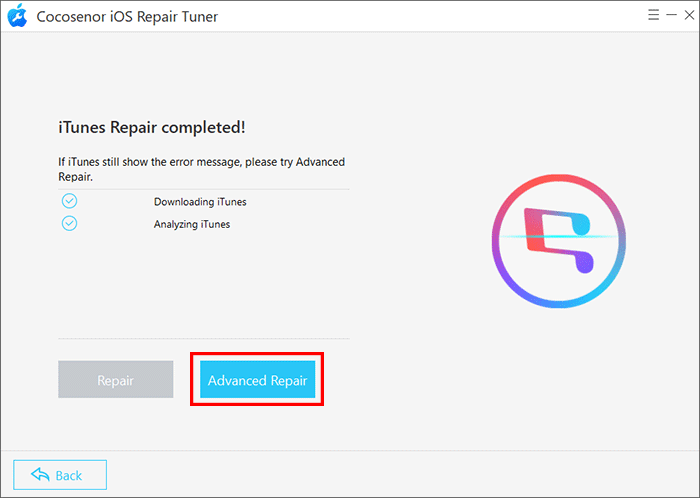
3. The software shows the repairing process is end. If your iTunes still pop out the error message, you can click Advanced Repair to get rid of the iTunes errors.
4. Now iTunes error is successfully fixed. Click OK to close the process.

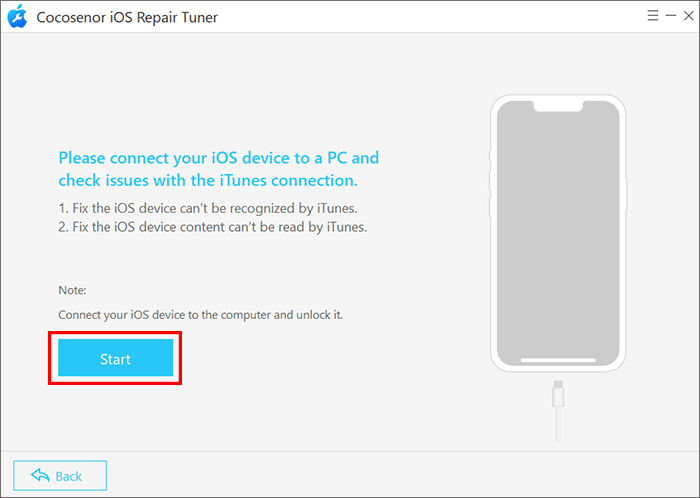
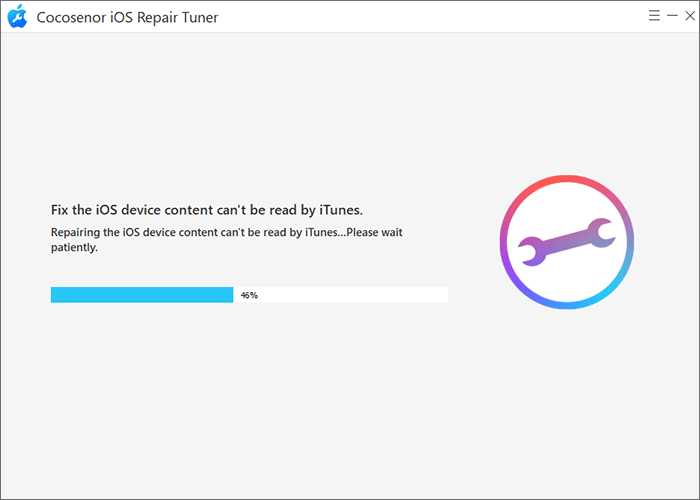
1. Connect your iPhone to the computer and unlock it. Then, choose Repair iTunes Connection Issues.
2. Hit the Start button to fix iTunes connection problems.
3. The software starts repairing your iTunes system automatically. You will get the successful message soon.
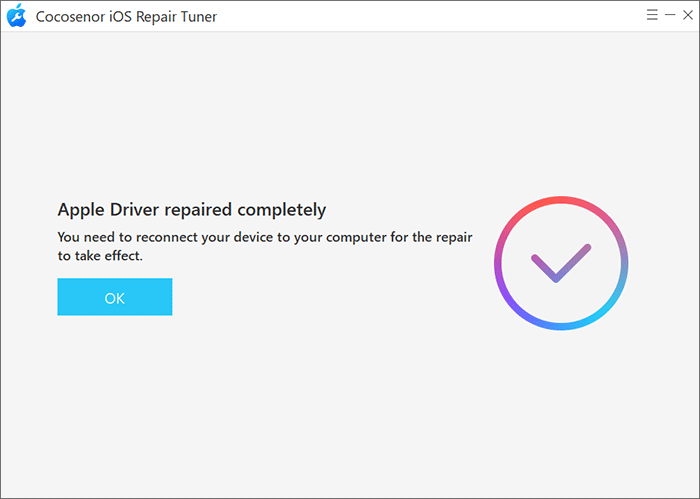
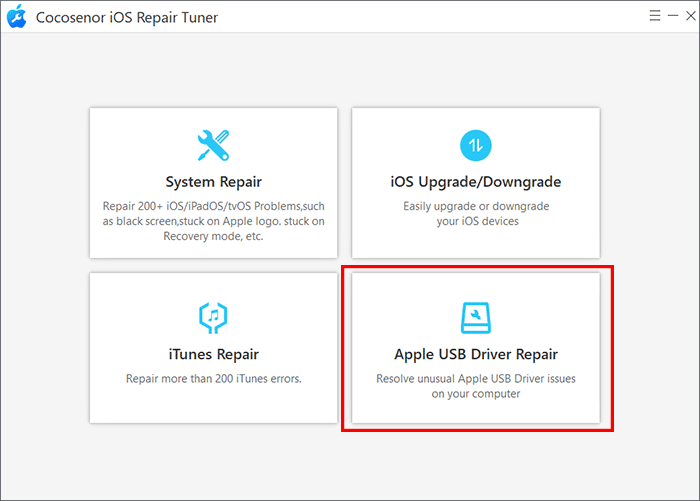
If there is something wrong with the Apple Mobile Device USB Driver, the iTunes cannot detect your iOS devices. Thus, you need to get Apple Mobile Device USB Driver back to normal. Cocosenor iOS Repair Tuner can help to fix it in one click.
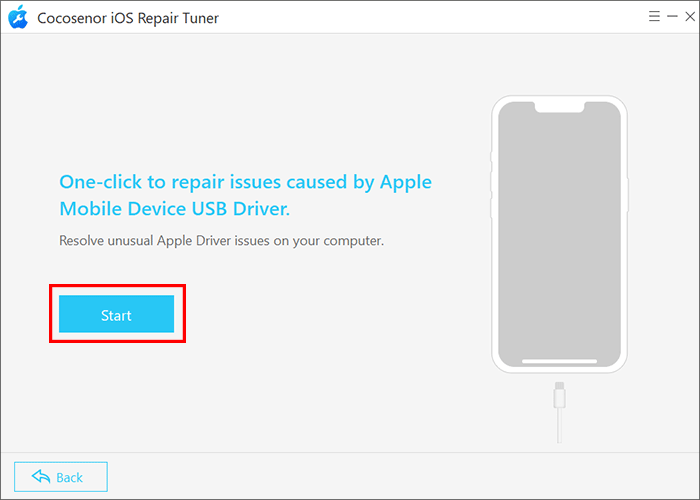
Now plug your iOS device out and then plug it in again. Finally, you can check whether the Apple Mobile Device USB Driver works properly or not. If there is still the connection issues, you can use the Repair iTunes Connection Issues to fix it.